Introducing NEAR Personas
NEAR’s account system – with human readable names and innovative access keys - is a thing of beauty. NEAR's focus on usability enables us to build applications that behave like people expect them to and abstract away some of the more blockchainy and cryptography parts of it.
This focus not only makes it very simple for someone new to crypto to create and manage their accounts, but relevant to what we're doing here with NEAR Personas, human readable account names with cryptographic underpinnings like bob.near or alice.near allow people to establish decentralized digital identities (DIDs) without even knowing it. NEAR enables a dimension of personality at the outset while also preserving the ability to remain pseudo anonymous if desired.
Imagine managing all your digital identities in one place, changing info everywhere whenever you want...

NEAR Personas expands on what NEAR accounts starts with respect to digital identities and personality. The two line pitch is that a NEAR account can create, own, and manage any number of digital identities in one place.
This is all made possible by creating and registering a link between a NEAR account and a decentralized identity. Ceramic network and specifically Ceramic IDX provides an open protocol for identity and manages mutable information on the open internet without databases or servers.
With that link established, we can publish information to Ceramic documents that is encoded to a specific decentralized identifier (DID), and then anyone or any app, anywhere can retrieve that information simply by querying the DID registry for the NEAR account name to get it’s corresponding DID to access whatever information has been made public.
These Ceramic docs, schemas, and definitions where the info is stored are fully extendable and customizable opening up the door for a huge variety of potential use cases – more than I can possibly describe or imagine (think profiles, reputation, automation of business process, and so on).

Catalyst will be integrating NEAR Personas to facilitate DAO member identities.
As Vital Point AI is building Catalyst – a DAOSaaS offering with social community features – the whole social part of it depends somewhat on people being able to provide an image of who they want to be to the DAO they are affiliated with. NEAR Personas is how we’ll be providing that feature and building that social fabric leading to more interactive and rich DAO experiences.
How Does NEAR Personas Work?
Take a look at the first part of the tutorial walkthrough to get a general overview of what NEAR Personas is and how it works. For anyone that has used nearnames.com to gift a NEAR account to someone, I used that as a foundation to build on.
The Building of NEAR Personas - A Story of Complications and Frustrations
NEAR’s account system and the feature that enables multiple access keys to be given to an account actually complicated the building of NEAR Personas. To make this work, there has to be a direct/permanent link between the NEAR account and a decentralized identifier (DID) allocated to it by Ceramic IDX. That DID is the key to finding anything associated with that DID on the Ceramic network which is ultimately why we’re trying to set this up in the first place.
Initial inclination might be to link the DID to the current key being used to access the app. When someone goes to use an app built on NEAR, typically they will follow a wallet login flow that results in a function call access key being added to their NEAR account. Problem with linking to that is that every time a user signs in/signs out, a new key is generated and added to the account. We’d end up orphaning DIDs and creating new ones with every key which does nothing for persisting any type of useful information to the account. We’d need to keep track of all the keys and somehow figure out how to aggregate all the DIDs associated with it.
Searching for light at the end of the tunnel
I actually went down that road for a bit and took a look at a few different things from Ceramic including 3ID Connect and their 3ID Key vault. 3ID Connect might have turned out to be suitable as it can keep track of multiple accounts, but it requires signing/interaction from the user.
One of the things we’re aiming to do with Catalyst and that I wanted to stick to in NEAR Personas is something more akin to a Web 2.0 user experience. I don’t want people to need to think about a wallet or authorizing a Metamask style popup. Just want them to be creating accounts and building profiles as seamlessly as possible.
Realizing the solution and the compromise
Ultimately that led to a realization that we needed to setup the DID link at the same time the NEAR account is created. That enables us to use the seed phrase of the NEAR account to generate the Ceramic seed needed to create the DID. They are then inextricably and permanently linked. We can recover either the NEAR account, the Ceramic Seed (and thus the DID) or both using the seed phrase which is guarded/kept safe by the user.
Ideally this integration would...
...be built into the NEAR wallet (and any other wallet) so a typical user is getting a Ceramic IDX DID at the same time as they are getting an account. Perhaps that’s a proposal for NEAR to consider at some point. It's how Catalyst is proceeding - Catalyst includes its own wallet based on the NEAR wallet code and builds in this functionality. NEAR Personas is an extraction of what we are working on there.
The downside of doing this is that there is always going to be one master NEAR account that doesn’t have a DID attached to it. I don’t think that’s a horrible tradeoff – it’s just the NEAR Persona holding account that then owns any persona accounts built by it and doesn’t really introduce much difficulty to understand. Just means if we pick thisaccount.near as the first root account – have to realize you won’t be building a profile for thisaccount.near. It’s just the owner of the personas you will build. Of course, from there any additional accounts you create using NEAR Personas all have the ability to have their own persona – and to own personas of their own.
This diagram might help visualize what’s going on.

And why are things like this? It’s because you need to start with a NEAR account to make another. You need to transfer some amount of NEAR from one to pay the storage cost of an account you create. And we need to use an existing wallet or near-cli to create that first account.
Right now, none of those existing wallets have the functionality to add a Ceramic DID and register it in a DID registry on NEAR (hence the potential proposal for NEAR to integrate it at the wallet level (or maybe we make it into a NPM package) to quickly add the functionality to existing wallets (sounds like more work to put on the roadmap).
Keeping our Seeds Safe
Another design issue to address was how the Ceramic seeds are kept safe and retrievable. In order for the app to give people the ability to add/change data in their personas, it’s necessary to use an authenticated Ceramic client. By contrast, any Ceramic client can retrieve data – it doesn’t have to be authenticated. To authenticate the client, it needs access to the original seed used to create the DID. We can store that in a user’s local storage (and we do) but that could get wiped and then anything associated with that DID is going to orphaned (at least until it is linked to another DID).
To combat this, we encrypt the seed for each account and store them in a Ceramic document created by the app. The app has its own seed to setup this storage area in the first place which makes one think that it will have access to all the seeds which may not be ideal, especially if you don’t trust the app. However, at time of encryption/storage, we’re able to identify which DIDs are able to decrypt it. We can remove the app’s DID and just leave the user’s DID – so once stored, only the DID owner can retrieve and decrypt it. That’s also a useful way to manage seeds for other things. Check out this article from Ceramic on how to store encrypted secrets using IDX for more info.
Finally got our DID
Now that we have a DID and way to ensure we always get the same DID for the same NEAR account – we build some schemas and definitions that define the structure of the data we want to collect or make available via the persona. Ceramic has a default BasicProfile schema already included but for this, we’ve opted to generate our own – both as a learning experience – and to extend/customize it for Catalyst’s needs. From there, it’s a simple method call to save data to the record.
The DID Registry on NEAR
One other critical component to be aware of is the DID registry. This is a smart contract, written in AssemblyScript, and deployed to a NEAR account:
TestNet: dids1.vitalpointai.testnet MainNet: did.near
NOTE: Data may not persist on Testnet. Personas created there may not persist (lots of testing/updating going on).
This contract is responsible for:
- Mapping the NEAR account name to it’s Ceramic DID
- Providing functions to look up/retrieve a DID
- Storing custom Ceramic schemas – mapped to NEAR accounts
- Storing custom Ceramic definitions – mapped to NEAR accounts
- Storing the set of all aliases (a more human readable way of referring to the Ceramic definitions)
This DID registry is what other apps can interact with to retrieve (and if they are wallet – create/store) DIDs of NEAR accounts.
Alright, Enough Background, Let's Get Into the Code and Build This Persona Enabled GuestBook
We're going to take one of the well known NEAR examples - Guestbook and give it Avatar and custom name support. Guestbook has an AssemblyScript backend and React frontend. When it comes to consuming the profile data, we're really only concerned with frontend files.
Before we get too far into it - let's take a look at what we're trying to accomplish - when we're done, the current Guest Book example (pictured on the left below) will be Persona enabled and be much more web 2.0 and social (pictured on the right).

While the avatar and custom names are cool, what's really wild is that in an Open Web 3.0 world you maintain control over the data and the apps only get to display what you provide. You can change your avatar or name at nearpersonas.com any time and the new avatar or data will be reflected in any app that has Personas enabled.
Persona Enabling Your App - Video Walkthrough
There are detailed text based instructions broken into eight steps below as well if that suits you better than listening to me drone on/watching me code in a video.
Key moments in the video (corresponding to steps below):
- 00:00-09:45 - Creating Personas with NEAR Personas
- 0945-10:30 - Example of what we're building
- 10:30-12:36 - Step 1: Clone Project Code
- 12:37-13:37 - Step 2: Configuring things for Ceramix IDX to work
- 13:37-17:00 - Step 3: Dependencies and Package.json
- 17:01-23:25 - Step 4: Finishing the Setup and Testing it Out
- 23:26-25:54 - Step 5: Hooking up the DID Registry Contract
- 25:55-30:45 - Step 6: Bringing in the Persona Data
- 30:46-32:25 - Step 7: Adding User Avatar Next to the Logout
- 32:26-42:18 - Step 8: Adding Avatar/Name Next to Each Message
- 42:18 - end - Some Closing Thoughts
Step 1: Clone the Project Code
First thing we need to do is clone the Guestbook example app. So open up VS Code or your favorite editor and then grab the clone url from the NEAR examples Guestbook repository.
In your terminal, clone the project into a new directory on your machine (here I'm cloning into the guestbook-avatar directory (will create it). Once done, cd into it and launch code to open up the folder:
>> git clone https://github.com/near-examples/guest-book.git guestbook-avatar
>> cd guestbook-avatar
>> code .
Step 2: Configuring Things for Ceramic IDX to Work
Ideally, this step is going to completely disappear in the future. Some of the dependencies that Ceramic relies on require some updates that they do not necessarily have any influence over. As a result, there are sometimes conflicts that we need to work around to get everything running smoothly.
Open the package.json file - scroll down to the resolutions section and add this after the one resolution that is already there:
"cids": "1.1.6"
It's a more recent version of cids that is currently required.
Step 3: Installing Dependencies and package.json
Next, run yarn which will install all the dependencies needed for guestbook to work.
>> yarn
Now we're going to install some specific packages needed for Ceramic IDX to work and some quick styling using Material-UI. After those are done installing, run yarn again:
>> yarn add @ceramicnetwork/http-client @ceramicstudio/idx @material-ui/core
>> yarn
We also want to make a change in package.json to the deploy command to remove gh-pages (leaving it in requires more configuration). Change the deploy line to look like so:
"deploy": "yarn build && near deploy",
And one more change - the browserslist section of package.json - change it to the following or you'll get errors relating to missing forofstatements - (related to javascript versioning):
"browserslist": [
"last 1 chrome version"
]
Step 4: Finishing the Setup and Testing it Out
In order to deploy the contract, we need to create a NEAR account to hold it. We'll use near-cli like so (ensure you've installed near-cli globally - npm install near-cli -g and change the names of the accounts to ones you want to use). Have a look at our article on Understanding NEAR Accounts if this is all new to you:
>> near create-account guestbook-avatar.vitalpointai.testnet --masterAccount vitalpointai.testnet --initialBalance 10
After the account is created, we need to tell the app what contract account to use, so open up /src/config.js and put your contract name in this line at the top:
const CONTRACT_NAME = process.env.CONTRACT_NAME || 'guestbook-avatar.vitalpointai.testnet';
Before going any further, run yarn start to make sure everything is working. It's going to build the project, the contracts, deploy them to the contract account you specified and eventually should open up a browser and show you the guestbook app:
>> yarn start

If all goes well, you should see something like this image on the right (unless you're already logged in, then it will look a bit different)
If you see the screen on the right, go ahead and login using a Persona account you created with NEAR Personas.
Step 5: Hooking Up the DID Registry Contract
If you recall from above, we need the ability to query the DID Registry contract on NEAR to retrieve the DID that was registered for the NEAR account when the Persona was created. To do that, we have to create a connection to the DID Registry contract.
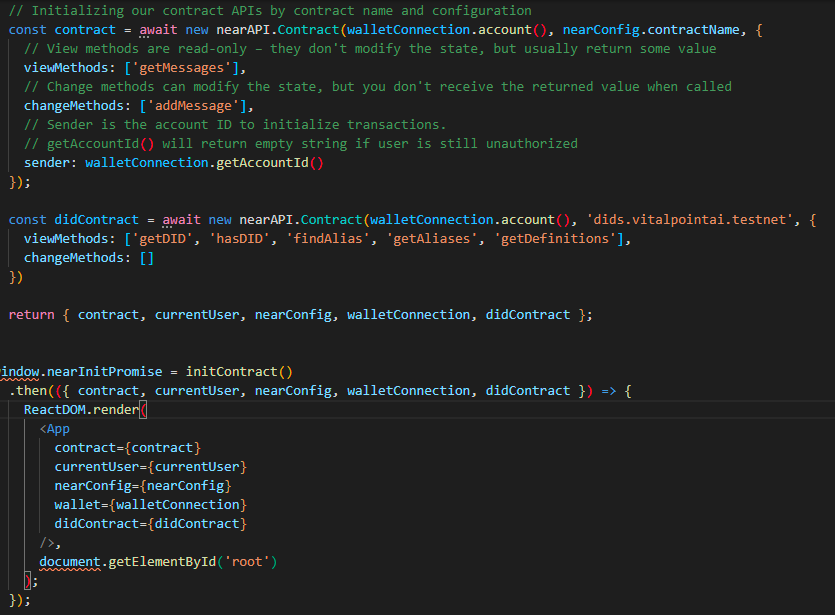
For TestNet - the DID registry contract is dids.vitalpointai.testnet, so we'll change the bottom of the index.js file to look like so:

What we did here is added the const didContract section to hook the currently logged in user account to the dids.vitalpointai.testnet contract and give it access to the view methods listed. (we're not setting any data in this app, only retrieving/displaying it).
We then need to return didContract and pass it as a prop to the <App> component. Be sure to add didContract to the props being brought in in the App component itself as well.
Step 6: Bringing in the Persona Data
Now that we have everything running, we're ready to bring in the Persona data - specifically the Persona's avatar and name - and it's really quite simple. First we'll deal with the logged in user and then we'll deal with getting the avatars for all the other users who have signed the guest book.
So, when the Guest Book app loads, we'll call out to the DID registry on NEAR and retrieve the decentralized identifier (DID) for the currently logged in NEAR account.
First we need to add two import statements to the top of the App.js file:
import CeramicClient from '@ceramicnetwork/http-client' //is our interface to Ceramic Network
import { IDX } from '@ceramicstudio/idx' // is how we read data from ceramic for the did
Next thing we need to do is ensure we bring the didContract into the App as a prop and setup a state variable for the avatar. So, we'll add it in App.js under the currently existing message state variables - that section will look like this when you're done:
When we retrieve the avatar link from the Persona profile, we'll set it using the setAvatar function and put the avatar variable wherever we want to display it.
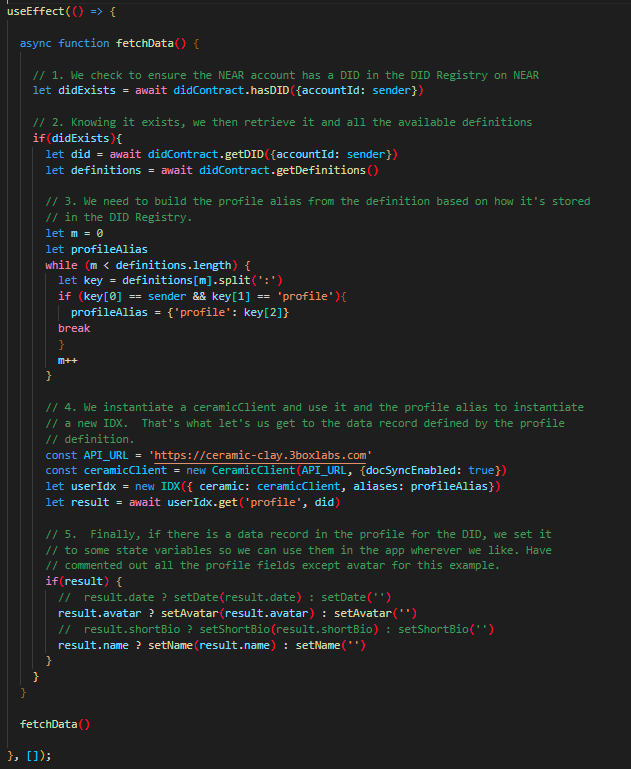
Next, move down to the useEffect method and add this async function - read the comments to understand what each section does:
async function fetchData() {
// 1. We check to ensure the NEAR account has a DID in the DID Registry on NEAR
let didExists = await didContract.hasDID({accountId: accountId})
// 2. Knowing it exists, we then retrieve it and all the available definitions
if(didExists){
let did = await didContract.getDID({accountId: accountId})
let definitions = await didContract.getDefinitions()
// 3. We need to build the profile alias from the definition based on how it's stored
// in the DID Registry.
let m = 0
let profileAlias
while (m < definitions.length) {
let key = definitions[m].split(':')
if (key[0] == accountId && key[1] == 'profile'){
profileAlias = {'profile': key[2]}
break
}
m++
}
// 4. We instantiate a ceramicClient and use it and the profile alias to instantiate
// a new IDX. That's what let's us get to the data record defined by the profile
// definition.
const API_URL = 'https://ceramic-clay.3boxlabs.com'
const ceramicClient = new CeramicClient(API_URL, {docSyncEnabled: true})
let userIdx = new IDX({ ceramic: ceramicClient, aliases: profileAlias})
let result = await userIdx.get('profile', did)
// 5. Finally, if there is a data record in the profile for the DID, we set it
// to some state variables so we can use them in the app wherever we like. Have
// commented out all the profile fields except avatar for this example.
if(result) {
// result.date ? setDate(result.date) : setDate('')
result.avatar ? setAvatar(result.avatar) : setAvatar('')
// result.shortBio ? setShortBio(result.shortBio) : setShortBio('')
// result.name ? setName(result.name) : setName('')
}
}
}
fetchData()
.then((res) => {
})
And that's it - once the app loads, it will bring in data from the Persona and it will now be available to the rest of the app to use wherever it wishes.
Step 7: Adding User Avatar Next to the Logout
Now we'll do a little React component work to make things display as we want them to. Open up App.js and add these imports to the top. They provide some Avatar and Grid styling from Material-UI.
import { Avatar } from '@material-ui/core' // provides styling for the Avatar
import { Grid } from '@material-ui/core' // provides a grid container for styling on the page
Next move down until you find the "Log out" words. We'll replace that button with the following line which is simply putting the avatar and the button side by side in a grid container. Note the {avatar} - that's the state variable that holds the link to the avatar we brought in from Ceramic:
<Grid container><Avatar src={avatar} style={{marginRight: '10px'}}/> <button onClick={signOut}>Log out</button></Grid>
If you type yarn start now, you should have an avatar next to the logout button - exactly what we want. Of course, to see an avatar, the account you're logged in with needs to have a Persona - where you've given it an avatar.
Step 8: Adding Avatar/Name Next to Each Message
This step requires a little more React work in that we'll need to create a new component (messageCard). Before we leave App.js though, scroll down until you find the Messages component and put the didContract in it to pass as a prop to our Messages list and beyond. It's this line (around 124):
{ !!currentUser && !!messages.length && <Messages messages={messages} didContract={didContract}/> }
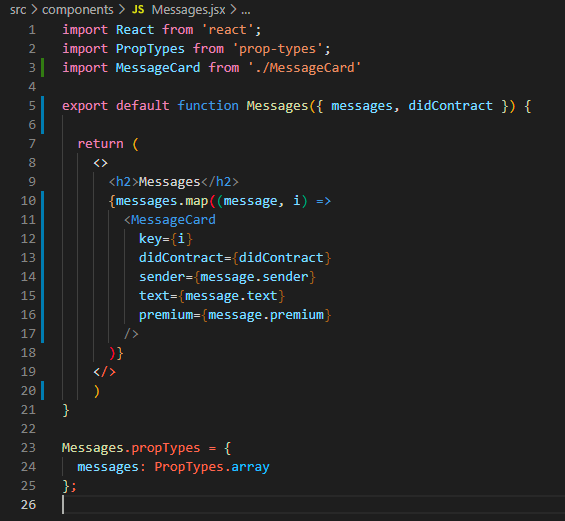
Alright, let's move to the Messages.jsx component in the components folder. Again, we need to bring didContract in as a prop and then we're going to basically map over each message and displaying a MessageCard which will have all the display info for each Guestbook message. So, this is the Messages.jsx file in its entirety:

Just note that you need to import the MessageCard component (which we'll create next) and then pass it the props as indicated - which will be used to display both the data stored in the guestbook contract as well as the data coming from Personas via Ceramic.
Now create a new file under components called MessageCard.jsx. I'll break it down and cover it in four parts: imports, function/state/props, useEffect, and return function.

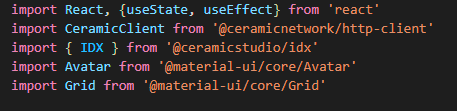
First, the imports (and a lot of this will look like what we did in App.js...) - nothing new here, same things we imported earlier.

Moving on down, we'll setup our state variables and deconstruct our props from the props variable. The state variables are what we'll use to store the Persona data in to later display avatar/name. The prop variables got passed in here from the Messages component.
Next up is the useEffect function. If you recall from App.js - this function brings in the data we need after looking up the user's DID from the DID registry. It's doing the exact same thing that it was doing in App.js.

And finally, we come to the return function which simply displays all the data we pulled into the state/prop variables in the manner we want to display it. Again, we'll use the Grid/Avatar styling from Material-UI to give us something like:

Congratulations - You've Now Got a Personas Enabled Guestbook

In Summary
In case it's not immediately obvious, a Personas enabled app means you maintain control of what gets displayed in other apps. If you want to update your avatar picture anywhere it is being used, you simply login to Personas and change it. That new picture is now the one displayed by any app that has Personas enabled. Same goes for any other information.
Consider how different that is from what happens in Web 2.0 land where companies ask you to fill out profiles. It's not only inconvenient, but your data is stored on their servers meaning they will likely do whatever they like with it (hopefully within what is legal). Consider how much work it would be to update your profiles on every site you interact with - Personas changes that dynamic.
This has been just one small example of what is now possible. Let your mind race to other possibilities - like image repositories that populate gallery sites where you can actually remove images you don't want people to see anymore, or real-time data sets that you can curate/keep up to date that are used in multiple locations.
I'm super excited about what I can build with this and hope you are too. If you want some help getting Personas integrated into your app/site, feel free to reach out to us - and we'll undoubtedly continue work on Personas with things like a NPM package and so on to make this integration even easier than is described here.
Let me know what you think in the comments below. Until next time, thanks for reading and happy blockchaining with NEAR Protocol.