No matter the reason you want to set up and run a NEAR validator node, whether it's to participate in NEAR Stake Wars III, to experiment, to contribute to NEAR's decentralization, or any other reason - this step-by-step guide has you covered.
In about 30-45 min, you'll learn:
- which Hetzner server to use (and what it costs)
- how to setup a NEAR validator node on that server
- how to turn it on and monitor it's performance
- how to stay on the list of active validators or chunk producers so you keep earning rewards
And rest assured, you can trust this guide. Here at Vital Point AI, we have setup and run our very own chunk producing validator - so you know you're following in the footsteps of someone who's done it.
Here we are in the active validators list on the NEAR Explorer (shardnet).

And a bit later we noticed a critical configuration error that required us to re-synch resulting in getting kicked out - read on to avoid the same issue.

Quick Links (Table of Contents)
Need to find something quick?
What is a Chunk-Only Producer?
In the NEAR world, validators supply NEAR's network infrastructure. Block producer nodes are currently running and securing/powering the NEAR mainnet and testnets. As part of the NEAR roadmap, they're gearing up to enable Chunk-Only producers to join the mainnet further increasing NEAR's decentralization. These are a type of validator node that is more accessible for people who don't have the required amount of NEAR (currently around 100,000) to run a block producer node.
This guide is all about learning to setup and run a chunk-only producer node which you can do right now on shardnet to learn how it works before moving to mainnet when that upgrade comes.
Be sure you know what you're getting into.
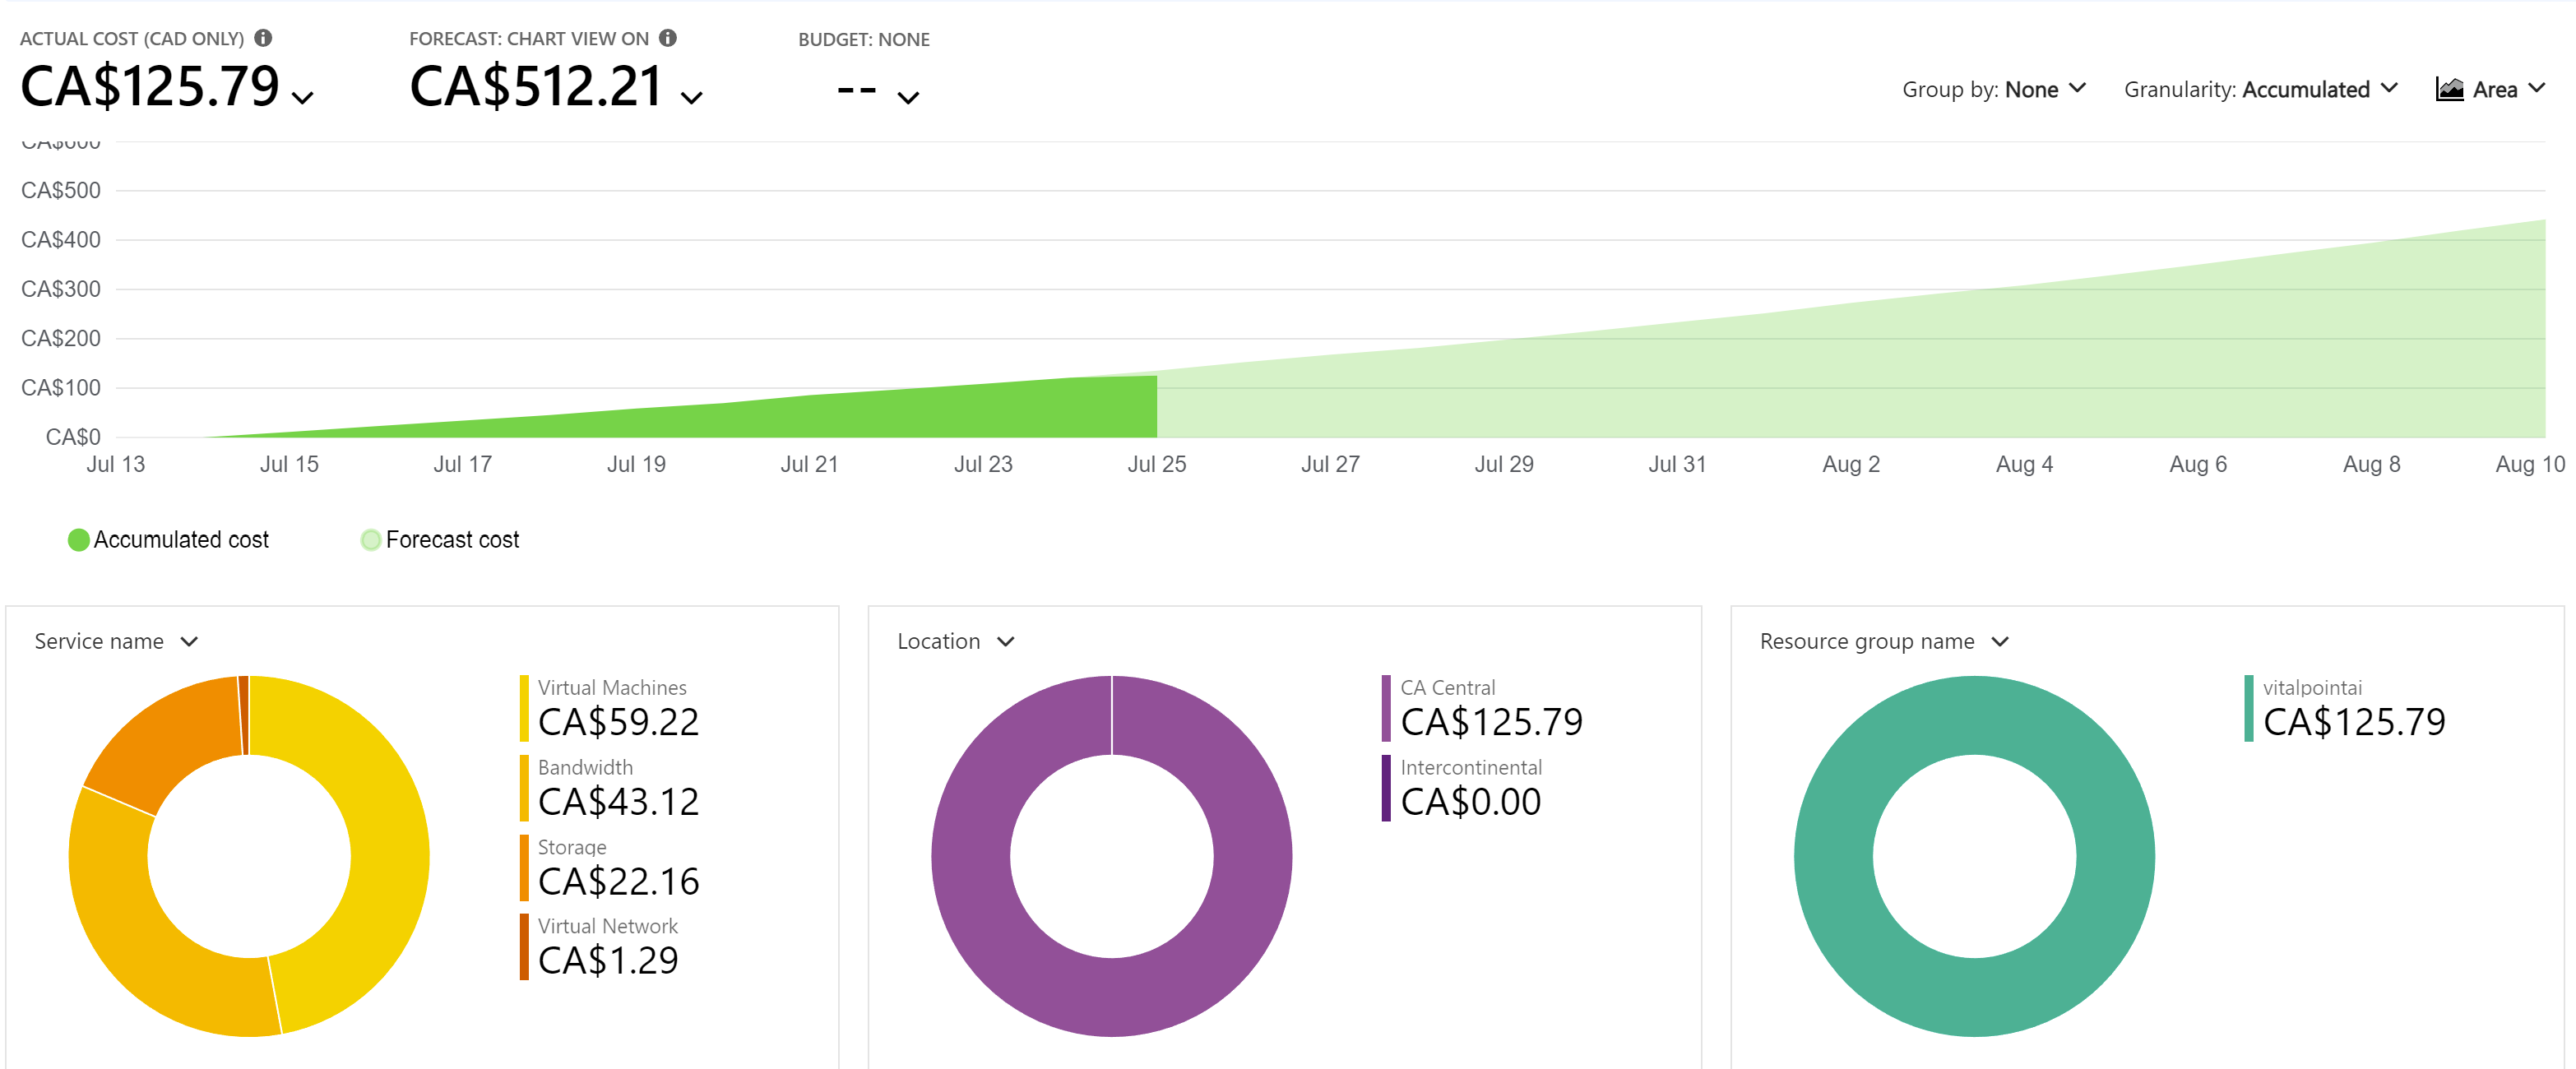
Before we get too far into this, it's important you understand that running a validator node on Microsoft Azure is fairly easy to do, but it isn't necessarily affordable. You're going to need to pay about $180/month (cdn) for a suitably sized virtual machine and another $35/month (cdn) for SSD storage for a total of $215/month (cdn). It has to run consistently 24/7 and you need to make sure you never miss a network update.
Note: After running the node for just over a week, it became clear that this setup was not cost effective. We've since switched to an AWS setup incurring about $5/day in charges vice the $10-12+ we were experiencing with Azure. Here's the graph/forecast just before we switched.

If that seems a little rich for you, you can still contribute to the security of NEAR Protocol and help with its decentralization efforts by staking with an existing validator. Think of it like putting money in a bank account and earning interest - only better because it's not a centralized bank and because you will earn rewards every epoch (currently ~ 2h on shardnet).
If you're still keen on setting up your own validator on a Microsoft Azure VM, then just skip over this next part and go to Step One - Provisioning your Azure VM
How to Stake Shardnet NEAR to the Vital Point Validator and Earn Rewards
Delegators are users who have $NEAR and want to support the network by delegating their tokens to validators. You do this by staking your tokens to a staking contract and use that validator's node/services to earn protocol rewards. Delegated tokens help validators generate more blocks/chunks increasing reward potential.
Staking is pretty straight forward and we'd love to have you stake with our validator. Most validators implement a fee that takes anywhere from 0-10% and higher of the rewards generated. Vital Point AI's fee is super low at 1%, which of course, is used to help offset the costs of keeping the validator up and running without issues.
As shown in the video above, here are the steps to take to stake with Vital Point AI:
1. Create a NEAR account on NEAR's shardnet - https://wallet.shardnet.near.org/. When done you'll see about 2000 NEAR in your account - woohoo, free money, you're rich!! Don't get too excited, it's not real NEAR. Shardnet is an incentivized testnet being used to help people learn to a testnet setup to test chunk producers/sharding.
What's the point if it isn't real?
Well, eventually our validator may move to mainnet where it is real NEAR. Practicing and getting familiar with staking and learning what kind of rewards you might get/when can help you get ready to do things for real when that happens.
2. Stake your NEAR to the Vital Point AI node - vitalpointai.factory.shardnet.near. You do this using near-cli. Installing near-cli is simple with this command in a bash terminal (if on Windows, consider setting up WSL):
npm install -g near-cli
Next, you switch to shardnet by typing this in your terminal:
export NODE_ENV=shardnet
Now, you'll need to login to your NEAR account which puts a full access key onto your machine, allowing you to sign transactions and interact with the NEAR chain. In your terminal, type:
near login
That will launch a browser window. Simply follow the instructions and close it when done which will take you back to your terminal indicating you are logged in.
Next you run the following command which deposit and stakes the NEAR to the Vital Point AI validator.
Note: At all times you remain in control. The validator can't steal your NEAR. If you ever decide you want to withdraw it and stop earning rewards, you can do that.
Ready to stake? Type this into your terminal, replacing YOURACCOUNTID with your NEAR account name. It will deposit and stake 1995 NEAR from your shardnet account.
near call vitalpointai.factory.shardnet.near deposit_and_stake --amount 1995 --accountId YOURACCOUNTID --gas=300000000000000
Awesome work. We sincerely appreciate your support. Enjoy the rewards.
Step One - Spinning Up a Suitable Azure VM
Hardware | Chunk-Only Producer Specification |
|---|---|
CPU | 4-Core CPU with AVX support |
RAM | 8GB DDR4 |
Storage | 500GB SSD |
I'm making an assumption that you already have a Microsoft Azure Account. If not, you'll obviously need to set one up before you go any further. You
Not just any old virtual machine is suitable for validating (either as a full validator or chunk producer) on the NEAR chain.
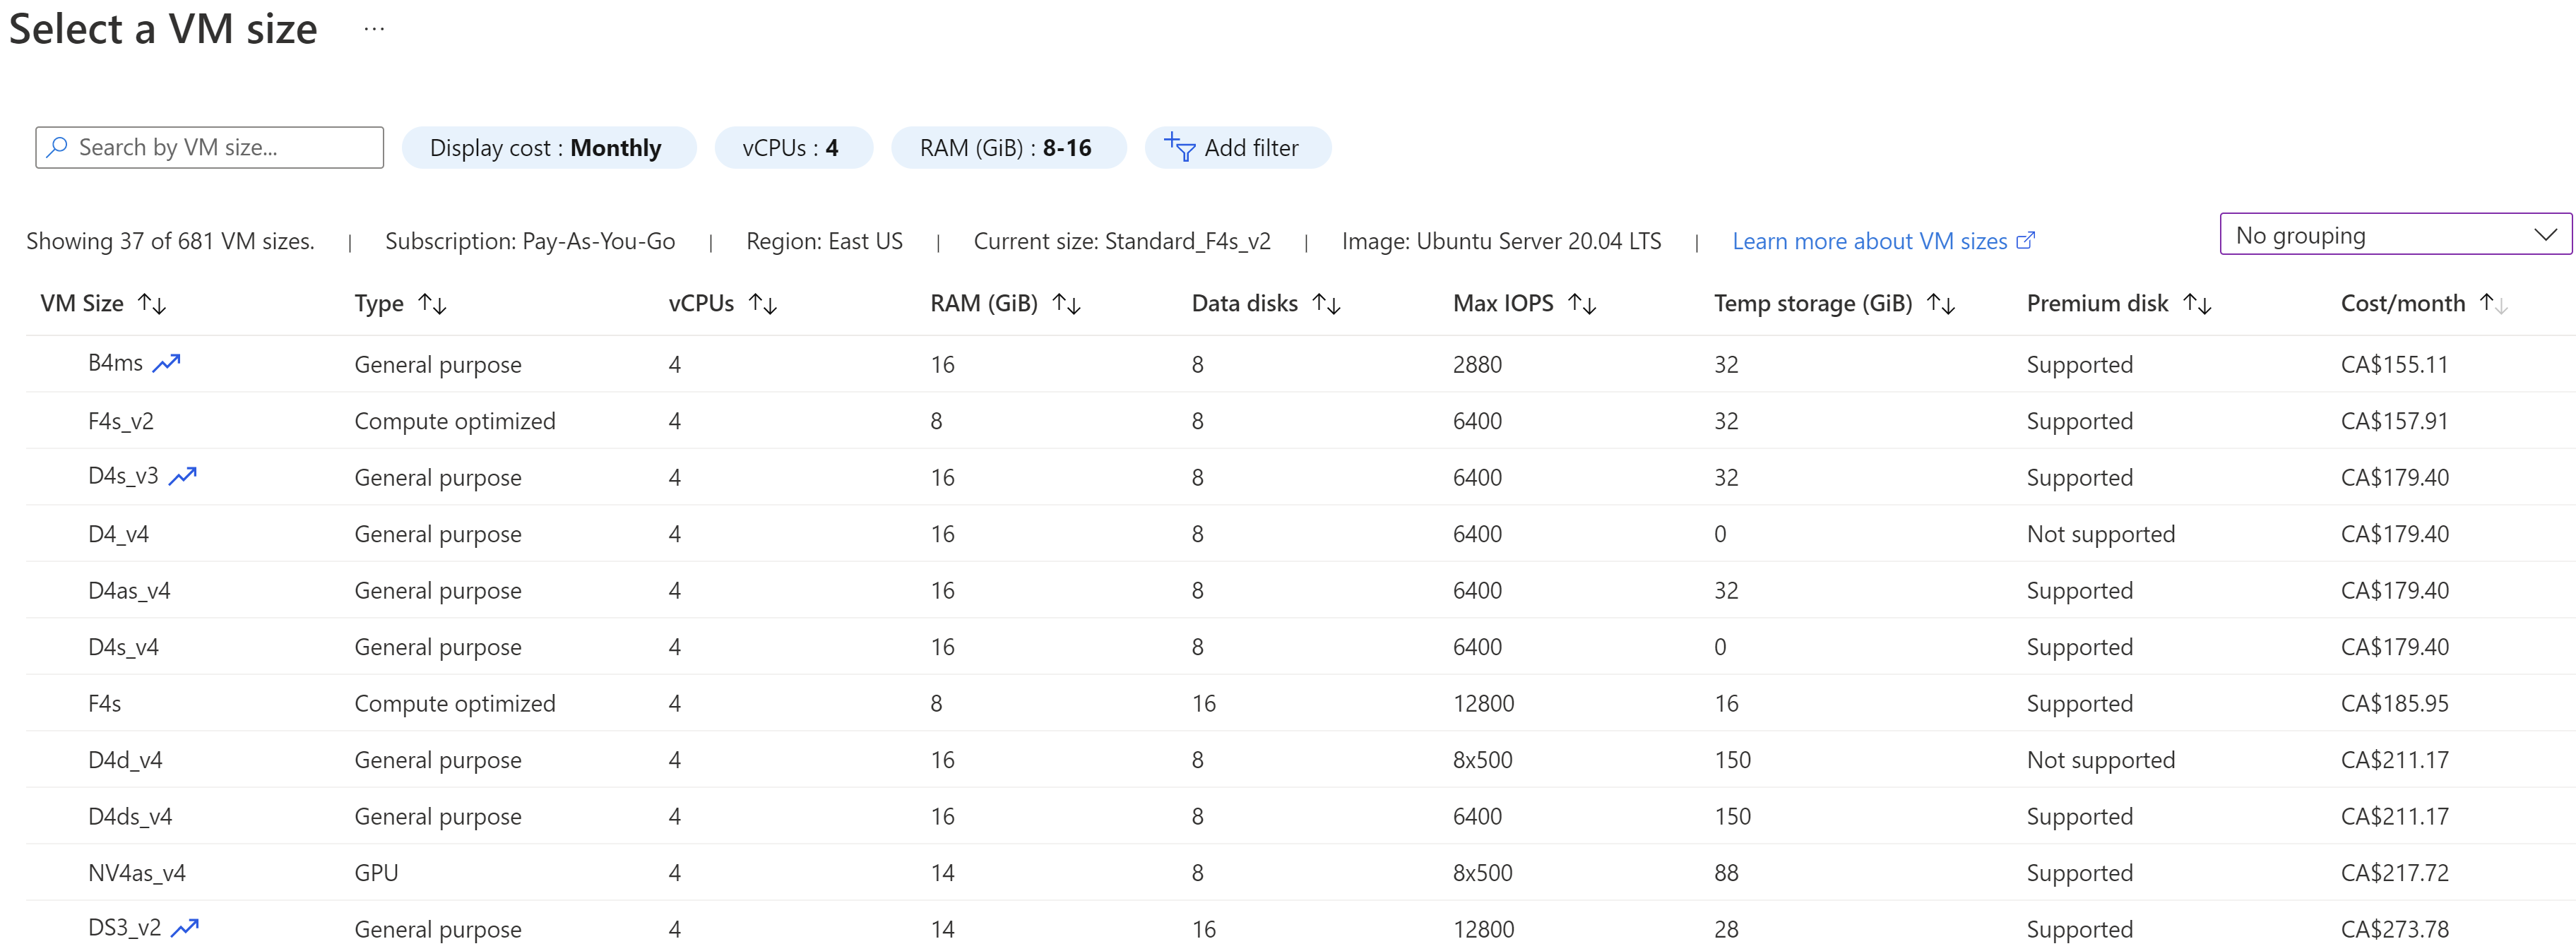
There are many options when it comes to picking a VM to use for your validator node. The minimum specifications for a chunk-only producer are shown in the table. Using Azure's filters, we can see what options exist (less figuring out which has AVX support). Keep in mind that prices change depending on where you set it up. For instance, it's cheaper to run a F4S_v2 in East US than it is in Canada Central (by about $20/month).
Here's an image (current as of 16 Jul 22) filtered by price showing potential options. After getting this list, you'd need to check whether they support AVX. At Vital Point AI, we're running a F4s_v2 VM which is the most affordable (as we couldn't determine if the burstable B4ms has AVX support) and it seems to be working perfectly so far.

You get to this screen through the Create Resource link in your Azure portal. Select Create Virtual Machine and you'll see a link where you get to choose your VM size. Here's a quick video showing you how to review your options and select and create the F4s_v2 VM.
Ensure you select a linux distribution for the node (eg. Ubuntu 20 as shown). Rest of this guide assumes you do so. If you pick a Windows OS, you're on your own.
Also, pay attention to how you decide to connect to the VM. It's not shown in the video, but to follow the rest of the guide as is, you'll want to be able to connect via SSH which means downloading the key file (remembering where you put it) and keeping it somewhere safe.
Step Two - Connecting to and Configuring Your Node
Create a Shardnet Wallet
Before continuing, you'll need a shardnet wallet.
If you've already setup a NEAR wallet on testnet or mainnet, then this process is no different.
You simply go to the NEAR Shardnet Wallet and Create a New Account. Follow the instructions, write down your passphrase and afterwards you'll have about 2000 NEAR in your Shardnet Wallet.
In order to set things up on your VM, you need to connect to it. Assuming you setup the SSH connection options when setting it up, you go to the VM's main page, click Connect, SSH, and then point to the .pem key on your machine. Before actually connecting, you should chmod 400 the .pem key so it has the right permissions. You can do that in any linux terminal (another good reason to be running WSL if you're on Windows).
As you'll see in the video - you'll get a SSH connection string that you then just paste into a terminal - say in VS Code - and it will open up a session on your VM. Once that has occurred, you're ready to continue with the rest of the configuration commands coming up.
First thing to do after connecting to your new server is to create a new user with sudo priveleges other than root.
Do:
sudo adduser <name>
You will be prompted for a password - enter one and confirm it.
Then: sudo usermod -aG sudo <name>
Now login with your new user: ssh -i ~/.ssh/hetzner <name>@<ip address>
Configuring Your Node
Before we do any configuring, let's just double check to ensure the node has the right CPU features (specifically AVX support). In your terminal, run (if you run into issues with multiple lines, try putting the command all on one line):
lscpu | grep -P '(?=.*avx )(?=.*sse4.2 )(?=.*cx16 )(?=.*popcnt )' > /dev/null
&& echo "Supported"
|| echo "Not supported"
Let's start by ensuring your linux machine is up-to-date. Run the following:
sudo apt update && sudo apt upgrade -y
Next, you'll install Node.js and npm with these commands:
curl -sL https://deb.nodesource.com/setup_18.x | sudo -E bash -
sudo apt install build-essential nodejs
PATH="$PATH"

Once done, it's a good idea to confirm they installed without issue, so check their versions using node -v and npm -v.
Mounting Your Data Disk
You'll see the current versions numbers installed and in use if everything went well.
When you setup your VM, you attached a 512GB disk. Now you actually have to find and mount the disk so you can use it to store the NEAR data. Forgetting this was a mistake we made setting things up so our OS disk quickly filled up requiring us to restart the node (downtime is bad...)
So, let's first find the disk:
lsblk -o NAME,HCTL,SIZE,MOUNTPOINT | grep -i "sd"
You'll see output similar to this:

In this example, the disk attached is the 512G one - sda at LUN 0 (LUN 0 comes from the Azure portal in your VM where it lists the disks attached to your VM)
Because it's a new, empty disk we need to partition it. We can use the parted utility to partition and format it. Most VMs will have the first data disk located at /dev/sdc - but replace sdc with whatever the output tells you - in the case above - sda - so our next three commands will look like this (run one at a time):
sudo parted /dev/sda --script mklabel gpt mkpart xfspart xfs 0% 100%
sudo mkfs.xfs /dev/sda1
sudo partprobe /dev/sda1
You'll see output similar to this:

For your awareness - the last command, partprobe, is required to make sure the linux kernel is aware of the new partition and filesystem.
Alright, now we're ready to mount the disk. First create a directory for it and then mount it with these two commands in succession:
sudo mkdir /chunkdrive
Now it's available, but it won't automatically be remounted after a reboot. To ensure it is, we need to add it to the /etc/fstab file using its UUID (Universally Unique Identifier). Let's get that UUID using blkid.
sudo blkid
You'll see output similar to this:

You can see the UUID of the /dev/sda1 disk. Let's add it to the fstab file. Make sure you get this right, because if you mess it up, you'll end up with an unbootable system.
sudo nano /etc/fstab
Add your UUID entry to the bottom of the file - use tab in between each section. What you add will be like this, but replace the UUID with your own. Ctl X, Y will let you exit nano, saving the file.
UUID=09916bfa-981e-47af-b078-26063f5465ed /chunkdrive xfs defaults,nofail 1 2
Now let's verify the disk - running the lsblk command again:
lsblk -o NAME,HCTL,SIZE,MOUNTPOINT | grep -i "sd"
You should be able to see your disk at the directory specified as depicted in the output.

Installing NEAR-CLI
Our next configuration piece is installing near-cli globally so we can interact with the NEAR network. This is pretty simple, simply run the following command which will put the near binary in your /usr/local/bin
sudo npm install -g near-cli
NEAR has several networks - mainnet, testnet, guildnet, betanet, and now shardnet. It's important to make sure you're working with the one you're expecting to work with. As we need to use shardnet, we'll set a persistent environment variable:
echo 'export NEAR_ENV=mainnet' >> ~/.bashrc
You can switch to other networks in your session using - export NEAR_ENV=mainnet (or whatever other network you want to use).
Now let's play around with near-cli to ensure it's working and see what it can do. The full list of near-cli commands is available in the NEAR documentation. We'll take a look at three here that pertain specifically to validators: near validators current, near validators next, and near proposals. Run each in succession to see the current validator details, those that will join in the next epoch, and those who have proposals pending for the epoch after next.

What's an Epoch?
An epoch is a unit of time when validators of the network remain constant. Both testnet and mainnet have an epoch duration of ~12 hours (43200 seconds to be exact). Shardnet's epoch length is 7200 sec, ~2 hrs.
You can get a bunch of information about the network if you install httpie and run the following command:
http post https://rpc.shardnet.near.org jsonrpc=2.0 id=dontcare method=EXPERIMENTAL_protocol_config
params:='{
"finality": "final"
}'
Installing Required Dev Tools
We have a few more things to install on the node so that we can eventually build and install nearcore which is the node software.
Install required developer tools, running following commands:
sudo apt install -y git binutils-dev libcurl4-openssl-dev zlib1g-dev libdw-dev libiberty-dev cmake gcc g++ 2to3 python2-minimal python2 dh-python python-is-python3 docker.io protobuf-compiler libssl-dev pkg-config clang llvm cargo
Install and configure Python pip:
sudo apt install python3-pip
USER_BASE_BIN=$(python3 -m site --user-base)/bin
export PATH="$USER_BASE_BIN:$PATH"
Install build environment:
sudo apt install clang build-essential make
And finally, Rust & Cargo:
sudo curl --proto '=https' --tlsv1.2 -sSf https://sh.rustup.rs | sh
Output from that will request how you want to proceed with the installation as depicted below - select 1 and press enter.

Source the environment (basically just refreshes settings so things work right):
source $HOME/.cargo/env
Install and Configure NEARCORE
First we clone the nearcore repository from Github, change into the nearcore directory and ensure it's up to date. Then we checkout the master branch (keep in mind that sometimes you may need to switch to other branch releases).
git clone https://github.com/near/nearcore
cd nearcore
git fetch origin --tags
git checkout tags/<version> -b mynode
Now we will compile the nearcore binary, so while still in the nearcore folder, run the following. Compiling takes a while, be patient:
make neard
This puts the binary path to neard in target/release/neard.
Now, open port 24567 on in your Hetzner firewall settings.
Next, we need to initialize the working directory and configuration files:
sudo ./target/release/neard --home ~/.near init --chain-id mainnet --download-genesis
You'll see output similar to this (ignore the use of /chunkdrive instead of ~/):

What just happened?
The command created the directory structure and generated config.json, node_key.json, and genesis.json on shardnet. Quick description of each file:
- config.json - Configuration parameters that determine how the node will work. It has needed information for the node to run on the network including how to communicate with peers and reach consensus.
- genesis.json - is a file containing all the data the network started with at genesis (when it began). It has initial accounts, contracts, access keys and other records that represent the initial state of the blockchain. It is a snapshot of a point in time - the beginning.
- node_key.json - A file containing the public and private key for the node. Also includes an optional account_id parameter need to run a validator node.
- data/ - a folder in which a NEAR node will write it's state.
Make changes to config.json as detailed here.
We're now going to replace the config.json with one that changes two parameters needed to make things work (boot_nodes and tracked_shards) - the config file used by neard needs to be where we compiled nearcore, so this time, we don't change the directory to our data disk:
sudo rm ~/.near/config.json
sudo wget -O ~/.near/config.json https://s3-us-west-1.amazonaws.com/build.nearprotocol.com/nearcore-deploy/shardnet/config.json
cd ~/.near
sed -e 's/"archive": false/"archive": true/' -i config.json
At this point, the config.json is going to end up saving NEAR chain data in its default location (~/.near/data). That's not going to work on an Azure VM with a small OS. We need to make sure the database is setup in a data directory on our data disk. So, let's open up the config.json and look down around line 152 for the store area. Add the following setting:
"path": "/yourdatadiskdirectory/.near/data",
That section of the config file should now look like so:

There, now the data will be saved to the data disk.
Next we'll get the latest snapshot using AWS Cli - install then download into our data directory - which we're going to make inside our data disk at .near/data (but you could put it anywhere you like as long as the config.json file is point to the right spot):
sudo apt-get install awscli -y
mkdir /chunkdrive/.near
cd /chunkdrive/.near
sudo aws s3 --no-sign-request cp s3://build.openshards.io/stakewars/shardnet/data.tar.gz .
sudo tar -xzvf data.tar.gz
That will create a data dir in ./near and extract all the data from the snapshot. Your node is now installed and ready to run, but before we fire it up, still a couple more things to do first.
Install Full Access Key Locally
We need a full access key to our shardnet wallet account we created earlier to sign transactions via near-cli. To do that, we login and authorize our machine:
near login
Doing that, opens up a browser (if it doesn't, copy the link provided in the terminal). Follow the instructions in the browser as shown in the gif.

Generate and Install the Validator Key
Let's generate a full access key file using near-cli. Replace <pool-id> with whatever you want to call your node. For example, we used vitalpointai as our pool-id:
near generate-key <pool-id>
Copy the generated key file to the validator directory (replace YOUR_WALLET with your pool-id name), renaming it in the process:
sudo cp ~/.near-credentials/shardnet/YOUR_WALLET.json ~/.near/validator_key.json
We need to make a couple modifications to the validator_key.json file. So make sure you're in your ~/.near directory where the validator_key.json file is and open it up with:
sudo nano validator_key.json
Edit the following:
- Edit "account_id" => xx.factory.shardnet.near (where xx is your pool-id)
- Change private_key to secret_key
The file should resemble this, then Ctl X, Y to save and exit the editor:
{
"account_id": "xx.factory.shardnet.near",
"public_key": "ed25519:HeaBJ3xLgvZacQWmEctTeUqyfSU4SDEnEwckWxd92W2G",
"secret_key": "ed25519:****"
}
Install the Systemd Service
Create a file in the /etc/systemd/system directory and open a nano editor with the following command:
sudo nano /etc/systemd/system/neard.service
Copy/paste the following into it (just check that it's formatted correctly afterwards). You'll need to make a couple changes:
- replace <USER> with your user in the three locations.
- (type whoami at a terminal prompt if you're not sure)
[Unit]
Description=NEARd Daemon Service
[Service]
Type=simple
User=<USER>
#Group=near
WorkingDirectory=/home/<USER>/.near
ExecStart=/home/<USER>/nearcore/target/release/neard run
Restart=on-failure
RestartSec=30
KillSignal=SIGINT
TimeoutStopSec=45
KillMode=mixed
[Install]
WantedBy=multi-user.target
Then Ctl X, Y to save and exit.
Start Up the Node
We are finally at the point where we're going to fire everything up. Run the following two commands in succession:
sudo systemctl enable neard
sudo systemctl start neard
And BOOM! Just like that your validator node should be starting up. In the next step, we'll look at monitoring your node to see that it is in fact working well.
Step Three: Becoming a Validator
Even though your node should be running, which we'll check in a minute, you don't automatically become a validator on the network. You're on your way, but few things need to occur first:
- In Progress. Your node must be fully synch'd - which means it's going to be downloading all the blocks and catching up to the head of the chain. This will take longer and longer to do the larger and larger the chain gets. Right now, it's not a horribly long wait;
- Done. The validator_key.json must be in place and the account_id needs to be set to the staking pool contract id
- To Do. We need to initialize the staking contract with the public key from validator_key.json.
- To Do. You need enough delegations to your node to meet the minimum seat price.
- To Do. You need to setup a regular ping to your contract that serves to initiate actions like submitting a validator proposal or updating rewards.
- To Do. Once your proprosal is accepted (happens automatically), you'll need to wait 2-3 epochs (4-6 hours) to enter the validator set
- To Ensure. Once in the validator set, you must produce > 90% of assigned blocks.
How do you know if you're in the validator set?
Go to the near shardnet explorer and search for your pool id. If you see an entry marked active - you're good to go. That won't be the case for you at the moment though. Let's change that.
Setting Up Your Staking Pool
Remember when you used near-cli to login to your machine. That put a full access key on your node that allows you to sign transactions. We'll be using that key to deploy a staking pool to an account Id. Here's the command and then following it are some aspects of it you'll need to change before hitting enter (you should put this into your terminal all on one line):
near call factory.shardnet.near create_staking_pool '{"staking_pool_id": "<pool id>", "owner_id": "<accountId>", "stake_public_key": "<public key>", "reward_fee_fraction": {"numerator": 5, "denominator": 100}, "code_hash":"DD428g9eqLL8fWUxv8QSpVFzyHi1Qd16P8ephYCTmMSZ"}' --accountId="<accountId>" --amount=30 --gas=300000000000000
near call factory.shardnet.near create_staking_pool '{"staking_pool_id": "<pool id>", "owner_id": "<accountId>", "stake_public_key": "<public key>", "reward_fee_fraction": {"numerator": 5, "denominator": 100}, "code_hash":"DD428g9eqLL8fWUxv8QSpVFzyHi1Qd16P8ephYCTmMSZ"}' --accountId="<accountId>" --amount=30 --gas=300000000000000
Changes to make:
- replace <pool id> with the pool id you used earlier. When this command goes through, .factory.shardnet.near will be added to it - so the staking pool you would later ask people to delegate to will look like yourpool.factory.shardnet.near
- replace <accountId> (in both locations unless you want to designate a different owner id) with your shardnet wallet account id (eg. youraccount.shardnet.near)
- replace <public_key> with the public key from your validator_key.json file. You'll need to open it up (sudo nano ~/.near/validator_key.json)
- decide on a fee and change numerator to reflect it. As is 5 with a denominator of 100 reflects 5% fee. You can pick any number you like between 0 and 100. Vital Point AI has a 1% fee.
Note that you will need to have at least 30 NEAR available (amount) in your shardnet account to cover the contract storage. That 30 NEAR gets staked in your staking pool.
After changing the required parameters, hit enter and you should see some output indicating that your contract is deployed.
At this point your validator should show up in the validator's list, although it won't be active yet.
Meet the Seat Price
As of this writing, the seat price to become a chunk-only producer validator is 802 NEAR. The seat price changes depending on the amount of NEAR staked.
What this means for you now, is that you need to delegate at least 802 NEAR to your staking pool contract. Luckily, you have a couple thousand free NEAR in your account, so let's stake some of it.
Type this into your terminal, replacing YOURPOOLID with your staking pool name and YOURACCOUNTID with your NEAR account name. It will deposit and stake 1000 NEAR from your shardnet account.
near call YOURPOOLID.factory.shardnet.near deposit_and_stake --amount 1000 --accountId YOURACCOUNTID --gas=300000000000000
Is My Stake Locked Away Forever?
Nope, you're in control. Just as easily as you stake, you can also unstake and withdraw from the staking contract (just takes 2-3 epochs).
Unstake all your NEAR using:
near call <staking_pool_id> unstake_all --accountId <accountId> --gas=300000000000000
Unstake some of your NEAR using:
near call <staking_pool_id> unstake '{"amount": "<amount yoctoNEAR>"}' --accountId <accountId> --gas=300000000000000
2-3 epochs after unstaking, withdraw all your NEAR using:
near call <staking_pool_id> withdraw_all --accountId <accountId> --gas=300000000000000
2-3 epochs after unstaking, withdraw some of your NEAR using:
near call <staking_pool_id> withdraw '{"amount": "<amount yoctoNEAR>"}' --accountId <accountId> --gas=300000000000000
Check the near-cli documentation for other commands you can issue to view the state of the staking contract including balances and other information.
Set up a Regular Ping
Nothing happens on a blockchain without a transaction. By setting up a periodic ping to your staking pool contract, you're essentially telling your node to call a ping function at a regular time. This ping function will initiate updates of things related to your node like staking rewards and proposals.
For the shardnet, we can use cron on the validator itself. I believe when we go to mainnet, we're going to want to set things up so that our full access key for our shardnet account is not on the validator. I'll update things when we figure that out.
To setup the cron job, we first need to create a ping script for the cron job to call. Move to your home directory (cd ~/) and copy/paste the following into a new ping.sh file (sudo nano ping.sh).
Replace the POOL_ID and ACCOUNT_ID with your pool id and account id. This will output a verbose log to the indicated file. If you want you can change DEBUG_MIN=0 to turn it off.
Ctl X, Y when you're done to save and close the file.
#!/bin/bash
# This script will manage your validators stake.
PATH="/usr/local/bin:/usr/bin:/bin"
PATH=$PATH
NETWORK="shardnet"
POOL_ID="xx.factory.shardnet.near"
ACCOUNT_ID="xx.shardnet.near"
# Enable More Verbose Output
DEBUG_MIN=1
# Epoch Length
MAINET_EPOCH_LEN=43200
export NEAR_ENV=$NETWORK
HOST="https://rpc.shardnet.near.org"
VALIDATORS=$(curl -s -d '{"jsonrpc": "2.0", "method": "validators", "id": "dontcare", "params": [null]}' -H 'Content-Type: application/json'>
if [ "$DEBUG_ALL" == "1" ]
then
echo "Validators: $VALIDATORS"
fi
if [ "$DEBUG_MIN" == "1" ]
then
echo "Validator Info Received"
fi
STATUS_VAR="/status"
STATUS=$(curl -s "$HOST$STATUS_VAR")
if [ "$DEBUG_ALL" == "1" ]
then
echo "STATUS: $STATUS"
fi
EPOCH_START=$(echo "$VALIDATORS" | jq .result.epoch_start_height)
if [ "$DEBUG_MIN" == "1" ]
then
echo "Epoch start: $EPOCH_START"
fi
LAST_BLOCK=$(echo "$STATUS" | jq .sync_info.latest_block_height)
if [ "$DEBUG_MIN" == "1" ]
then
echo "Last Block: $LAST_BLOCK"
fi
# Calculate blocks and time remaining in epoch based on the network selected
BLOCKS_COMPLETED=$((LAST_BLOCK - EPOCH_START))
BLOCKS_REMAINING=$((BLOCKS_COMPLETED - MAINET_EPOCH_LEN))
EPOCH_MINS_REMAINING=$((BLOCKS_REMAINING / 60))
if [ "$DEBUG_MIN" == "1" ]
then
echo "Blocks Completed: $BLOCKS_COMPLETED"
echo "Blocks Remaining: $BLOCKS_REMAINING"
echo "Epoch Minutes Remaining: $EPOCH_MINS_REMAINING"
fi
if (( $EPOCH_MINS_REMAINING < -150 ))
then
PING_COMMAND=$(near call $POOL_ID ping "{}" --accountId $ACCOUNT_ID)
echo "New Epoch Reached. Sending ping"
echo "$PING_COMMAND"
fi
Script files need to be made executable on linux in order for them to run. So, run this in the same location as the ping.sh file:
chmod u+x ping.sh
Now that we have an executable ping script, let's setup the cron job to run it every hour. To do that:
crontab -e
Assuming you put the ping file in your ~/ directory and installed near-cli globally (in other words, you followed this guide) - then put this line at the end of the file that just opened replacing <user> with your user (run whoami at a prompt if you're not sure):
0 */1 * * * /home/<user>/ping.sh >> /home/<user>/near.log 2>&1
Ctl X, Y to save and exit. Now your crontab should run and be setup to run every hour from here on out.
Too Much Pinging?
The way the script is setup it won't call the contract's ping function unless a new epoch has come around which we know is every 2 hours on shardnet.
You only need to ping the contract once an epoch and anything more than that wastes NEAR that you pay in transaction fees. Keeping that in mind, scheduling a ping every minute, for example, is overkill and anything more than 2 hours on is not enough. 1 hr intervals are a good middle ground.
That should take care of everything needed to get your validator running and accepted and added to the active validator set. Now, let's learn how to monitor it to ensure it stays there.
Step Four: Monitoring Your Node
So, up to this point, your node should be running, but you don't really know for sure because you haven't checked other than watching for it to show up in the shardnet Near Explorer.
First, let's learn how to look at the validator logs. To make them nicer to look at, consider installing ccze, by running this:
sudo apt install ccze
Then we can open up a running stream of the last 100 log entries in color with this command:
journalctl -n 100 -f -u neard | ccze -A
There is something super satisfying about watching these logs stream - you're really a part of the NEAR chain now.

Let's take a closer look at a log file entry of a validator who has joined the active set:
#85079829 H1GUabkB7TW2K2yhZqZ7G47gnpS7ESqicDMNyb9EE6tf Validator 73 validators 30 peers  506.1kiB/s
  428.3kiB/s 1.20 bps 62.08 Tgas/s CPU: 23%, Mem: 7.4 GiB
At the beginning we see the block number. It should always be increasing.
Next we have a hash, and following the hash it says Validator indicating this node is part of the active validator set. If your node is still synching, you'll see something more like the long list of logs above where it says "in progress".
Next, the log indicates there are 73 validators on the network and this node is connected to 30 peers. You need at least 3 peers to reach consensus and start validating.
RPC calls
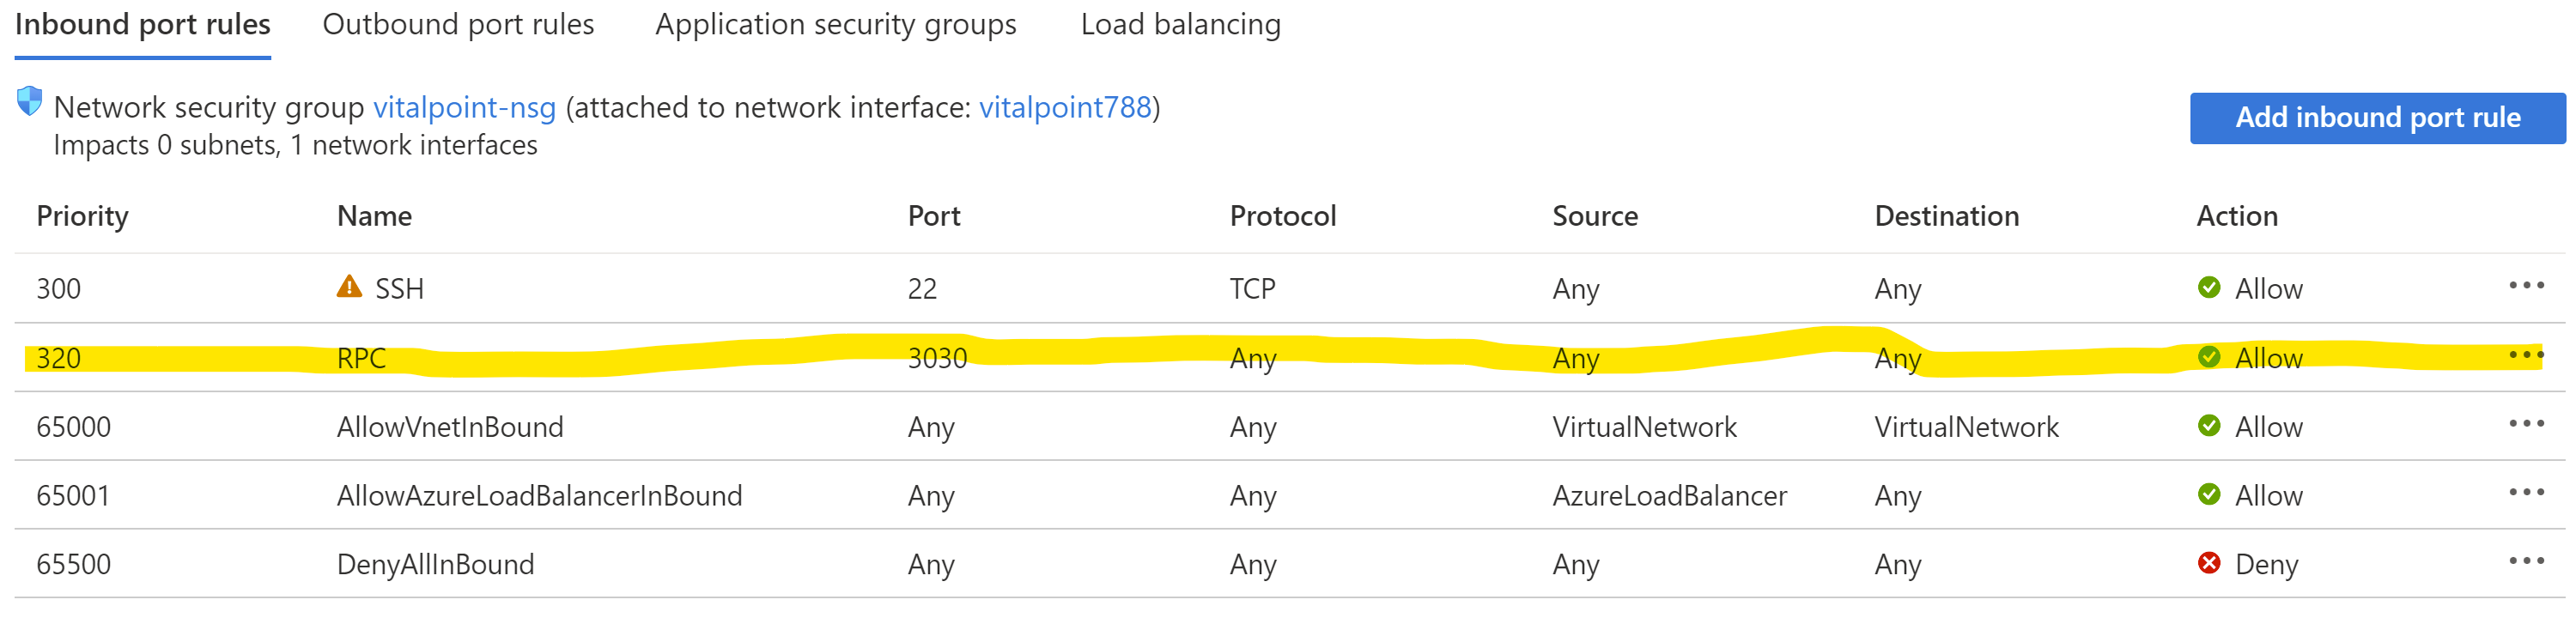
Every node on the network offers RPC services on port 3030 as long as the firewall is open and port is available (and it hasn't been turned off in config.json). As is, we have not opened up the RPC port. If you want to do that, there is a networking tab in the VM's list in Azure Portal.
You'll need to add an inbound port rule that looks like so:

While that should allow others to call your validator RPC url, to do it locally to check your own stats/info you need to install curl and jq. Curl is probably already installed, but we'll add it again anyways with the following. Ensure you're on shardnet (export NEAR_ENV=shardnet):
sudo apt install curl jq
After that's done you can check out a bunch of info using the rpc services such as:
Node Version:
sudo curl -s http://127.0.0.1:3030/status | jq .version
Check Delegators and Stake:
sudo near view <your pool>.factory.shardnet.near get_accounts '{"from_index": 0, "limit": 10}' --accountId <accountId>.shardnet.near
Check Reason for Getting Kicked:
sudo curl -s -d '{"jsonrpc": "2.0", "method": "validators", "id": "dontcare", "params": [null]}' -H 'Content-Type: application/json' 127.0.0.1:3030 | jq -c '.result.prev_epoch_kickout[] | select(.account_id | contains ("<POOL_ID>"))' | jq .reason
An example of what you see when you get kicked for not producing enough blocks (this occurred when I had to switch things to store data on our data disk instead of OS - hopefully I save you the same pain.)

Check Blocks Produced vs Expected:
sudo curl -s -d '{"jsonrpc": "2.0", "method": "validators", "id": "dontcare", "params": [null]}' -H 'Content-Type: application/json' 127.0.0.1:3030 | jq -c '.result.current_validators[] | select(.account_id | contains ("POOL_ID"))'
And an example from the same time period, being offline, not producing the number of blocks expected:
Application Insights on Azure
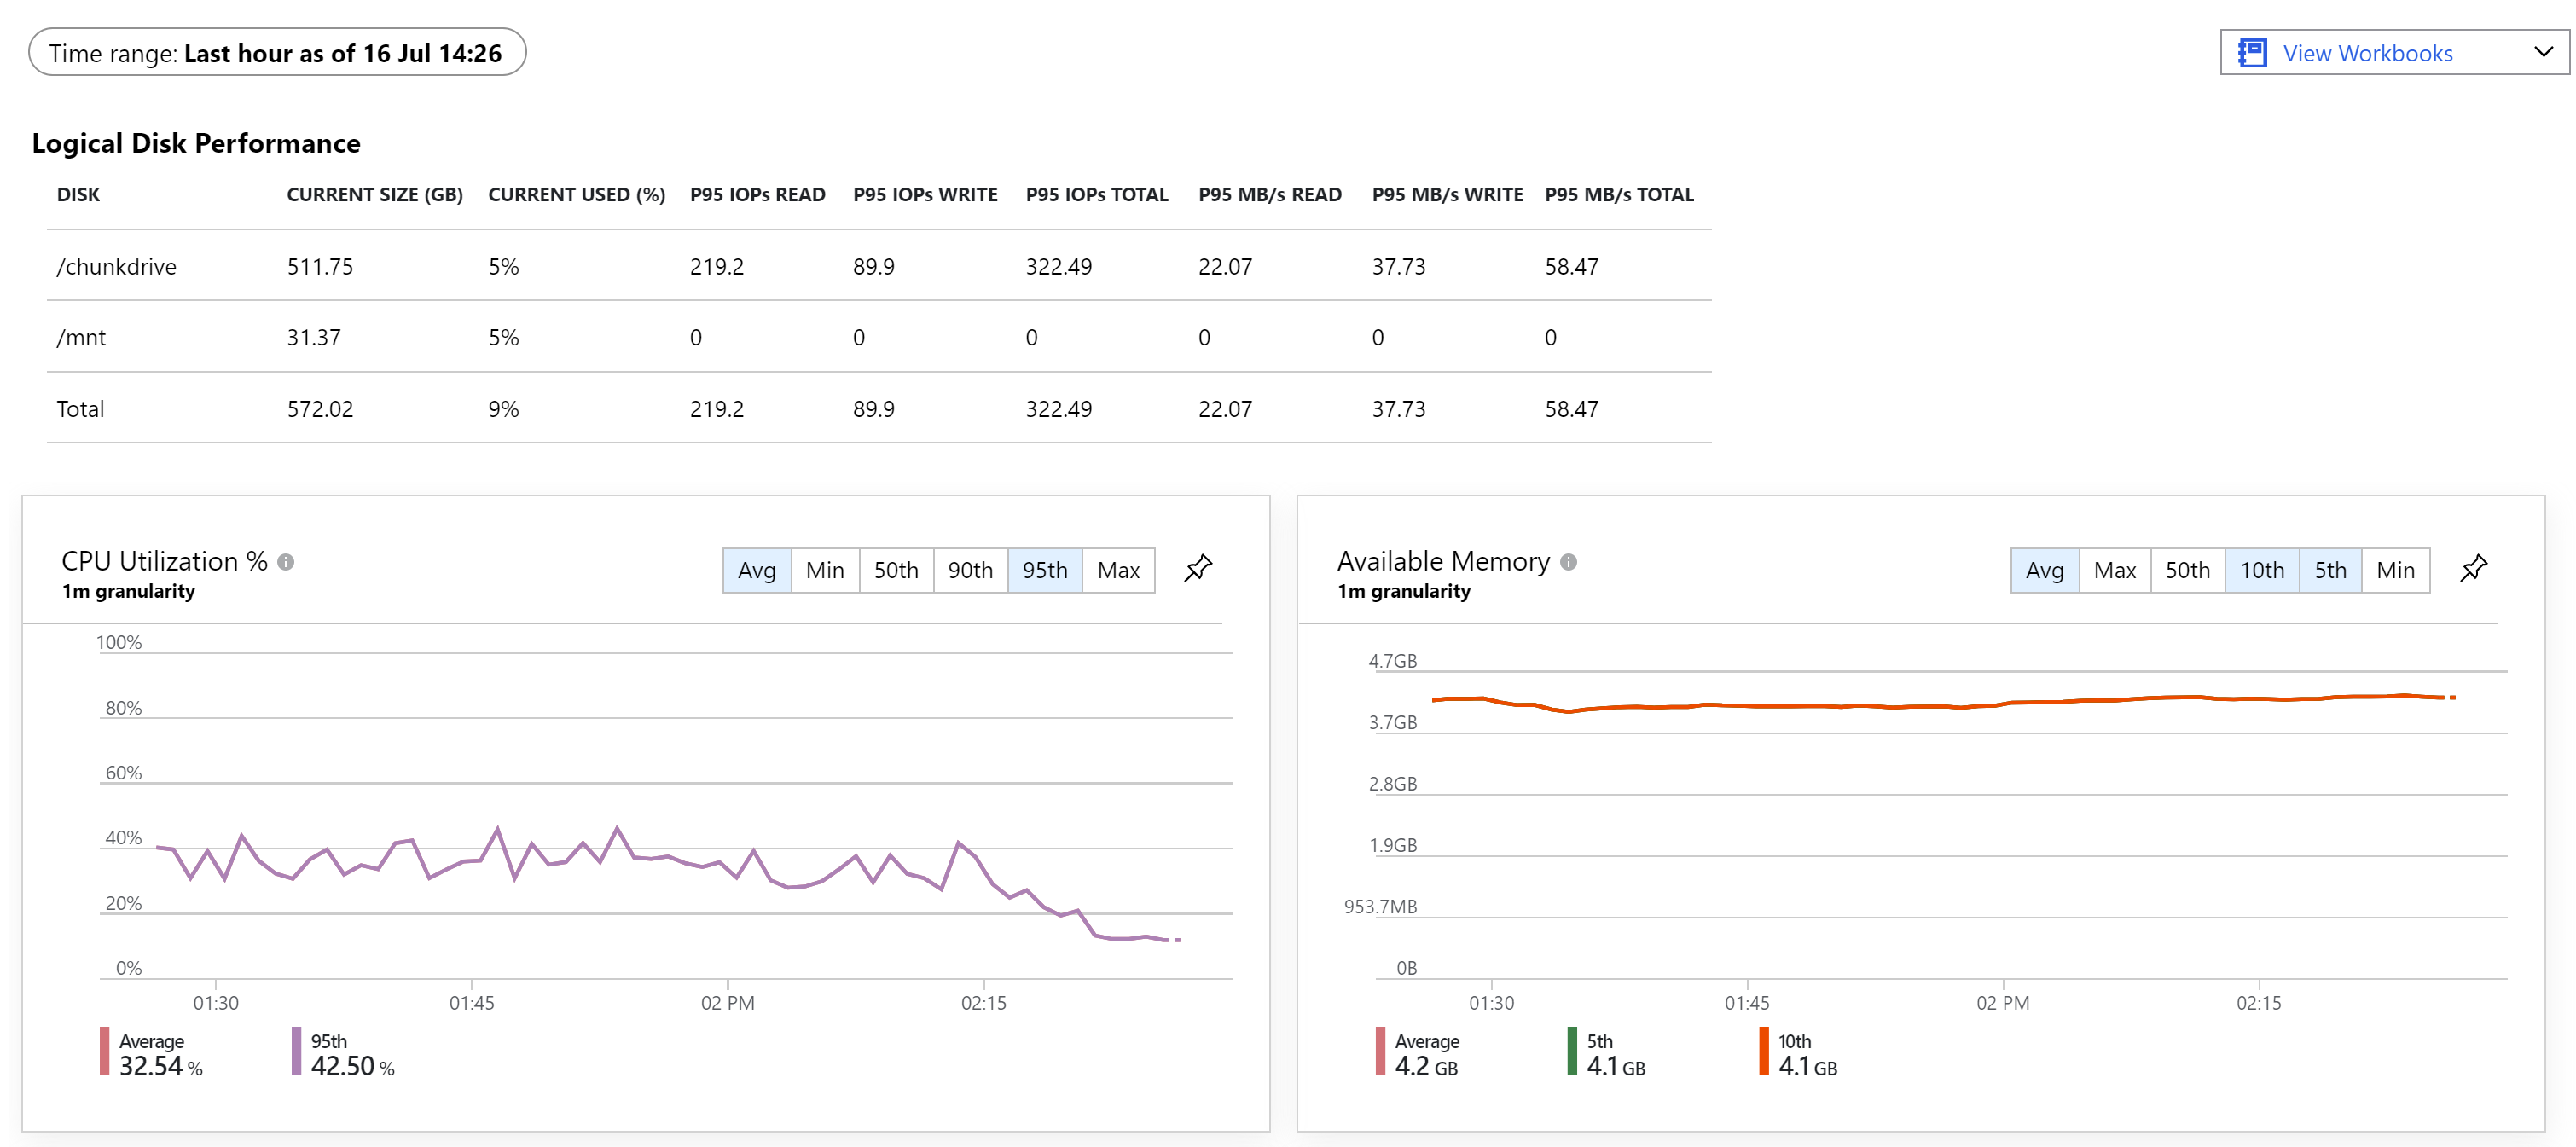
While the RPC calls give you a method of determining status when you ask/need to find out what happened, Microsoft Azure Application Insights can help you get alerted to issues with the VM itself that might affect your validator status.
Highly recommend enabling it through your portal. Just visit your VM and click on enable in the Insights tab under the Monitoring heading. Once enabled and it starts collecting data, you can see real-time monitoring, set alerts and monitor the health of the VM.
It's all about recognizing when there is a problem, getting alerted to it and fixing it as soon as possible in order to keep your validator in good standing to keep the rewards flowing in.

Wrapping Up
Congratulations. If you've made it to this point, then you have your own chunk-only producer running on a Microsoft Azure Virtual Machine and likely patiently waiting to join the active validator set.
Hope you enjoyed the step-by-step walkthrough and welcome to the world of NEAR network infrastructure.
If you found this tutorial useful and feel so inclined, you can help support what we do at Vital Point AI. We accept NEAR and I'm not too ashamed to beg :). Thank-you for visiting.

If you have any comments/questions or something isn't clear, or just have general feedback, feel free to leave a comment below and I'll aim to help as best as I can.
Take care and NEAR on.