This is part 2 of our deep dive into NEAR accounts, contracts, and keys. To recap - the end-state for writing this multi-part tutorial (and hopefully yours for reading it), is to completely understand how accounts, contracts and keys work together opening up cool possibilities for projects.
More...
Reminder
There are other excellent resources that also cover the subject of NEAR accounts and keys from different perspectives.
Two of the NEAR Collective's team members - Matt Lockyer and Sherif Abushadi - gave a webinar on NEAR accounts and Key Registration.
Another member of the NEAR team, Mike Purvis did up an excellent overview of NEAR accounts/keys.
And that was followed up by a pairing of Matt Lockyer and Mike Purvis going into even more NEAR keys depth including the multisig contract.

I'd encourage you to supplement what you learn here by watching them before/after (multiple times as needed).
Part 2: NEAR Access Keys
KeyPair Overview
Before we get deep into access keys on NEAR accounts, let's first make sure we understand what keys are in general. NEAR, like other blockchains, is based on public key cryptography and relies on key pairs - an association of one public key with one private key. NEAR uses the public key for identity and the private key is for signatures (proving control of its associated identity). The key pair is generated using ed25519 (an elliptic curve that produces cryptographic results very quickly).
We saw this in action in Part 1: NEAR Accounts when generating implicit keys locally using near-cli and the near generate-key command. Recall:
The last line there shows the key pair that was stored on our machine - a public and private key. Keep in mind that it's a key pair - meaning a one to one relationship - one public key for every one private key.
What this fundamentally means, and what's important to know is that whoever has the private key controls its associated public key identity. That's why, in the blockchain world, there is so much emphasis on keeping your private keys safe and not disclosing them to anyone unless you want them to have that identity and ownership over everything associated with it.
So what happens if the private key is lost or compromised? On most chains, if you lose a private key, it's gone, you've lost control of the identity/account, there is no back button. If it's compromised, you may have a small grace period (or not) in that you can generate a new key pair and transfer everything to it or in the case of NEAR, delete the old one.
NEAR's account system helps out a bit with respect to account recovery. When creating an account, a BIP 39 Mnemonic seed phrase can be copied/stored offline or sent to you via email or SMS which provides a bit of a failsafe in event something goes wrong with your account. Of course, every one of those is an attack vector on its own. If someone gets your recovery info, they can take control of your account and its contents. It's not unheard of to hack email accounts or SMS messages, so consider that when choosing your recovery method.
Three types of key pairs exist on the NEAR platform as described in the NEAR docs:

1. Signer Keys (also known as account keys, contract keys, access keys)
These are the keys that we are going to talk about in depth in this tutorial - for now, just know that they are used by all accounts (both user and contract) on the network to sign transactions. When we talk about protecting your private keys - these are the keys we are talking about. The keys attached to the accounts we created in Part 1 are signer keys.
2. Validator Keys
As the name suggests, these are the keys used by the validators working to ensure the integrity of the blockchain. Validators will setup their node, create keys and that's it. The node will then use the keys to do its thing validating blocks and chunks. Unless you're running a validator node or doing something specific with validator nodes in your application, these probably aren't going to be of much interest/concern. Even if you are running a validator node, the setup script typically sets the keys at startup and unless there's some kind of problem requiring them to be reset, the validator probably won't deal with them after that.
3. Node Keys
Typically only the core contributors to the platform need to think about or care about these. They are used internally by nodes to sign low-level communications with other nodes in the network (e.g. sending block headers or making other verifiable requests).
KeyStores
The three types of keys are only good if they are available to the node, validator, or signer to use. Therefore, once they are generated they get stored somewhere - that somewhere is a keystore and near-api-js can use three types of them:
InMemoryKeyStore - keys are stored in memory only - typically used for temporary scenarios.

Browser Local Storage
BrowserLocalStorageKeyStore - keys get stored unencrypted in browser local storage. You can take a look at them by opening up developer tools in your browser, selecting application, and then expanding Local Storage.
If you're on a site or app using NEAR like the testnet wallet, you should see a key beginning with something nearlib:keystore:... (highlighted keys in the image)
UnencryptedFileSystemKeyStore - we saw this in Part 1: Understanding NEAR Accounts. It's a key file stored in your operating system's home directory at ~/.near-credentials. Here's a look at it again:
A look at the key file stored in the unencrypted file system key store
We can also combine keystores using near-api-js MergeKeyStore. That basically lets us create a virtual key store which is a grouping of multiple other key stores. It takes an array of KeyStores in its constructor and goes through them sequentially from start to end. Calls that need to write to the chain will use the first keystore and read calls will iterate through all the keystores from start to end of the array.
This might be useful in situations where we are storing keys in various places and want the app to look somewhere first, then somewhere else, and so on.
Signers
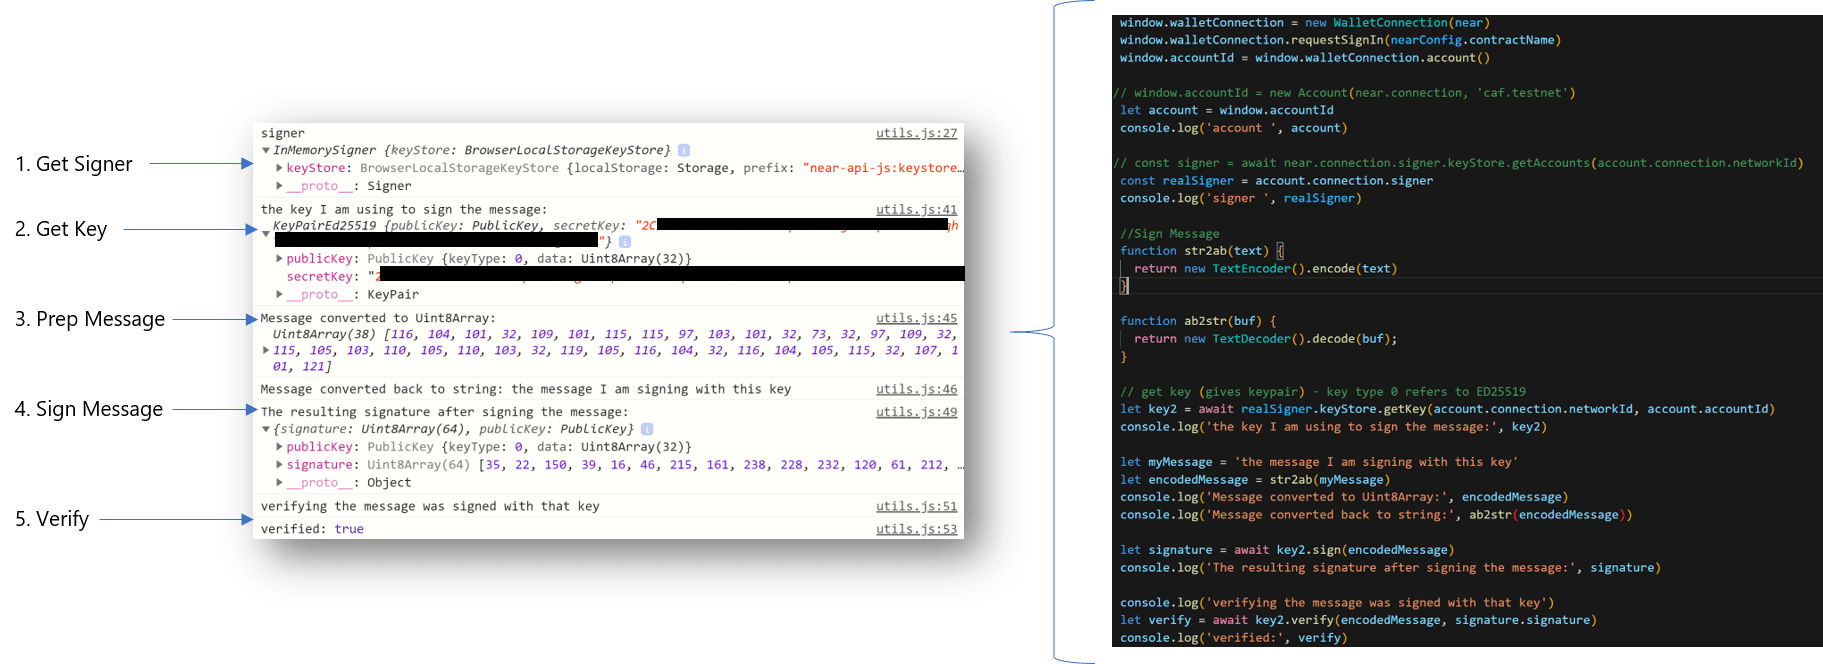
Now that we have keys and a place to put them - we can now use them to do what they are really intended for - signing messages. A message in our applications is typically a serialized transaction, but as we see from the below flow, it can be other things as well (like a string) that is encoded to a Uint8Array.
Let's walk through this:

Signing and Verifying a Message
The first step is to load up the signer. Near-api-js lets us call the InMemorySigner which is part of the account object. The InMemorySigner just provides access to the keys stored in the keyStore.
Next, we get the current account's key for the current network. We access it from the InMemorySigner keyStore.
Third, we prep a message for signing. In this example, I'm using a TextEncoder function to turn my message string into a Uint8Array.
Fourth, we sign the message using the key loaded from the InMemorySigner. The resulting signature consists of a public key and the signature.
Finally, we can reverse things and verify that the encoded message was signed with that key by calling the key's verify method and passing it the encoded message and the resulting signature.
The whole point of this is that by signing a transaction or message, the resulting signature is proof that it was signed by a certain key. We can therefore trust that a message or transaction came from whomever holds that key.
NEAR Access Keys (Signer Keys)
Ok, with that background done, let's get down to business and start with what the NEAR Protocol Specification says about access keys. In part 1, we dug into NEAR Accounts and touched on the fact that NEAR accounts have access keys associated with them. It's possible for each account to have several keys or none. The keys it can have will have Access Permissions that make them either FullAccess or FunctionCall keys.
All keys associated with an account will be unique within that account, but we can assign the same public key to multiple accounts and give it different access permissions.

Does an Account Have to Have Access Keys?
No and when an account has no keys, it's because they've explicitly been deleted. As we saw previously both explicit and implicit accounts are generated with at least one FullAccess key, so when we come across an account with none, it's because someone who had FullAccess decided to delete all the keys or coded the contract on the account to delete all the keys.
When an account has no keys it means there is no owner who can run transactions on its behalf. If that account contains a contract that has code - that code can still be invoked by other accounts and contracts.
This is important from a trust perspective. Let's say someone builds an app that does some kind of money management. If that person keeps a FullAccess key on the account where all the funds are being deposited, that person will always have the ability to alter what's going on in that account and if they are malicious can one day decide to take all the funds and go on extended vacation somewhere nice.
When there is no FullAccess key, while the code in the contract might be setup to do something nefarious, at least we know nobody else can alter the code and/or conduct transactions from the account.
Removing the keys is known as locking the contract - means that there are no access keys allowing the contract code to be re-deployed. You can see the status of an account in the NEAR explorer. If there is even a single FullAccess permission access key the locked status is set to "No".
Note that even if there are no keys, the contract itself may be designed in such a way to re-deploy itself or re-add FullAccess keys. There's still an element of trust needed when working with contract code (recommend sticking to open source contracts so at least you can inspect it...)
Let's use near-cli and look at the keys assigned to one of the accounts we created in Part 1. We see it printed out below - one FullAccess key. We already know what the public key is, so let's turn our attention to the nonce which below is 0.
A nonce (number only used once) is required for each transaction signed with an access key. To ensure it's unique, every time the key is going to be used to sign a transaction, the access key's current nonce is retrieved and incremented by 1.
If the access key needs to be recreated, it's important to also set the nonce equal to the nonce of the last transaction the key was used for. If not, old transactions will be replayed.

Because it increments with every use of the key, it can also tell us how many times that key has been used with a specific contract. For example, look at the output from near-cli near keys dao.vitalpointai.testnet (an account with a contract deployed to it). We can see it has interacted with the receiver_id (dao.vitalpointai.testnet) - 25 times. This is a FunctionCall key with no explicitly defined functions (therefore it can call all of the ones made visible by the contract). If there were method_names listed, we'd know the key was calling one of the specific methods listed.
Access Key Permissions

I've already used the terms a couple times (FullAccess or FunctionCall) so you might have an inkling of what they are, but to formalize it. FullAccess or FunctionCall access are the two types of permissions that a NEAR access key can currently have.
There are currently seven action types in NEAR. FullAccess keys are allowed to do any of them while FunctionCall keys are limited to the FunctionCall action which calls contract methods. When we create and add FunctionCall access keys to an account we have the option to define exactly which methods on the contract the key has permission to call.
Do you really want to issue a FullAccess Key?
Took me awhile to wrap my head around this, but unless you're running a wallet or similar application where users need absolute total control over their account to the point where they can completely disable it by deleting all its keys, what you probably want to issue instead is a FunctionCall key that has full access to any exposed contract methods.
You do that by adding an empty array of method names to the add access key function (near-sdk-as) or leaveing the optional methodNames argument of the near-api-js AddKey out.


This will let a user user your app and call everything in it (that you make visible), but will prevent whomever you are giving the key to from having total control over the associated account. I'll try and clear that up with an example below in a minute.
Common Scenarios
To help explain this, let's consider two common scenarios.

When you use the NEAR wallet to create an account, this is the type of scenario that is occurring. You create the account which creates a keypair representing fullAccess to the account.
That keypair gets saved to your browser local storage (keystore). The public key on the account corresponds to the private key saved in your browser local storage and is associated with the seed phrase generated in event you need to recover it.
The private key associated with this keypair is required anytime you want to sign a transaction with this account. For us app developers, that means you either need to visit the wallet so the app can access your localstorage to authorize transactions or you need to manually pull the key out and put it somewhere (.env file) where your app can securely access it, or run your own modified wallet as part of your apps login flow.
Note that there is no contract intermediary anywhere in this setup. The wallet app is using near-api-js to talk directly to the chain to setup the account along with its associated fullAccess key.
If you visit your wallet after creating this account you will see a fullAccess key (or you can view it with the near-cli as we demo'd in part 1).

For those of us trying to develop applications, this is the more common scenario. An application is built that uses near-api-js to talk to a contract account that has been deployed to the chain. That contract has various methods the app calls that correspond to all the functionality in the app. The contract, in turn, uses the near-sdk-as to talk to the NEAR chain to do what it needs to do.
If you've tried interacting with a contract on the NEAR chain, you've probably tried to login and were sent to your NEAR wallet to authorize the app. That's because it's your NEAR wallet that is helping you sign things with your private keys. It's going to happen anytime an app is using wallet.requestSignIn().
Right now this wallet.requestSign() assigns the account a functionCall access key to the specified contract; however, it doesn't allow app developers to specify methods. That may change in the near future when this issue gets implemented. The only way to add a limited access functionCall access key to an account right now is programmatically using the account's private key.
So, currently this authorization flow is the process by which the contract you are trying to work with via the app offers your account an access key. If you accept (authorize) the app, then the access key is added to your account (you can see it show up in your wallet under authorized apps).
As I just mentioned, the default key added in these situations is a FunctionCall access key with receiver_id pointing to the contract you've authorized, no method names identified, and an allowance of 0.25 NEAR. The allowance just means you can't spend more than that amount in gas fees for any one transaction (typically way more than you'll ever use). Again, because there are no method names specified, that key allows your account to call any method that is exposed on the contract.
Exposing Methods on the Contract
For an app to work with a contract, you need to initialize it and tell it what account is working with it. Here's an example of what that might look like:

When I refer to exposing methods, I mean making them visible by listing them in the view/change methods during contract initialization in your app. Doing this allows your app to call any of them, including ones that transfer NEAR.
If the account that it's been initialized to (typically one using the app), has no method names specified in it's key for this app, then it can work with all of these methods. If only specific ones are identified, it will only be able to work with the subset identified.
It may not be obvious, but you aren't restricted to using the NEAR wallet to manage this login/authorization flow. You can create your own wallet apps that create NEAR accounts for your users or import existing NEAR accounts into your wallet. Likewise, you can code your own authorization flow that doesn't rely on the NEAR wallet.
If you're looking to figure out how that works, I'd suggest going through the wallet.js and account.js files of the current NEAR wallet.
The Role Based Access Control Use Case
Let's get out of the theory for a bit and take a look at how we can apply these two different types of signer access keys to a real situation - role based access control. A quick primer on that...
Organizations create roles for certain job functions. Those roles are then assigned to the people who need access to the specific actions and information necessary to function in that role. Thus, the organization gives them permissions to use those functions/information and denies them access to anything outside of that role's requirements.
It's a way of compartmentalizing and tends to be good security practice. One can add/remove permissions and access from someone or a group of people simply by removing or changing the roles assigned to them.
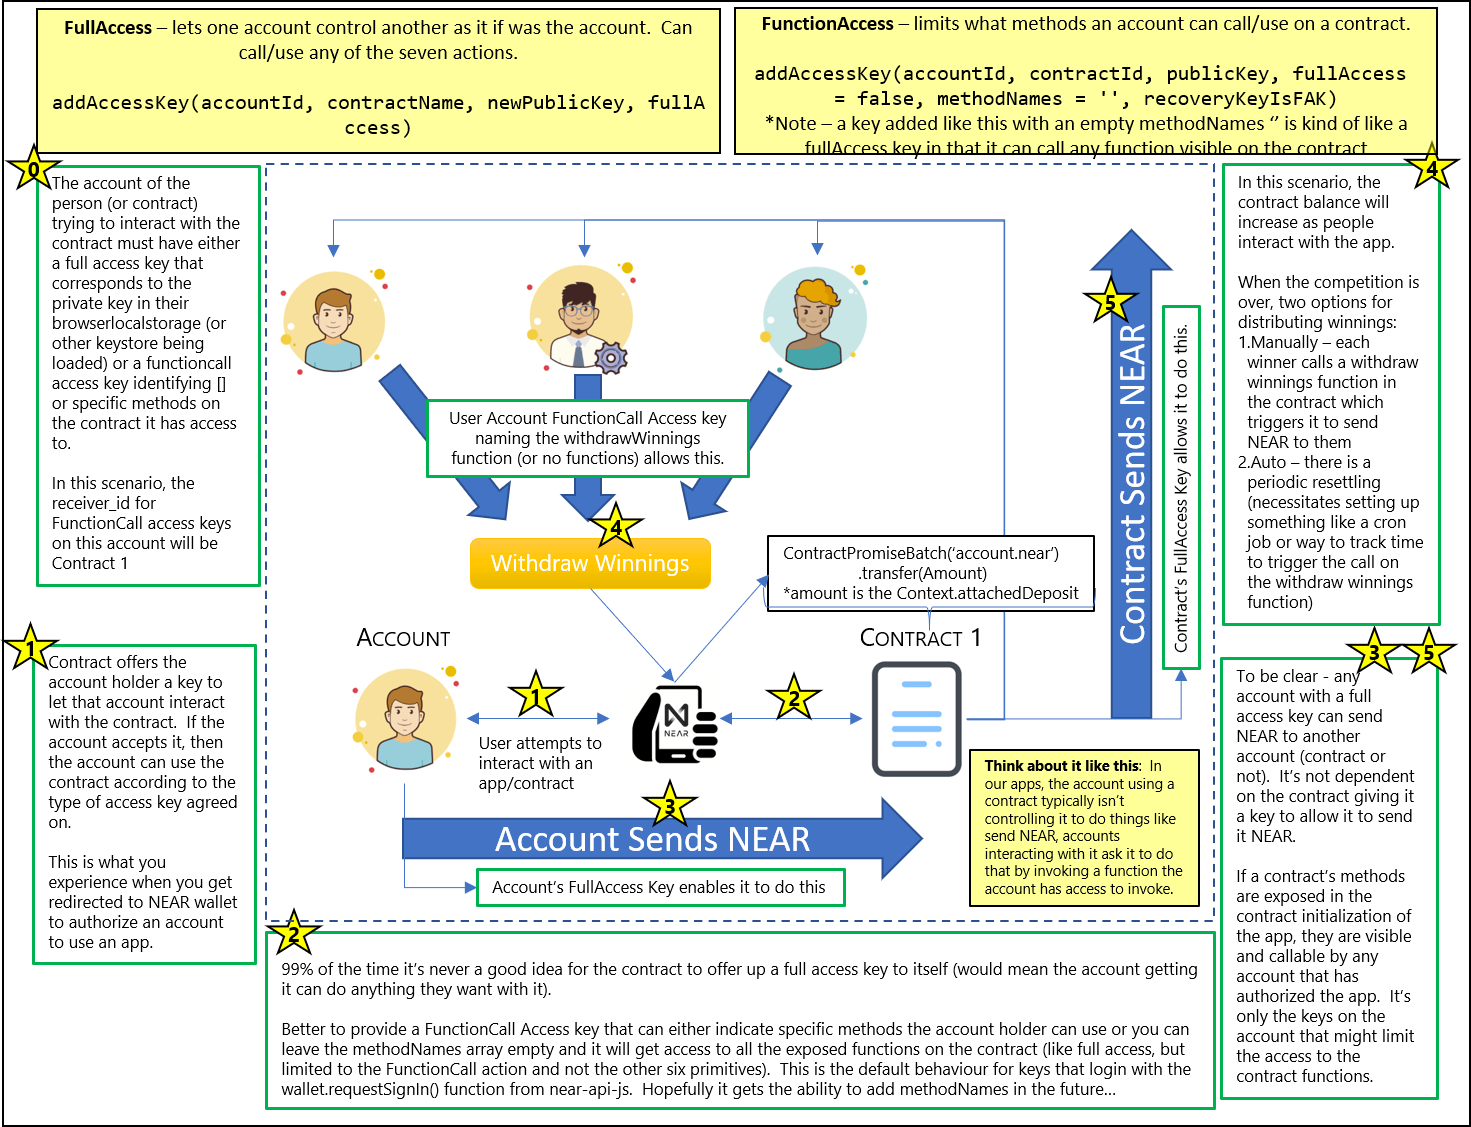
Take a couple minutes to digest this image and then we'll walk through it.

This image shows us how we can use NEAR FunctionCall keys to grant role based access inside an application. To set the stage, our application is a content management system similar to WordPress. There are three classes of users using the application:
- Subscribers - normal users who probably don't even log in to the application, but they have permission to read all the articles submitted to the platform;
- Editors - these are the people writing the articles. We could just have easily called them publishers or writers. They are given the same permissions as subscribers but have added permissions to create posts, edit their own posts, and delete their own posts; and
- Administrators - these are people who take care of the platform itself, moderate it's content and generally keep it going. They are like owners and need permission to pretty much do anything required on the platform - so they get full access to everything (on the contract, but not the contract account itself).
The image shows one contract account (Contract) and three people - each representing a different account. For each user account to interact with the contract, the contract needs to offer each an access key and the user needs to accept it.
As an aside, while I'm only showing one contract here, we can build applications that take advantage and call several contracts, each providing a different set of access keys/permissions. Doing so introduces complexities as we have to setup cross contract calls and consider the gas cost associated with making them - but it is certainly doable and desirable (search composability in the NEAR whitepaper for reasons why).
Cross Contract What?
A super cool aspect of blockchains is that contracts can use (call) the existing functionality of other contracts published to the chain. It speeds up development as you can build on top of things that already exist (although you need to trust the contract you're calling). The NEAR docs describe them as being similar to calling an external API in a Web 2.0 context. At the heart of it - it's one contract talking to another - and it's awesome.
The contract contains all the functionality of our app. Let's say we coded in the following functions: createPost, editPost, deletePost, viewPost, and assignRole. Revisiting our users and their roles, we want access to use these functions to look like:
- viewPost: subscribers, editors, administrators
- createPost: editors, administrators
- editPost: editors (own posts), administrators (all posts)
- deletePost: editors (own posts), administrators (all posts)
- assignRole: administrators
Let's now translate that into the right type of keys.
- Administrators. Need access to all the functions, so it may seem appropriate to give them a FullAccess key. That's not necessarily true for the reasons we've covered already. A better option is a FunctionCall key with an empty method names array. That means they will have access to all the visible functions on the contract, but won't have access to the other six actions that a FullAccess key can do as we described above (i.e., create/delete accounts/keys, make transfers and so on). A couple of our functions the admin will be able to access will assign appropriate roles to application users.
- Subscribers. Only need a FunctionCall key that gives them permission to call the viewPost function.
- Editors. Need a FunctionCall key that gives them permission to call the createPost, editPost, and deletePost functions. However, there will be some internal permissions logic to confirm the posts they are working with belong to them.
Ok, so now how does all this fit together.
Well, we would code out the application giving it the ability to add keys (near-api addKey). The first account to interact with the contract could be given administrator privileges (we could also do this through the constructor when deploying the contract.). From there the administrator will be able to assignRoles to other accounts. Those accounts, whether a user who is a subscriber or an editor, gets FunctionCall access keys specific to their role which they then use to interact with the relevant functions in the main contract.
Simple enough?
A Hands On Example: Dorian's App
Everyone - meet Dorian.
Dorian is creator/star of Blockheads - a Youtube series that's doing interesting things like taking us along on his journey to learning how to build blockchain apps on NEAR.
Dorian recently asked me about access keys...
The question came at the perfect time, as I was just finishing up this part of this lesson/article. So, I decided to use his question/concept as a hands on example to more or less bring everything together that we've been talking about here.
It's not going to look super pretty, but it will be functional. Dorian - if you're reading - hopefully this answers your questions :). So what are we going to do.
The Project Concept
I don't know the specifics of everything Dorian is working on, but in general, he's trying to figure out how to:
- let users send NEAR to a contract (like an entry fee for a competition)
- have the contract keep track of who has sent what
- distribute funds to winners of the competition when it's over
We're going to build out the parts of that that demonstrate the access key functionality and requirements. I'll leave the rest of it up to Dorian. It's depicted in this super complicated looking picture (don't worry, we'll simplify it).

The contract could have a PersistentMap that keeps track of how much NEAR accumulating in the contract account belongs to 1st, 2nd, and 3rd place (% of all contributions). Once the competition ends, the funds will be available for the winners to withdraw by invoking a function which tells the contract to send them the NEAR they are entitled to (assuming they have a functionCall access key that allows them to do that).
The users don't need keys that allow them to take over the contract's transfer ability, they just need to be able to ask the contract to send the NEAR. If they've authorized the app in the normal way through the wallet.requestSignIn() - then they've will have been given a functionCall access key (with empty methodNames array) to use the app. That will be sufficient to ask the contract to send the NEAR to our winners, but it won't limit what else they can do with the app.
Thus, for our purposes here, we're going to avoid the wallet and work with the keypairs directly (but I'll be sure to point out when you should be thinking about it).
Here is a video demonstration of our competition app that we will use to explain how all these access keys are working together (and hopefully give Dorian enough to carry on with his project).
All the code you're about to see can be found in this Github Repo: NEAR Access Key Tutorial.
I'm sure that's all as clear as mud. Let's step through it and hopefully clear it up.
Step 1: Setup our project (calling it accessKeyTut)
Note: If you see reference to RBAC in any of this, just substitute in access - this evolved over a month and a half so rather than redoing everything - it's a bit of a mix.
We set things up quickly and easily using create-near-app. Open up VS Code or your favorite IDE, find a terminal prompt and enter this command:
>> npx create-near-app --frontend=react accessKeyTut

That will create a new directory called accessKeyTut, download and setup the folder scaffolding for a new NEAR project using ReactJS as the frontend.
Once it's done, cd to the new accessKeyTut folder and open it up in your editor. If you're using VS Code, you should see a file structure as depicted on the right.
The create-near-app command finishes up with a npm install that brings in all the dependencies for the app; however, if you ever need to delete the node_modules folder and reinstall things, using npm at the command prompt simply enter:
>> npm install
Step 2: Create contract account and set deployment sequence
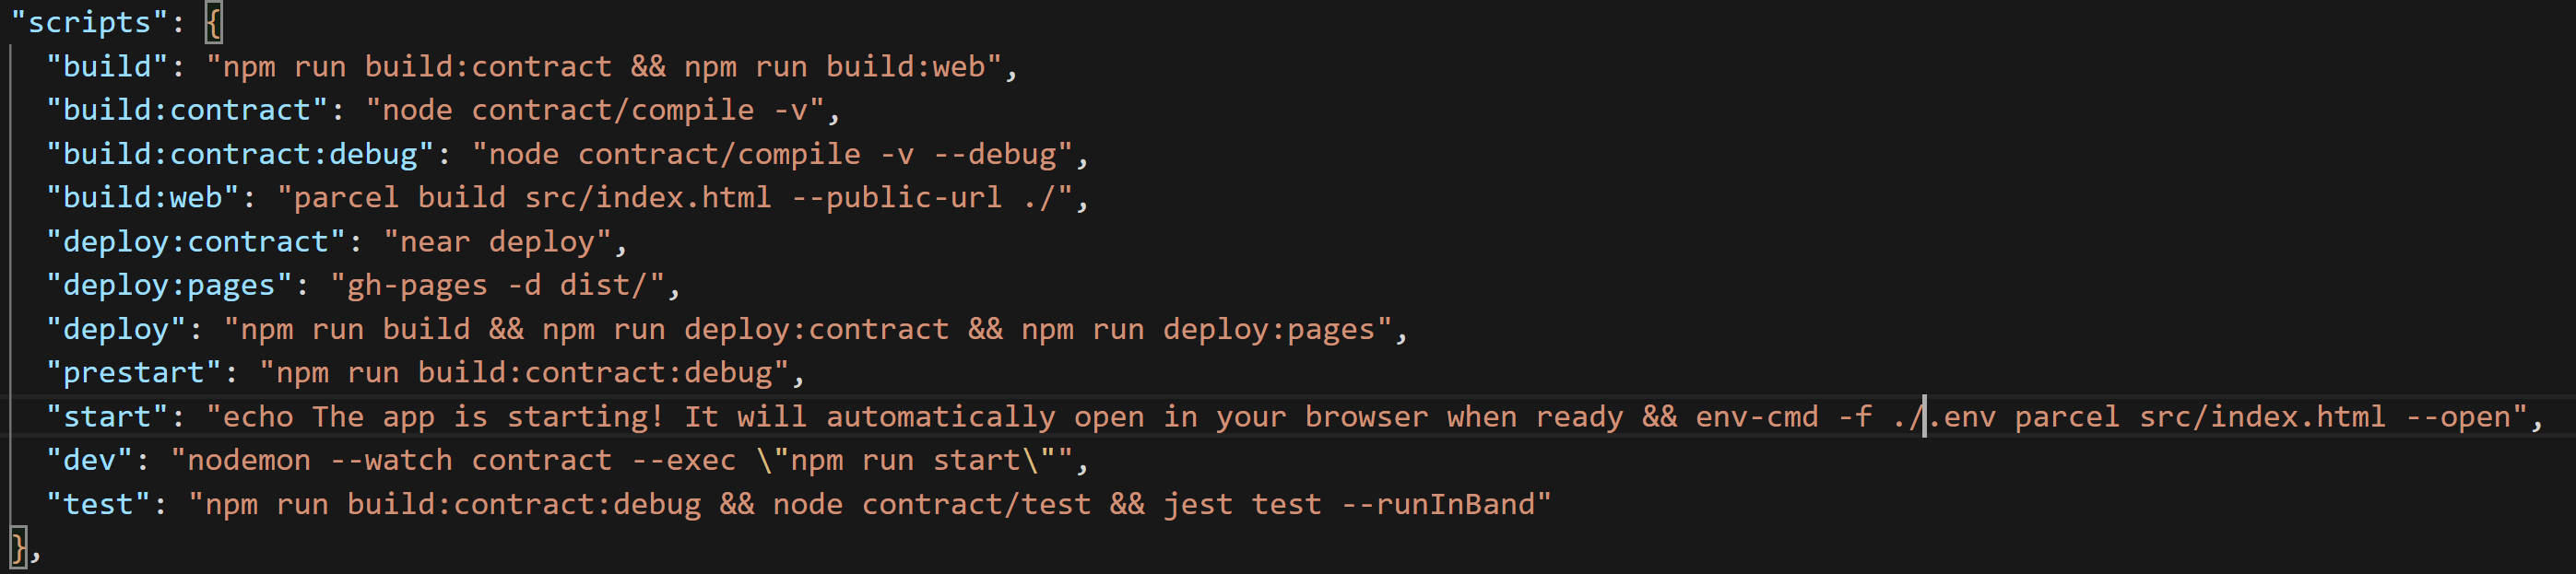
By default, create-near-app includes a dev deployment sequence using near-cli's near dev-deploy to automatically create a dev account and and then deploy your code. We're not going to use it here so we can get a better idea of how the access keys are being assigned. Dev-deploy does some of that for you. I actually never use the dev-deploy functionality when developing projects.
So, that means we're going to modify a couple things to take back control of the deploy process.
- Delete the neardev folder completely
- Open package.json and ensure script section and delete the dev:deploy:contract line, remove '&& npm run dev:deploy:contract' from the prestart line, and remove 'neardev/dev-account' from the start line. It should look like so:

- now, we need to add a .env file to the root directory. It's where we add environment variables (like private keys) that are used throughout the application. Immediately after adding it, go into your .gitignore file and add .env as a file to ignore. We put secret keys, API keys, etc... in env variables and we don't want those inadvertently ending up in a public github repository.
- now add the following line to your .env file.
CONTRACT_NAME=access.youraccountname.testnet
That makes the assumption you've already created an account on testnet. access.youraccount.testnet will be a sub-account of that 2nd level account - youraccount.testnet. Visit Part 1: Understanding NEAR Accounts to see how to create a new 2nd level account (usually through NEAR wallet) and then sub out youraccount for the name of the account you create.
With that complete, the way we will deploy ensuring a clean state as we do our development will be with the following sequence of three commands (sub your account name for vitalpointai).
Something to Ponder...
If you haven't changed the underlying data model, you can get away with just doing a build and near deploy vice deleting and recreating the account. Also, keep in mind that every time you delete and recreate the account, it issues a new keypair. This will drive you insane if you forget when you're wondering why your signer isn't working (getting errors saying there is no matching key on the network for the account).
This will only work if you've already created the access.youraccount.testnet account (can't delete what doesn't exist...). If you haven't done that, skip the first command and start with near create-account...
>> near delete access.vitalpointai.testnet vitalpointai.testnet
>> near create-account access.vitalpointai.testnet --masterAccount vitalpointai.testnet
>> near deploy --wasm-file out/main.wasm --accountId access.vitalpointai.testnet
The create-near-app template comes with a small contract already coded. We're just going to do the above deployment steps to ensure everything is running correctly before moving on to the next step. So, if you have already created an account and haven't tried deploying to it, go to a terminal prompt and type:
>> npm run build
Doing that compiles your contracts to wasm and puts the files in a newly created out directory (default being out/main.wasm). It also creates a dist directory where all your frontend files get built to. Once that's done, type:
>> npm run start
The end result should be a browser opening and you seeing this "Welcome to NEAR!" message and sign in button. Go ahead and play around with it if you like, but getting to this point was just to ensure the build process and everything we've done to now is working/on the right track.

Step 3: Let's Create an Administrator
Remember that our administrator is an account that has a FunctionCall access key to the contract with an empty method names array so it can call any method on that contract. In this case, the contract being called (the receiver) is access.vitalpointai.testnet. So, let's quickly take a look at what keys exist on access.vitalpointai.testnet. We'll do that using near-cli and the near keys command:

As you can see, it has one fullAccess key on it. That means that whoever is the owner of that public_key has fullAccess to the access.vitalpointai.testnet account. Can you guess where that key is currently located?
If you guessed that it's on your machine, you're right - and you can verify by opening up the ~/near-credentials/testnet/access.vitalpointai.testnet json file:
If we wanted to add access keys to this account, we'd copy this full access private key and put it in an a .env variable and then use it to make/add more access keys. This might be useful in a cross-contract situation where we want to identify what methods one contract can call on others and then delete all the other keys - effectively preventing any further changes (known as locking the account).
Now, we want to enable an administrator to have access to call any method on the access.vitalpointai.testnet contract. So we need to figure out how to add a FunctionCall access key to the admin's account that points to access.vitalpointai.testnet (receiver_id). The account I'm going to use as the administrator account is one I created called caf.testnet - so let's take a quick look at it:

and it's current keys:

Interesting. So, what happens if we visit the frontend of the deployed contract on access.vitalpointai.testnet and sign in - will it automatically give our caf.testnet account a full access key? Let's find out. After I sign in to the app and authorize it to interact with caf.testnet using the near wallet - the keys on caf.testnet now look like:

Well, look at that - the app added a FunctionCall access key to access.vitalpointai.testnet allowing caf.testnet to call methods on the receiving contract account - access.vitalpointai.testnet. Because it doesn't specify any method_names it acts like a fullAccess key with respect to function calls as it can call any function, but it does have an allowance attached meaning it can only spend up to that yocto number there. Let's see if the keys on access.vitalpointai.testnet have changed:
Nope. Same FullAccess key present.
Ok, so far so good.
Let's put together our contract and deploy it to access.vitalpointai.testnet so we can start interacting with it.
Step 4: Coding the Contract (AssemblyScript & near-sdk-as)
Sorry Rust folks - there's plenty of resources for you - I'm an AssemblyScript fan and we need more... Rust or AssemblyScript or whatever other languages are supported in future - choose what works for you - these contracts compile to WASM. That's the code we actually deploy to the account.
Someday I probably will work on improving my Rust skills. Majority of the resources/contracts available are all written in Rust and in the NEAR community - it's definitely well represented. That said, I'm going to do my best to keep AssemblyScript on the radar, because while learning Rust might be nice, I'm able to be productive with AssemblyScript now given how relatable to Typescript it is.
So, decided the easiest way of communicating what's going on here is to do a video walkthrough of the contract code. You can use the video along with the comments and contract code to understand what's going on.
Alright, that's the whole contract. Now build it and deploy it to your account - access.vitalpointai.testnet
>> npm run build
>> >> near deploy --wasm-file out/main.wasm --accountId access.vitalpointai.testnet
Step 5: Coding the Front End (React and near-api-js)
For this, we are going to need to create three "Player" accounts and we're going to use the NEAR wallet on testnet to do it because I want to show you how to add keys to those accounts once you create them. As I already mentioned, it's unfortunately super tedious right now until we get the ability to add methodNames to the wallet.requestSignIn() function. Pretty sure that will be next on my list...
So, head to the NEAR Testnet wallet and create three accounts. Player1, Player2, Player3 for instance. Then come back.
Alright, now you need the three private keys that correspond to each of those accounts you just created. If you recall, those private keys are stored in your browser local storage. Open the developer console in whatever browser you're using and go back to the wallet. In the application tab under localstorage you'll find a list of keys.
Grab the private key for each of the three player accounts you just created and put them in your .env file like so (add those other env variables if you haven't got them in there yet):

The other variable you'll need to add is the private key from your contract account. It is in the .near-credentials folder on your computer (see above). Add it as CONTRACT_PRIV_KEY.
Adding Keys for Each of Our Players
Near-api-js is how we build frontends that interact with the blockchain or the contracts in accounts.
The general sequence for configuring things to add keys to an account is:
- Get a KeyPair - can pull it out of localstorage, create it randomly (KeyPair.fromRandom), or from a private key (KeyPair.fromString).
- Prepare a Signer - InMemorySigner.fromKeyPair(networkId, accountId, keyPair).
- Configure a connection to the network that uses the signer and the keys it put in its keyStore that we just made - connect from near-api-js
- load up the account object from that connection
- Create transactions on that account, having it sign and send them. Adding a key is a type of transaction.
With that general knowledge, let's do a video walkthrough of the frontend code to understand the rest of how near-api-js is interacting with the contract and the chain to complete the functionality for the app.
Sender vs Predecessor
It's important to understand the difference between a sender and a predecessor. Both refer to an account calling a function or sending a transaction - but the difference is subtle:
- Predecessor is the account that made the last function call transaction.
- Sender is the first account to make a call to the function
- If there is only one call - sender and predecessor are the same account.
So consider Bob, Alice, and Tom and this ordered list of function calls:
1. Bob calls Alice - Bob is both the Sender and the Predecessor
2. Alice calls Tom - Bob is still the Sender but Alice is now the Predecessor
3. Tom calls Bob - Bob is still the Sender but Tom is now the Predecessor
Summing Up
And with that, I have finally come to the close of my in-depth dive to NEAR accounts and access keys. This tutorial took approximately 45 days and countless frustrating hours of trial and error to figure out how all this fits together. I sincerely hope it helps you fully grasp the power behind NEAR's account model and it's access keys.
We have learned about:
- keystores and signers
- keypairs - public/private key combinations that are used to sign/verify transactions and messages
- the three types of keys Signer, Validator, Node keys
- fullAccess and functionCall Access keys
- how to add keys to accounts
- how to switch the types of keys being used to interact with a contract
- how to put it all together to build a working application showing all these concepts in practice.
And hopefully, we've helped out Dorian in the process. Seriously, check out his blockheads episodes on Youtube.
Happy blockchaining with NEAR.
P.S. I'm sure you've got questions or I didn't explain something well enough. Feel free to ask them below and I'll do my best to answer. I feel like I might actually grasp how these keys actually work now.