Creating a Community
So you have an idea and want to build a community around it. Well, doing so the DAO-way is simple, quick, and easy with Catalyst.

Below you'll find a text version of the video with more detailed descriptions of the community initialization settings.
Step 1: Choose Your Community Name
Select the create community link from the menu and you'll be presented with this dialog.

You simply choose a name for your community and enter it where it says Dao Name. It can be 2-48 characters long with no symbols (except -). Make sure you pick the one you want as you won't be able to change it or delete it - it's permanent.
Why is it permanent?
NEAR accounts can be deleted, but only if there is a full access key on the account that can call the delete action. When Catalyst communities are created, the accounts are locked - which means all keys associated with it are deleted. This prevents anyone from ever tampering with the code. It can't be changed. This has implications in that the community can't be upgraded to new code and the account can never be deleted. On the other hand, you know the community will continue to operate exactly how it was intended to.
If there is an upgrade that you wish to take advantage of, you'll need to create a new community and invite your members to join you in it. This is not a bug, it's by design and is a characteristic of contracts deployed to blockchains in general.
Some people like to use a versioning naming system to make it easy to keep track of the version of the community. For example, mycommunity-v1.cdao.near or mycommunity-v2.cdao.near.
Once you have a name, you'll need to confirm that you understand that you have to transfer 2 NEAR to setup the community. It says this is non-refundable but that's only partly true. We'll cover inactivating a community later on, but if everyone leaves the community, the last member will get whatever funds remain in the contract less the amount that needs to stay to cover the storage cost of the contract itself. At time of writing that is approximately 1.1 NEAR.
There isn't much you can do with a blockchain that is free. Gas is required to run code and the contract needs funds to cover storage. Luckily with NEAR compared to other chains like Ethereum, these fees are miniscule to the point where you won't even notice them for most things.
After you've confirmed, hit create community. Like any other transaction you do on NEAR, you'll be taken to your wallet to authorize the transaction.
You will be asked to make two authorizations using your NEAR wallet:
- First authorization. Creates the community account and deploys the community contract code to it.
- Second authorization. Registers the decentralized identifier (DID) of the community on NEAR. This is used by Ceramic to create a data stream specific to your community where lots of data that doesn't need to be stored on NEAR gets stored for free.
Step 2: Choose Your Community Structure
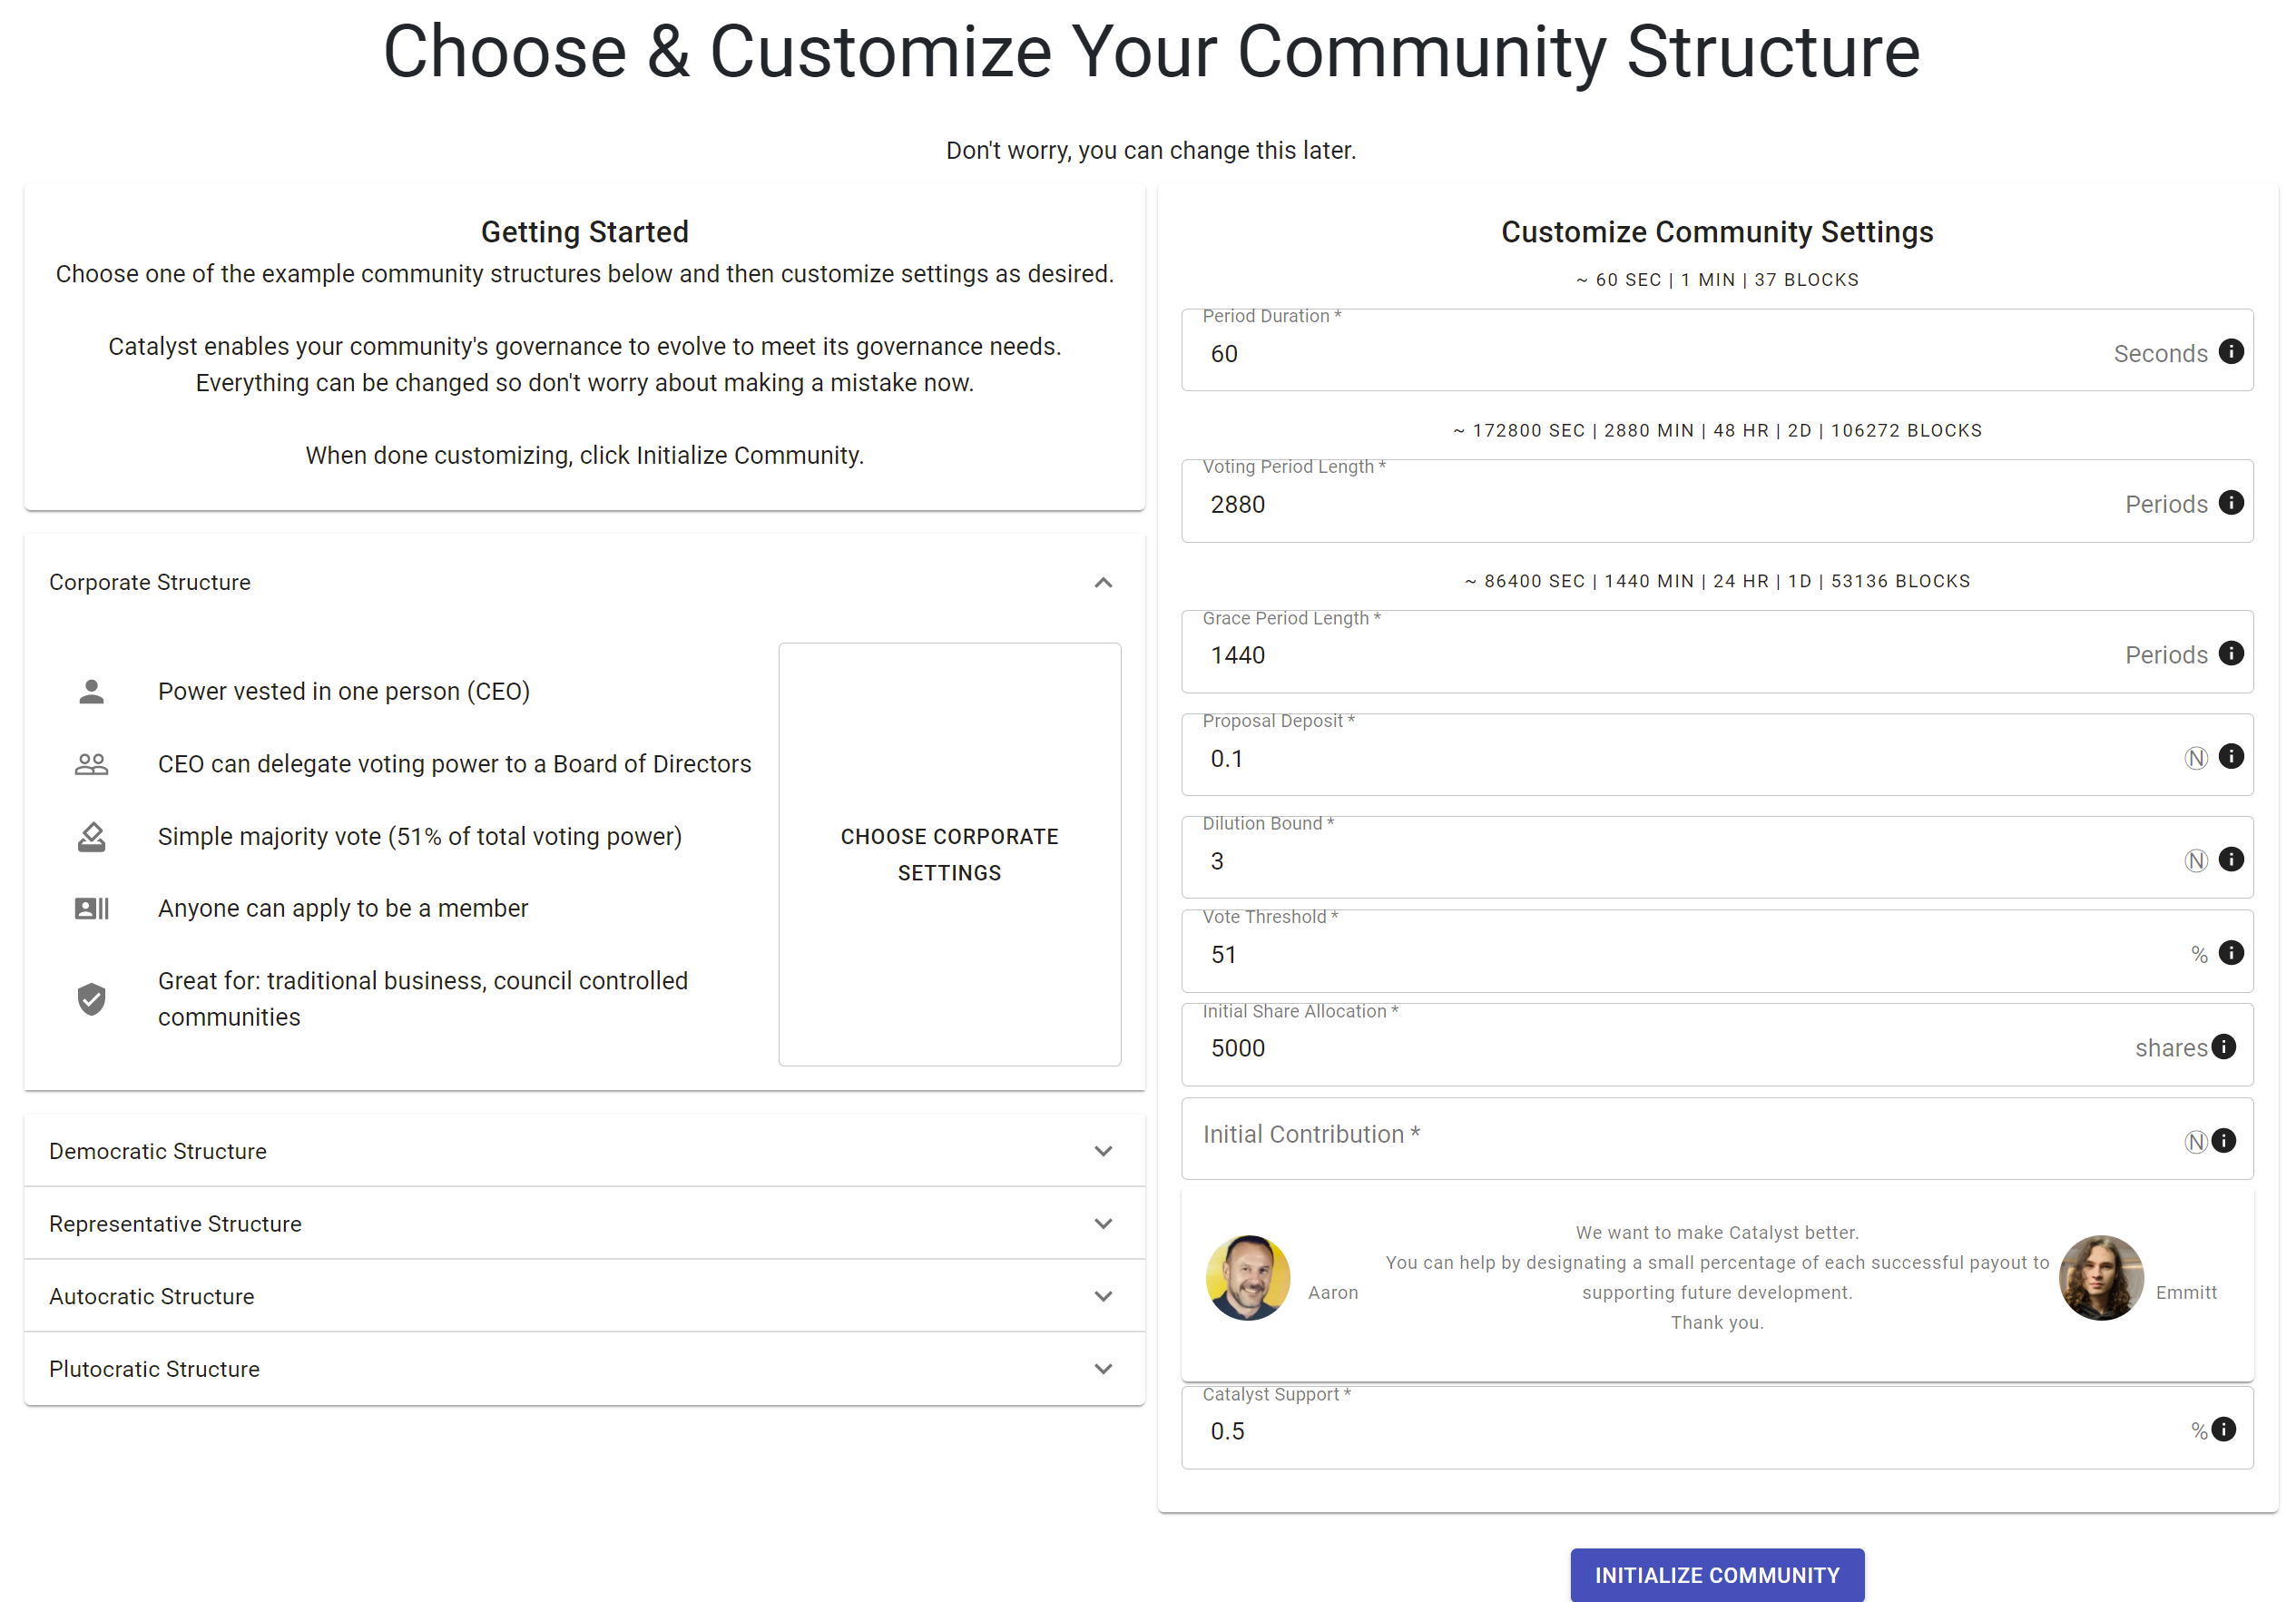
After completing the authorizations, you'll be returned to Catalyst and presented with the following screen:

Lots going on here, but it's really pretty simple and we've made things a little easier by giving you some community presets down the left hand side.
With the exception of the initial contribution and initial share allocation, all of these settings can be changed later, so don't worry about making a mistake right now.
Governance encompasses all the rules and processes and structures present in your community that dictate how people will coordinate and interact. Those governance structures can range from one-person dictatorships to full on one-person, one-vote democracies and everything in between.
Expand each of the various structures down the left to see what they might be good for and when you find one that appeals to what you want to setup, click the "choose ... settings" button next to it. That will auto-populate most of the fields on the right.
Let's cover what each setting on the right means (Note: you can also hover over the info icon on each line for a short description):
- Period Duration. Exactly as it sounds, it's the length in seconds of what you define a period to be in your community. That can be a minute, hour, day, week or whatever you want. Recommend leaving it as 60 seconds.
- Voting Period Length. The number of periods that a proposal will remain in the voting period for. So, in the example above, if you left the period duration setting as 60 seconds (1 minute), 2880 minutes = 48hrs or 2 days. There is a little helper above each of these lines that will update and help you visualize what the numbers result in.
- Grace Period Length. After the voting period, there is a grace period that gives people who voted no or who abstained the opportunity to ragequit. This setting determined how long that period lasts. It's identical to the voting period length - just serves a different purpose.
- Proposal Deposit. Most actions in your community will require the person making them to attach the size of deposit you set here. It's an economic incentive to prevent spam submissions. It gets returned to the proposer once a proposal is finalized (whether it passes or fails). Recommend setting high enough to prevent spam, but low enough not to discourage participation.
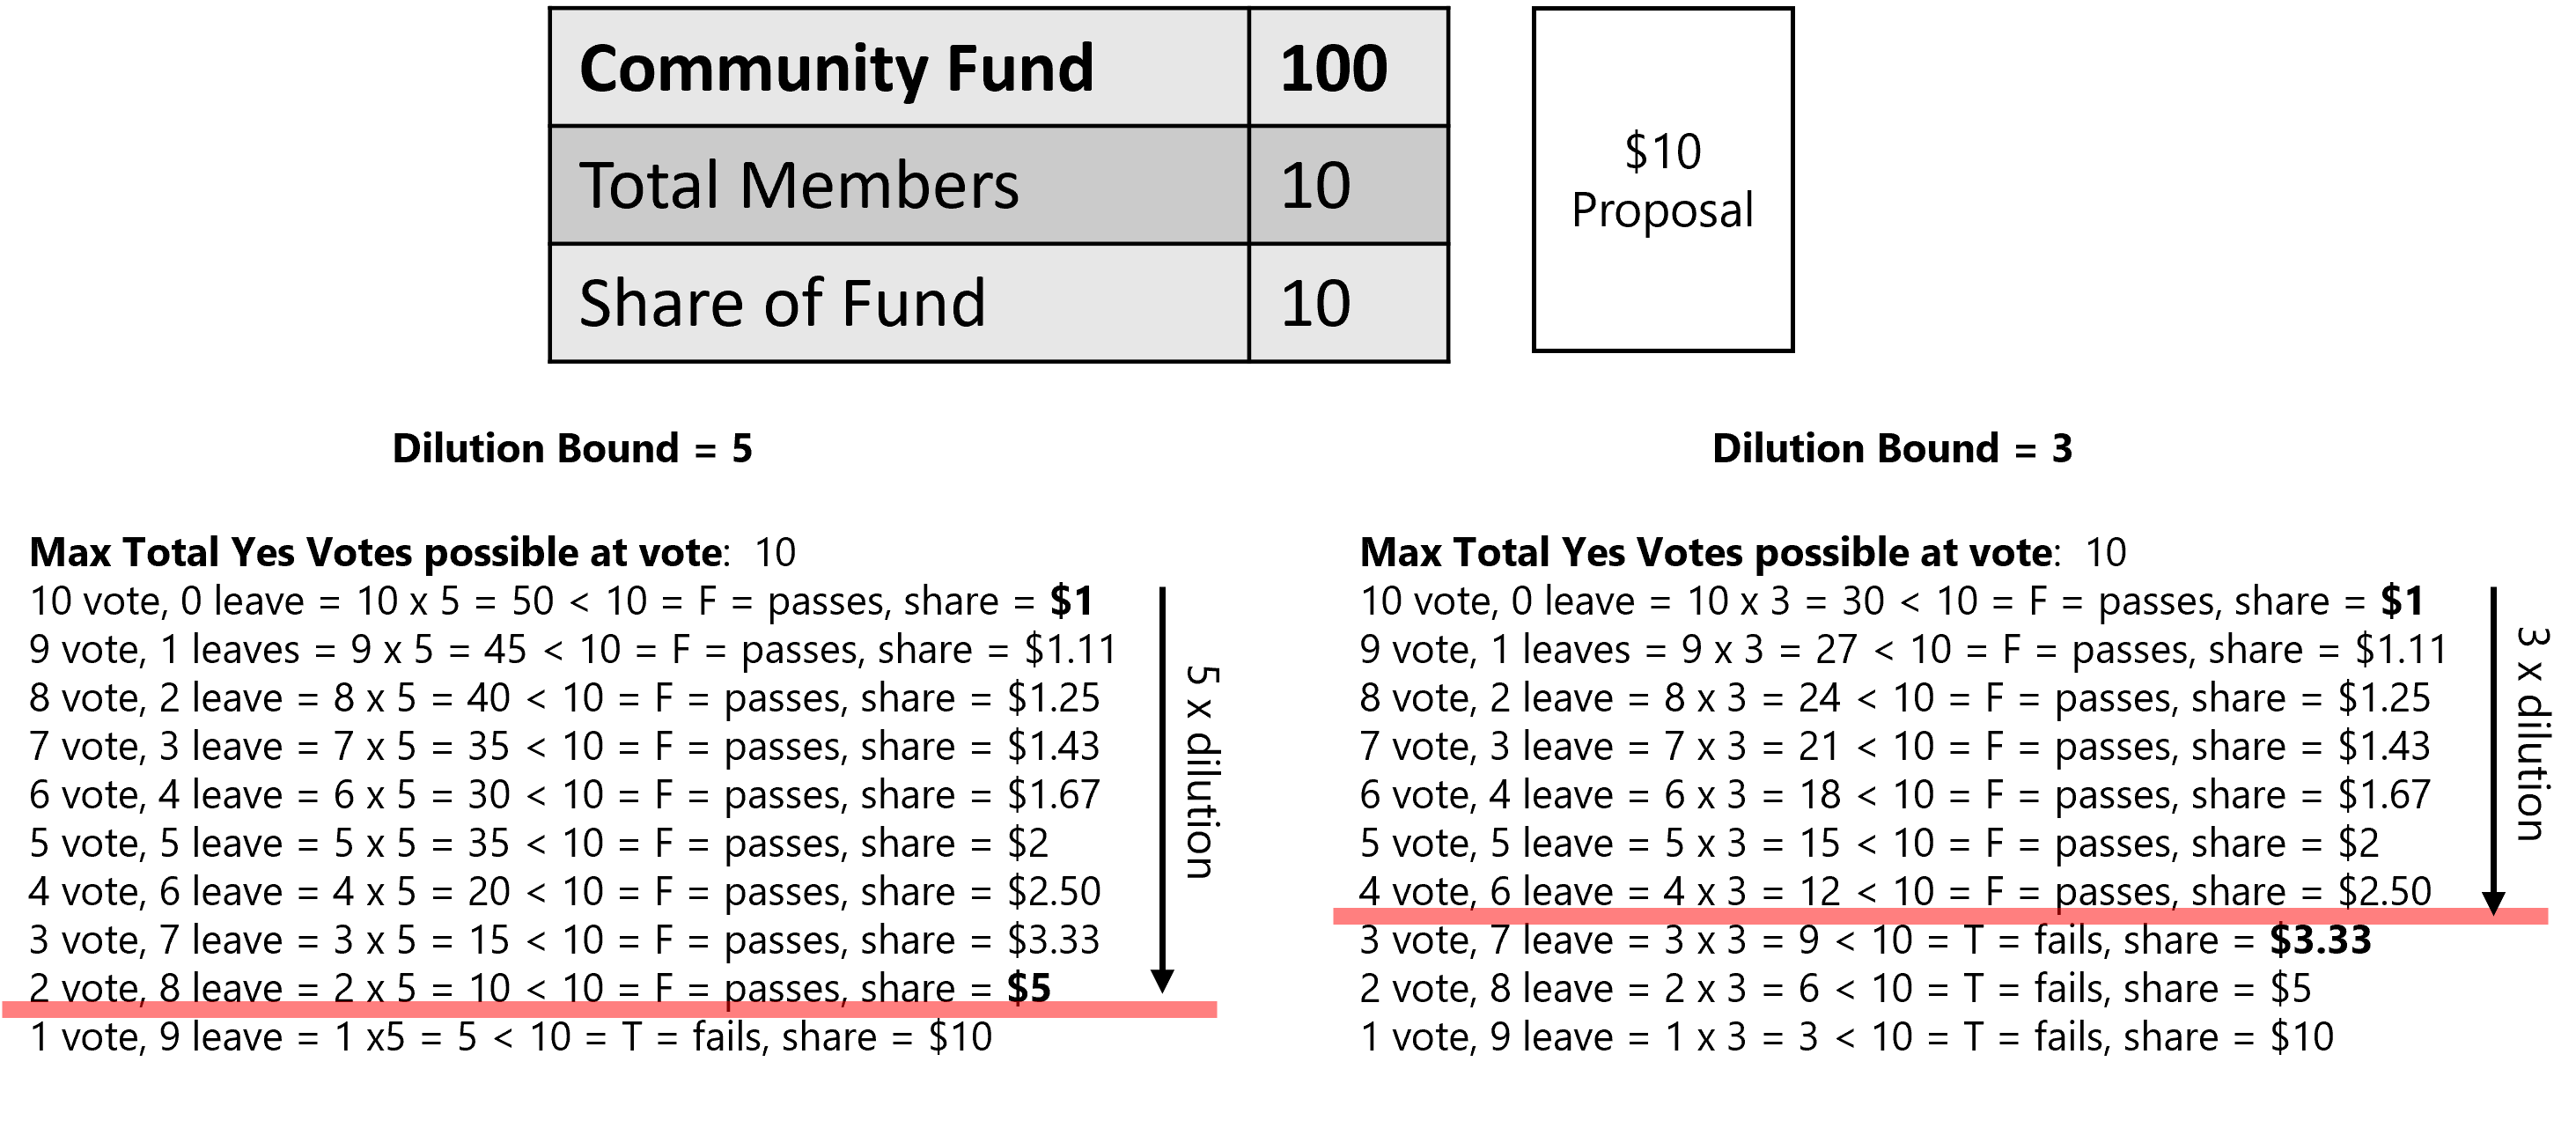
- Dilution Bound. This one is a bit complicated. It's an upper limit you set to protect people from excessive dilution due to ragequitting. Because we allow people to burn their shares (ragequit) and leave with their share of the fund if they vote no or abstain, it's possible a large number could collude and all leave at the same time causing excessive dilution. This limit sets the maximum acceptable dilution and thus the cost one person may be expected to bear. It's best to try and visualize it with real numbers:

- Vote Threshold - determines the percentage of the total available votes that must be achieved in order for a proposal to pass. For example in a community with a threshold of 51% and 100 voting shares, 51 votes is required for a proposal to pass.
- Initial Share Allocation - the number of shares you create and give to the person creating the community. This is useful if you want control of the community to remain with one person who can then delegate votes to others. If you set to 1, you achieve democracy and you will lose sole decision making power as soon as another member joins.
- Initial Contribution - the amount of NEAR you want to seed the community fund with right at the start. Like your first deposit.
- Catalyst Support - this is a percent of every successful payout that you request gets diverted to the developers behind Catalyst. Even small amounts are appreciated so we can continue to make improvements and dedicate time to Catalyst. Thank you very much.
And that's it. Once you're happy with your community settings, hit initialize community and you're ready to start inviting members. Happy community building.
Previous
Next
Enter your text here...