To ready Catalyst for deployment on both the NEAR and Ceramic MainNets, we needed to setup and host our own node on the Ceramic network. The current documentation to do that is a little sparse. So, in an effort to share what we've learned over many days of trial and error, we've documented and streamlined the steps necessary to setup and host a configured, always available, dns/SSL-enabled Ceramic node.
There are basically six steps: provision a server, connect to it, install the Ceramic CLI, setup and mount a drive to ensure you can backup data and state from IPFS/Ceramic, setup a service to automatically run the daemon, and configure DNS/SSL. Successful completion of those six things will mean you will be a part of the revolution Ceramic is ushering in in terms of creating, hosting, and sharing streams of data.
I should point out that the way we did this below is exactly that - the way we chose to do it. You can certainly use other cloud providers, hardware configurations, or whatever, but the general steps should remain the same.
Final note before getting into it - many of the images below are hard to read, but if you click on them, they'll open up the full image so you can see what to put in your config files.
Step 1: Provision the Server
You have many choices here, but I'd suggest looking at using a cloud provider. We use Microsoft Azure, so this tutorial will focus on that platform, but steps would be similar for any provider or even a local setup. You basically need a server that is capable of running:
- Node.js v14
- npm v6
For this, we provisioned a Basic_A1 server on Azure that comes with a 30GB disk for an estimated monthly cost of $19.34. We chose the Node.js single-tier option and set it up through the Bitnami Launchpad for Microsoft Azure. You could set it up using individual components using Azure, but Bitnami makes deployment/provisioning very simple.


Once you've got it running, download the keys and keep them somewhere safe as you'll need them in the next step to connect to your server. Once the machine is setup/started, you'll get an IP next to the computer image:
It's important that this IP is static. In Azure you have to go to the server's ip configuration and set it to static. You can also give the server a more readable name. Example:
Step 2: Connect to Your Server
To connect, you'll need a program called PuTTY which lets you open a SSH connection using the keys you downloaded to the node. Once installed, open it up and we'll setup the connection.

On the first screen - enter the ip address of your server, ensure port is 22 (unless you changed it to something else), SSH is checked and under Saved sessions - call this session something so we can save the configuration. Here, we've used ceramic-node. Hit save and ceramic-node should show up in the list of saved sessions.

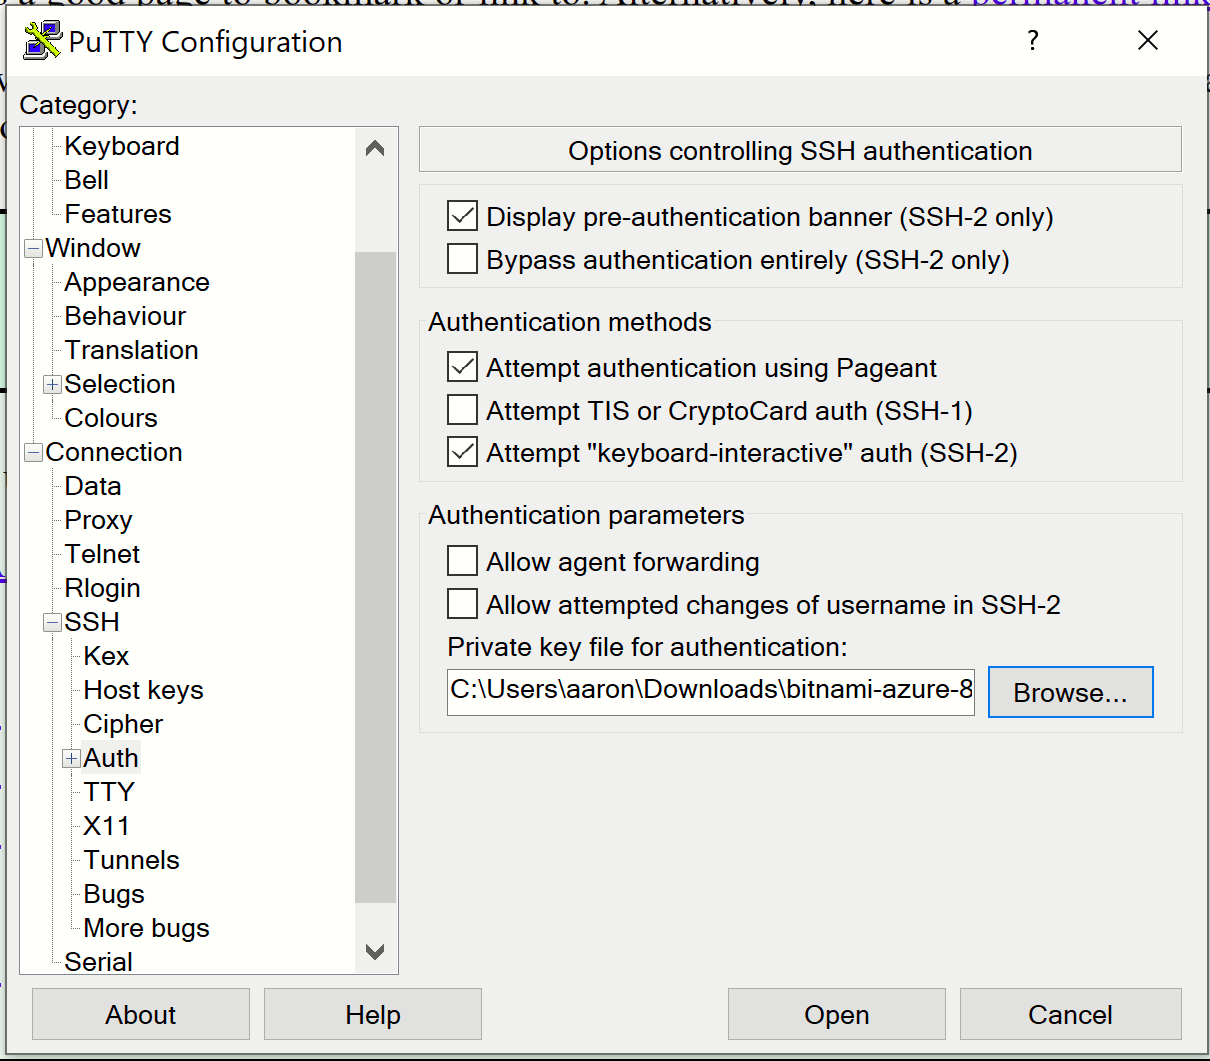
Now expand SSH on the left menu and click on Auth. In the private key file for authentication field, navigate to the key you downloaded and select it so the path shows up here.
Then click on Session and hit the Save button again to update the configuration.
With that, you should be ready to connect. Click Open. When you do, on the first connection attempt, you'll probably get a security alert indicating that the server's host key is not cached in the registry. It's ok to click Yes.

In the connection window that opens, you'll be asked to login as:... What you put here will depend on the username associated with your key, but if you used Bitnami, the username is bitnami. It will then use your key and log you into your server where you'll see a screen like the one here on the left.
Step 3: Install the Ceramic CLI
Because you setup the machine using a Node.js image (if you didn't, you'll need to install Node), npm is automatically a part of it and we'll use it to install the Ceramic CLI.
Before we do though, we'll need to change permissions to npm's default directory or you'll get EACCESS errors when trying to install globally.
Run the following command to change the owner of npm's directories to the name of the current user. It will change the permissions of the sub-folders used by npm and some other tools.
$ sudo chown -R $(whoami) $(npm config get prefix)/{lib/node_modules,bin,share}
Now that the permissions are right - you should be able to install the cli using:
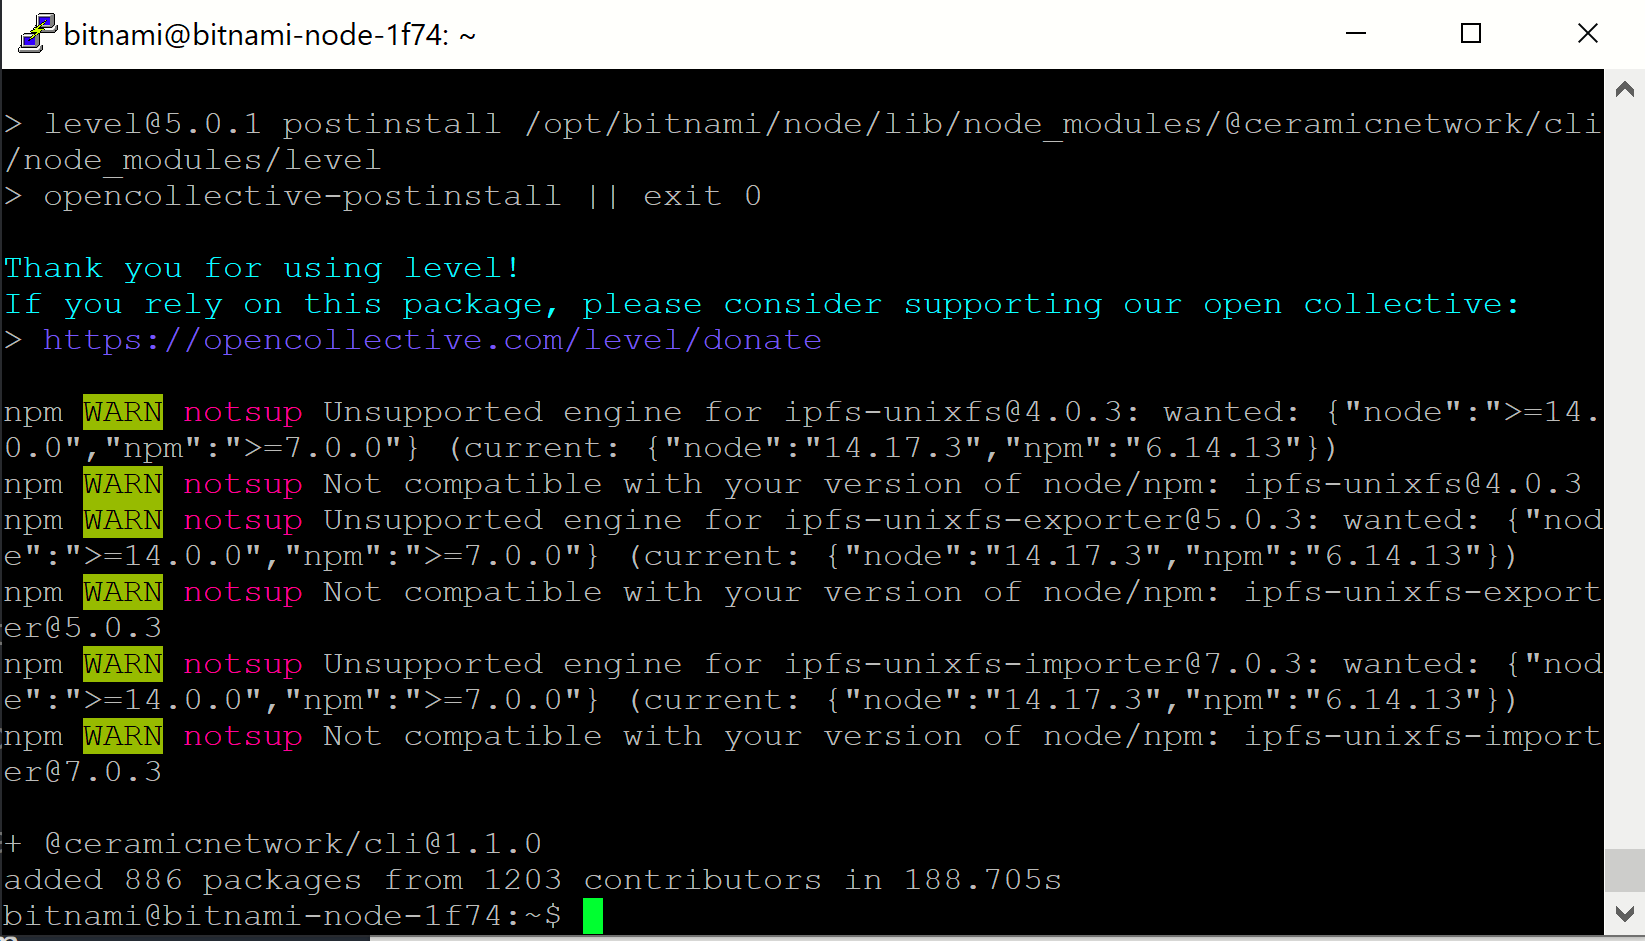
$ npm install -g @ceramicnetwork/cli
It will take a few minutes, be patient. You'll probably get a bunch of warnings about deprecated packages which are safe to ignore. If successful, you should see something like this indicating the cli is installed and how many packages were added.

Let's test it out. At the prompt, type:
$ ceramic daemon
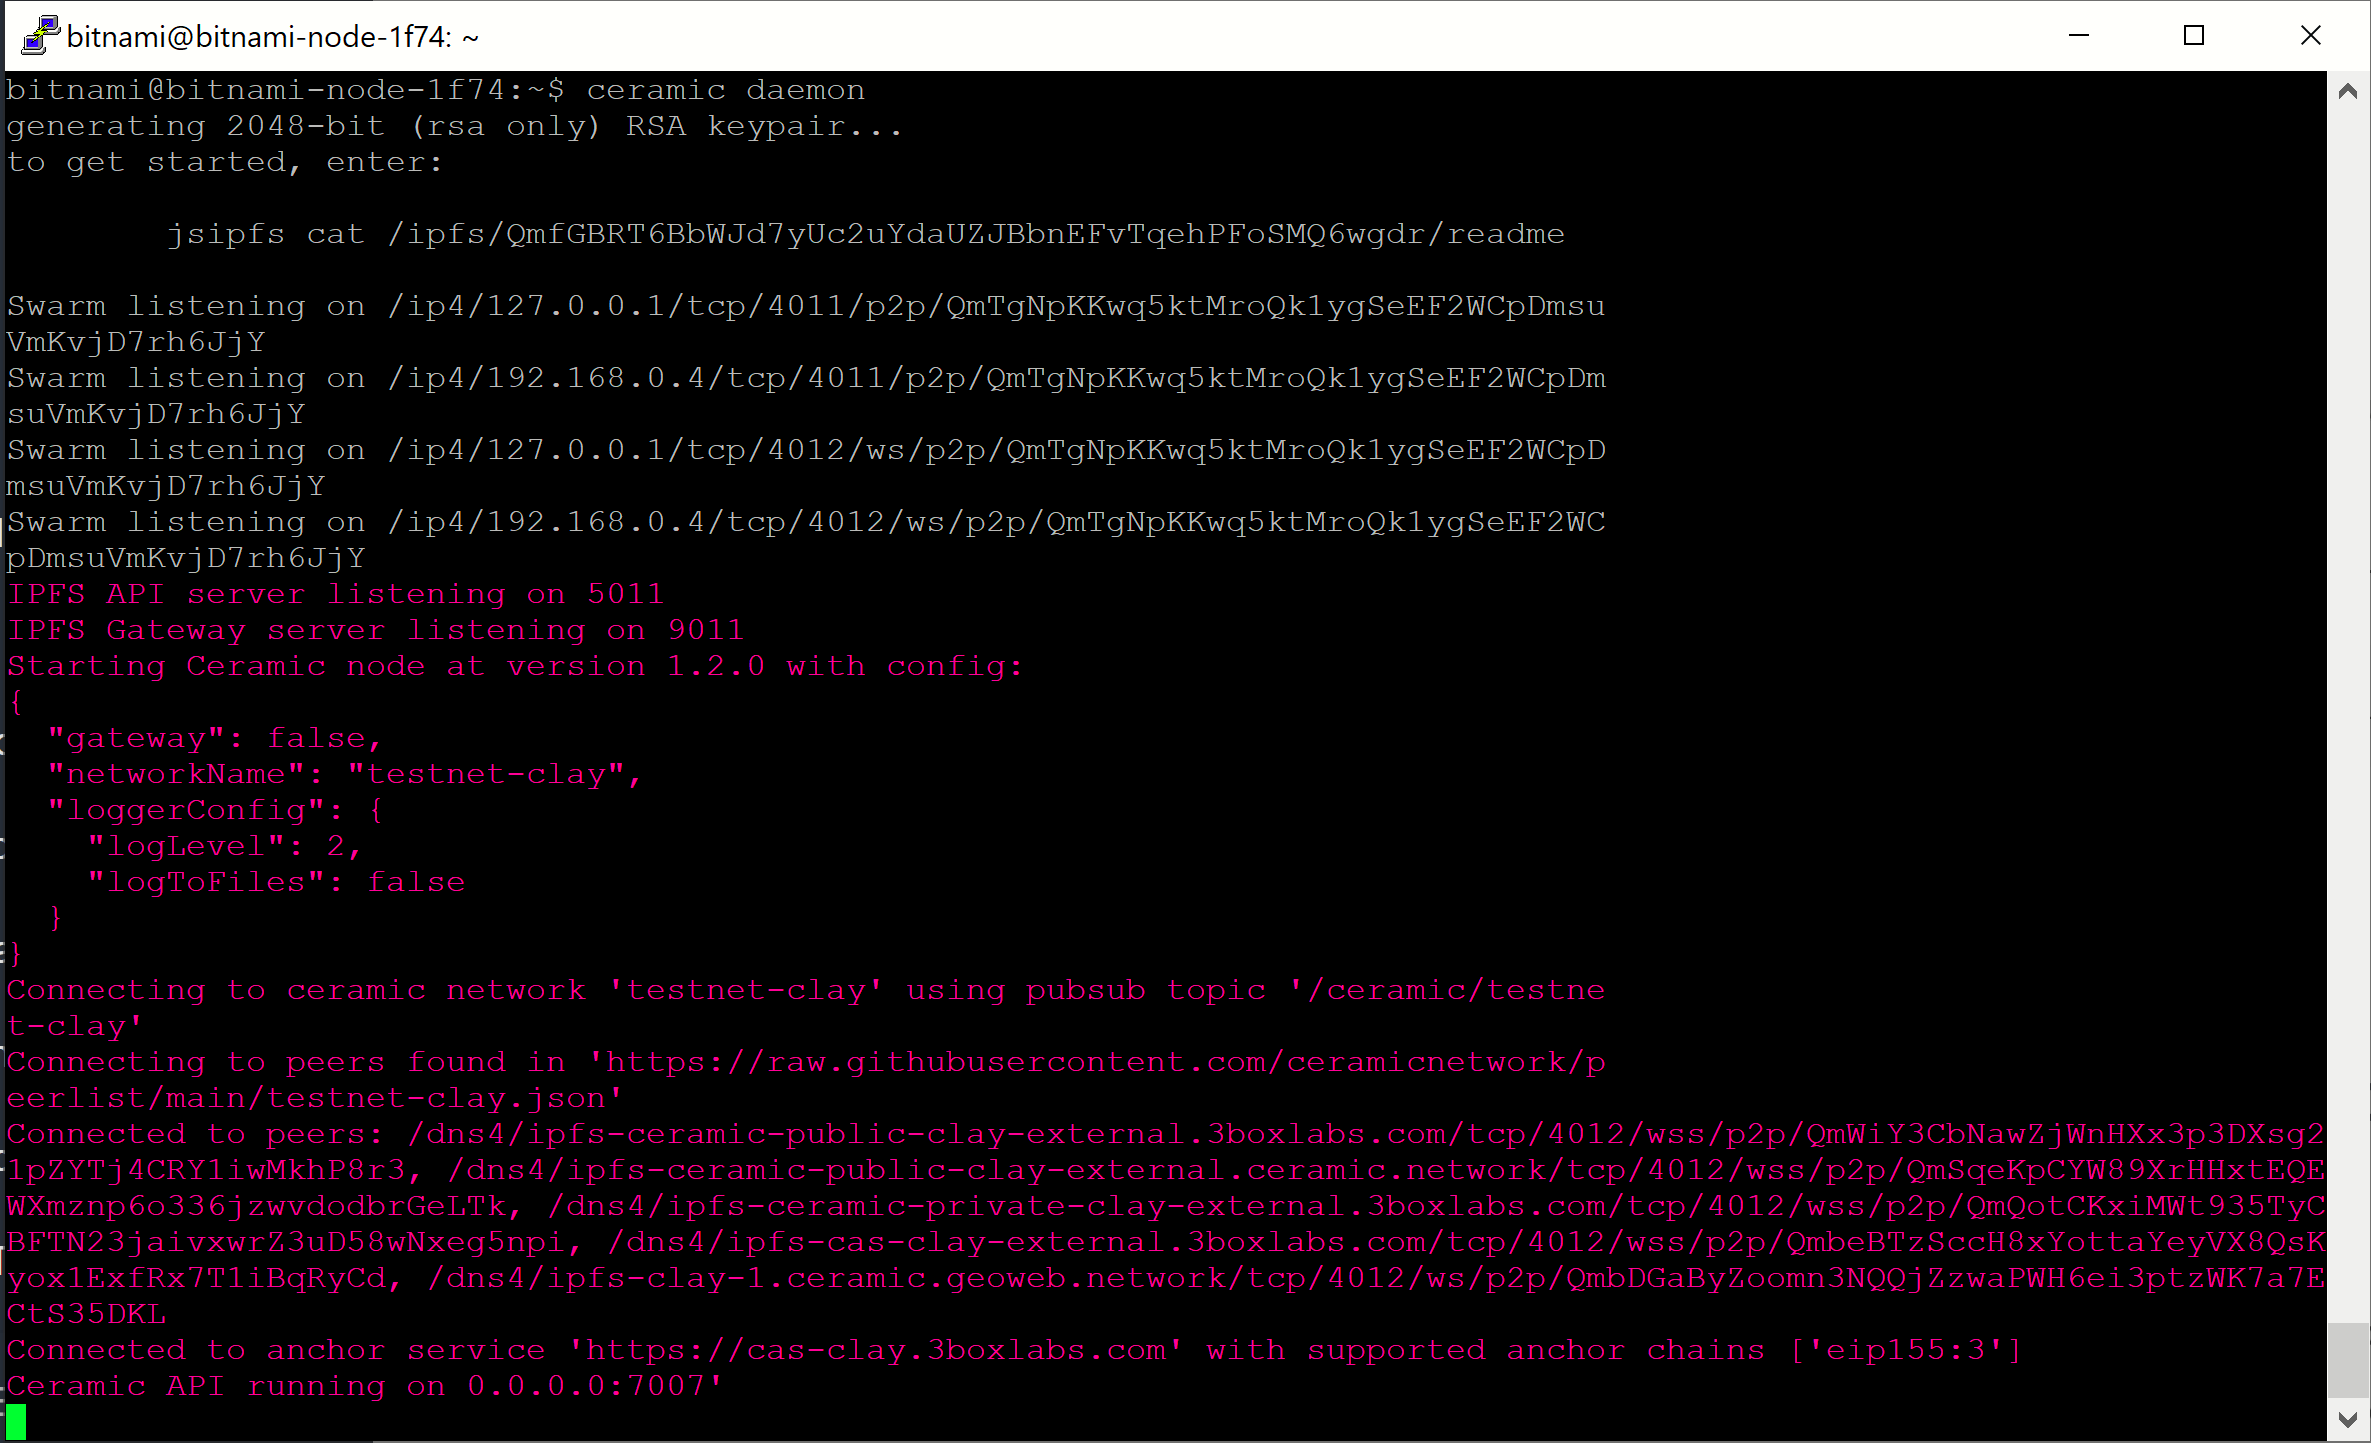
That will start things up and you'll get this output (or something similar).

Might be helpful to understand what this is telling you.
First, the daemon generates a RSA keypair to the node can be uniquely identified and securely interact with other nodes.
Next, a properly configured IPFS instance is created which is then used to create an instance of the Ceramic JS Core Client which gets connected to the Clay Testnet. There are options for changing the network which will be required when moving your node to main net, but for now the defaults are good to go as you'll be working on the test net.
So, at this point, we've confirmed the node is running. Almost there, two steps to go.
Step 4: Run an Out-of-Process IPFS Daemon
We are going to run an out-of-process IPFS node. If you just run ceramic daemon it will spool up a properly configured IPFS instance, but for more customization, resource allocation, and scalability, you can also run your own node using a ceramic wrapped IPFS setup.
Determine what shell you're using - we need to set the IPFS network environment variable and ensure it gets loaded anytime the VM restarts:
$ echo $SHELL
As I'm using the bash shell, I need to edit $HOME/.bashrc and add the following so IPFS connects to Ceramic's Clay Testnet (do that with sudo nano $HOME/.bashrc). I'm also setting a specific path for IPFS which is pointing to a separate data disk that has been mounted (will cover that below), then save and exit:
# BEGIN IPFS CONFIGURATION SETTINGS
export CERAMIC_NETWORK=testnet-clay
export IPFS_PATH="/catalystdrive/ipfs"
# END IPFS CONFIGURATION SETTINGS
You can reload the bashrc file using:
$ source ~/.bashrc
Now we need to find the additional disk we mounted that will be used to store the IPFS and Ceramic State data with this command using bash shell:
$ lsblk -o NAME,HCTL,SIZE,MOUNTPOINT | grep -i "sd"
Which gives an output like this:

Because this is a new disk, need to partition it, create a directory and then mount that directory:
$ sudo parted /dev/sdc --script mklabel gpt mkpart xfspart xfs 0% 100%
$ sudo mkfs.xfs /dev/sdc1
$ sudo partprobe /dev/sdc1
$ sudo mkdir /catalystdrive
$ sudo mount /dev/sdc1 /catalystdrive
Next, need to get the UUID for the new drive - run the following command and take note of the UUID:
$ sudo blkid
Now need to edit /etc/fstab (sudo nano /etc/fstab) and add the following line (replacing the UUID and the directory with your values):
UUID=f2004930-00ce-423f-ab2c-6149b4a30423 /catalystdrive xfs defaults,nofail 1 2
The drive is now available (mounted) which you can check with:
$ lsblk -o NAME,HCTL,SIZE,MOUNTPOINT | grep -i "sd"
Step 5: Daemon Reliability and Recovery
In order for any applications that are using your node to get the streams and data they want from the Ceramic network, they need to be able to connect to it reliably. Currently, the Ceramic daemon requires a manual start, so we need to automate that so that if the server ever reboots or the daemon fails, it gets restarted.
First, stop the daemon using Ctl-c in your PuTTY terminal.
We'll need to find the executable path of the ceramic daemon - it should be at /home/bitnami/stack/node/lib/node_modules/@ceramicnetwork/cli/bin
You can test if it's the right path by ensuring the daemon starts using the following command:
$ node /home/bitnami/stack/node/lib/node_modules/@ceramicnetwork/cli/bin/ceramic daemon
We also need to make sure we have the right path to the node executable being used, which you can find like this (should output /opt/bitnami/node/bin/node):
$ which node
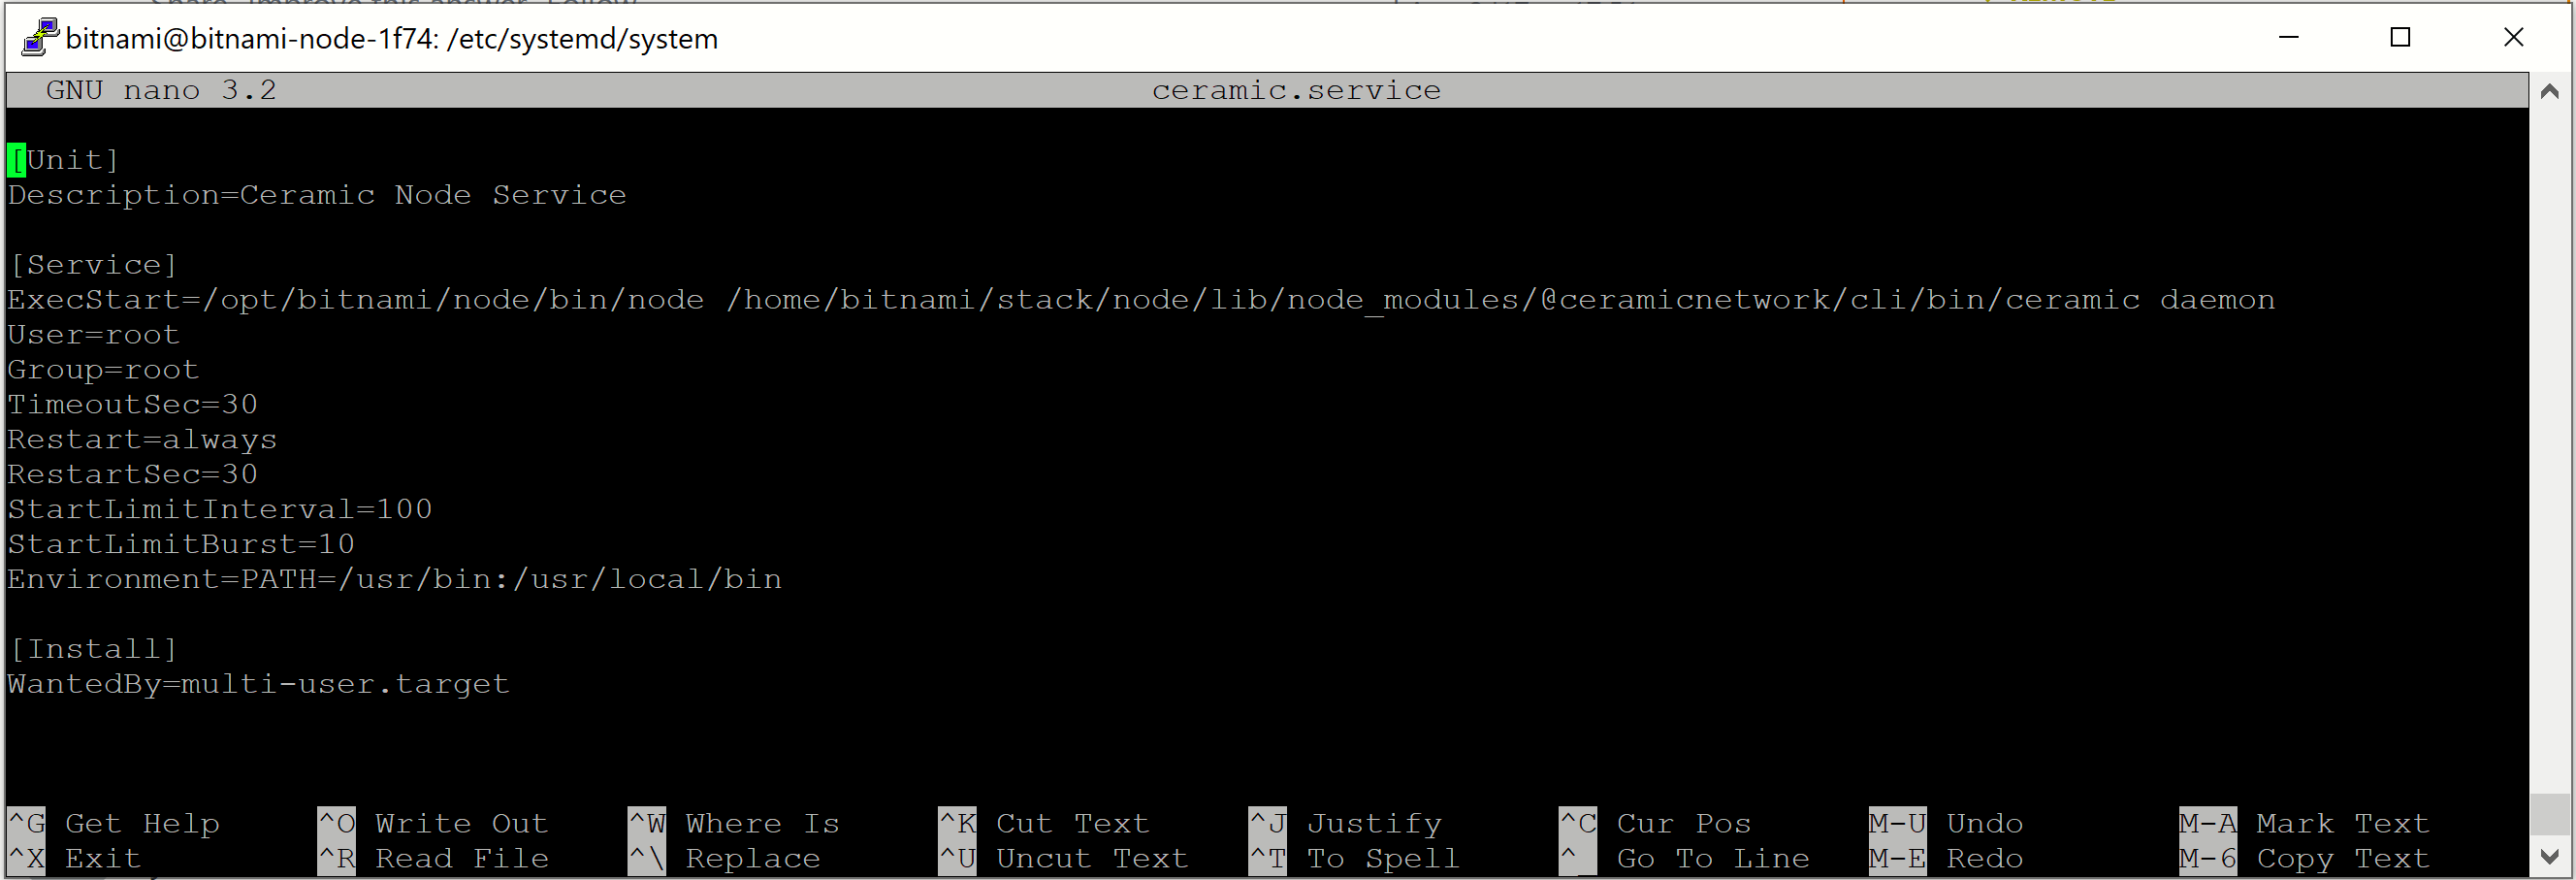
Now, we need to create a .service. Head to the /etc/systemd/system folder on your server and then open a new file called ceramic.service (or name it whatever you like). We're using the nano editor to create the file here.
$ cd /etc/systemd/system
$ sudo nano ceramic.service
Add the following to the ceramic.service file, then use Ctl-X, y, enter to save it.

Finally, we start it and then enable the service to run at boot:
$ sudo systemctl start ceramic
$ sudo systemctl enable ceramic
Now, repeat the steps you used to create the ceramic.service to create a similar file called ipfs.service. It should contain the following (note https should be http):

And voila, another step done. That Ceramic daemon and IPFS daemon will stay running now.
Step 6: DNS, SSL, and Firewall Settings
Last thing we need to do is setup DNS for the node so that if the IP ever changes, it's not going to mess up every application that is relying on it.
This is going to vary a bit depending on where you have your domain registered (which is the first thing you'll need to do). On Azure, we configure DNS zones. We have a domain vitalpointai.com that we'll be pointing at this server.
To do that, in your DNS records, you need to add an A record to the IP address of the server. We're also going to add a prefix so our server will be accessible by https://ceramic-node.vitalpointai.com.
After you have your domain pointing to your server, you can go back to your PuTTY terminal and reconnect to your server if not still connected and start the Bitnami HTTPS Configuration tool. Just follow the instructions - they've made it pretty simple to use/understand:
$ sudo /opt/bitnamit/bncert-tool

After completing all the steps in the tool, you should be able to visit the name of your server in a browser and see the lock indicating that https is working (port 443).
If you recall, the ceramic daemon is running on port 7007, so we need to route traffic coming in via port 443 to 7007 (think this is called a proxypass or something like that - I could be wrong.)
Full disclosure - this part of things drove me nuts for days. Hopefully, all works out well for you.
Back in your PuTTY terminal, connect to your server and:
$ cd /opt/bitnami/apache/conf/vhosts
$ sudo nano yourappname-https-vhost.conf
Put the following in the file and save it (Ctl-X, y, enter). Note that you need to change the names of the certificate/key to match the names of the ones generated when you ran through the bncert-tool. If you're unsure as to what they are, take a look in the /opt/bitnami/apache/conf directory where they should both be (one with .crt extension, the other with .key extension).

My understanding of what this does is that it tells Apache (the http server running on your node) to listen for https traffic on port 443, set a CORS header (*), and then pass it all over to the ceramic daemon running on port 7007.
And that should be it. Your application should now be able to initiate it's Ceramic client using your node url - https://yournode.com
Let's Summarize
So goal here was to get a Ceramic node setup and running. We:
Congratulations - you made it. Would love to see what you're working on on Ceramic, so please do share in the comments. Happy building.