Multisig Contract
Lesson 2
NEAR advises that the Multisig Contract is experimental - recommended to thoroughly test it on TestNet before incorporating into anything you're doing on MainNet.
Important to Note Up Front
Be aware that User can delete access keys on the multisig contract such that the total number of different access keys will fall below num_confirmations, rendering the contract locked. This is due to not having a way to query the blockchain for the current number of access keys on the account. See discussion here - https://github.com/nearprotocol/NEPs/issues/79.
The whole premise of a multisig contract is that it can implement logic that requires more than one person or entity to confirm a request/proposal before it will execute. This is known as setting a K out of N multi sig scheme, where N is the total number of participants and K is the number that must be in agreement before the request or proposal will execute.
This multisig contract allows the owners of keys that have been added to it to request to sign transfers, function calls, or add/remove existing or additional keys.
There is no time limit built into this. Any of the authorized access keys can confirm up to the point where the required number of confirmations is achieved.
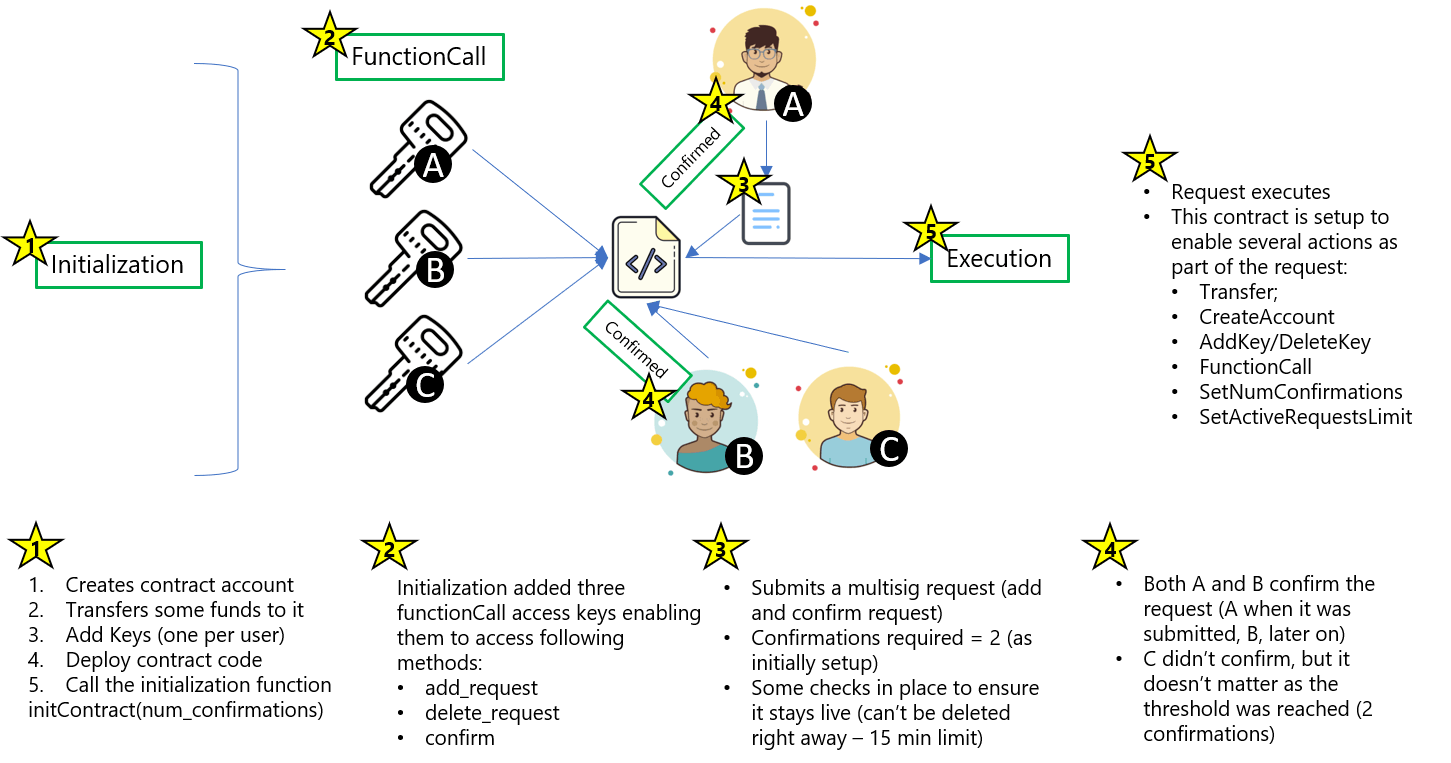
Let's take a look at an overview of the entire process:

Walking Through the Flow
Step 1: Initialization
Before we deploy and use the contract, we need a couple things:
- Decide on how many confirmations we want before some request actions will execute; and
- The public keys of all the accounts we want to initialize with (should be greater than the number of confirmations we're looking to have).
For example, I want to deploy a multisig that will have three participants (three access keys) and I want two separate confirmations before any action will execute. In other words, two of the three pers using the contract must agree on the request.
With that info in hand, we can deploy the contract calling it's initContract function. We'll do it using near repl:
const fs = require('fs');
const account = await near.account("vitalpointai.testnet");
const contractName = "multisig.vitalpointai.testnet";
const methodNames = ["add_request","delete_request","confirm"];
const newArgs = {"num_confirmations": 2};
const result = account.signAndSendTransaction(
contractName,
[
nearAPI.transactions.createAccount(),
nearAPI.transactions.transfer("100000000000000000000000000"),
nearAPI.transactions.addKey(
nearAPI.utils.PublicKey.from("Eg2jtsiMrprn7zgKKUk79qM1hWhANsFyE6JSX4txLEuy"),
nearAPI.transactions.functionCallAccessKey(contractName, methodNames, null)),
nearAPI.transactions.addKey(
nearAPI.utils.PublicKey.from("HghiythFFPjVXwc9BLNi8uqFmfQc1DWFrJQ4nE6ANo7R"),
nearAPI.transactions.functionCallAccessKey(contractName, methodNames, null)),
nearAPI.transactions.addKey(
nearAPI.utils.PublicKey.from("2EfbwnQHPBWQKbNczLiVznFghh9qs716QT71zN6L1D95"),
nearAPI.transactions.functionCallAccessKey(contractName, methodNames, null)),
nearAPI.transactions.deployContract(fs.readFileSync("out/multisig.wasm")),
nearAPI.transactions.functionCall("initContract", Buffer.from(JSON.stringify(newArgs)),
10000000000000, "0"),
]);
Of course, one can assign as many keys as one wants and raise or lower the number of confirmations required. One can also add more keys later on or change the number of confirmations required.
Step 2: FunctionCall Access Keys
NEAR has two types of access keys - fullAccess and functionCall access. When we initialized, we set three functionCall access keys and gave them access to the methods identified by the methodNames array ('add_request', 'delete_request', and 'confirm'). Becuase they are functionCall access keys - they can only call those three change functions on the contract (as well as any view functions). In our example above, these three keys represent three individuals using the contract - A, B, C.
Step 3: Submitting a Request
At star 3 - user C submits a multisig request to the contract. We'll assume it is a request to transfer funds to somebody.near. Using near-cli it would take this form:
Transfer Request
near call multisig.vitalpoint.ai add_request '{"request": {"receiver_id": "somebody.near", "actions": [{"type": "Transfer"}], "amount": "1000000000000000000000" }}' --accountId multisig.vitalpointai.testnet
Add Another Key to Multisig
near call multisig.vitalpoint.ai add_request '{"request": {"receiver_id": "multisig.vitalpointai.testnet", "actions": [{"type": "AddKey"}], "public_key": "<base58 of the key>"}}' --accountId multisig.vitalpointai.testnet
Change number of confirmations required to approve multisig request
near call multisig.vitalpoint.ai add_request '{"request": {"receiver_id": "multisig.vitalpointai.testnet", "actions": [{"type": "SetNumConfirmations"}], "num_confirmations": 2}}' --accountId multisig.vitalpointai.testnet
All of these return the request_id which can be used to query/confirm details. Also keep in mind that you can create more complex calls that chain multiple actions together.
An alternative
Note that there is a method in the contract 'add_request_and_confirm' which does the same thing as 'add_request', but it combines the request submission with a confirmation by the key adding it. If submitted with 'add_request', the user, in this case C, will still need to confirm it. Don't forget to add 'add_request_and_confirm' to the methodNames array at initialization to provide the proper permissions to call it to the access keys.
The contract also has a number of view requests one can call to get some information:
List all request ids
near view multisig.vitalpointai.testnet list_request_ids
See information about a specific request
near view multisig.vitalpointai.testnet get_request '{"request_id: 0"}'
See confirmations for a specific request
near view multisig.vitalpointai.testnet get_confirmations '{"request_id: 0"}'
Total confirmations required for any request
near view multisig.vitalpointai.testnet get_num_confirmations
You might notice...
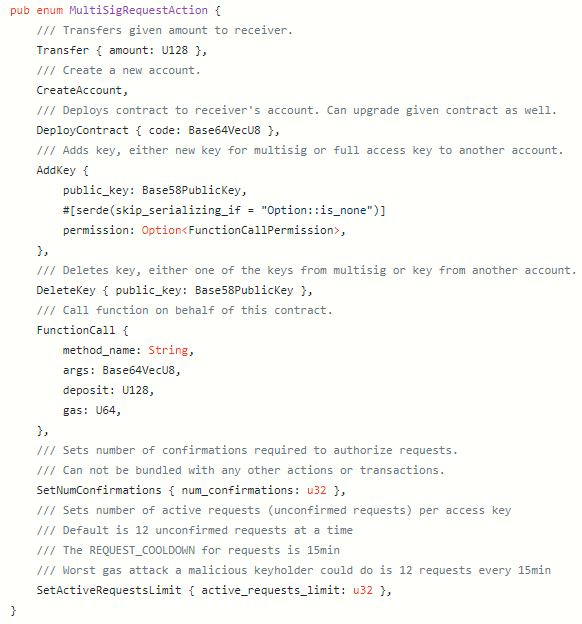
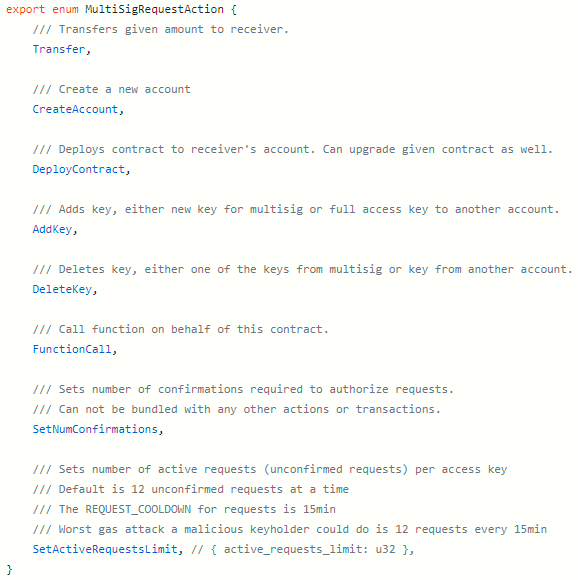
If you're looking closely at the differences between the Rust multisig contract and this AssemblyScript contract, you'll notice some differences in how the MultiSigRequest is structured. AssemblyScript doesn't have functionality for embedding arguments in an enum, so we had to extract those things out and put them in the MultiSigRequest class as arguments and then reference them appropriately in the switch statement during execution. Here are the two enums in Rust (left) and AssemblyScript (right) (click on each to enlarge):

Rust enum

AssemblyScript enum
For a more detailed look and how this then changes how each type of contract executes the request - check the execute_request function of the Rust contract and compare it to the execute_request function of the AssemblyScript contract.
Step 4: Confirmations
At star 4 - both user's B and C call the 'confirm' method on the contract indicating their support for the associated request_id. It's pretty straight forward. That looks like this:
near call multisig.vitalpointai.testnet confirm '{"request_id": 0}' --accountId multisig.vitalpointai.testnet
As we initialized the contract requiring 2/3 confirmations - with B & C's confirmations, it triggers the execute_request function which takes us to the last step.
Step 5: Execution
Execution is exactly what it sounds like. Because the request submitted at step 3 received the necessary two confirmations, the execute_request function executes and performs whatever actions were part of the request (assuming all the relevant arguments are present). They include:
- Transfer
- CreateAccount
- DeployAccount
- AddKey
- DeleteKey
- FunctionCall
- SetNumConfirmations
- SetActiveRequestsLimit
So What's a MultiSig Contract Good For?
Use your imagination - probably come up with many scenarios where it makes sense to submit a request and reach a majority (or some other consensus) among participating people.
This is essentially how decentralized autonomous organizations (DAOs) run and NEAR's account and access key system along with a multisig contract in this context opens up some novel ways to implement those systems.
This multisig could be the beginning of a super robust DAO. The contract could be extended to include various other request types and the members of the DAO (as depicted by their access keys) could indicate support for certain requests, add/delete additional members or whatever else you can imagine.
It's Upgradeable
But be careful if you decide to do it - following request will deploy new contract code on the given account. You need to consider data and requiring migrations (contract updates should include data migrations moving forward).
const fs = require('fs');
const account = await near.account("vitalpointai.testnet");
const contractName = "multisig.vitalpointai.testnet";
const requestArgs = {"request": [
{"receiver_id": "multisig.illia", "actions": [{"type": "DeployContract", "code":
fs.readFileSync("out/multisig.wasm")}]}
]};
const result = account.signAndSendTransaction(
contractName,
[
nearAPI.transactions.functionCall("add_request", Buffer.from(JSON.stringify(requestArgs)),
10000000000000, "0"),
]);
This still acts like a request and will require confirmation by the number of confirmations setup for the contract.
Video Code Walkthrough
All the code for the multisig contract in AssemblyScript is in this repo.