Signing in to NEAR Personas
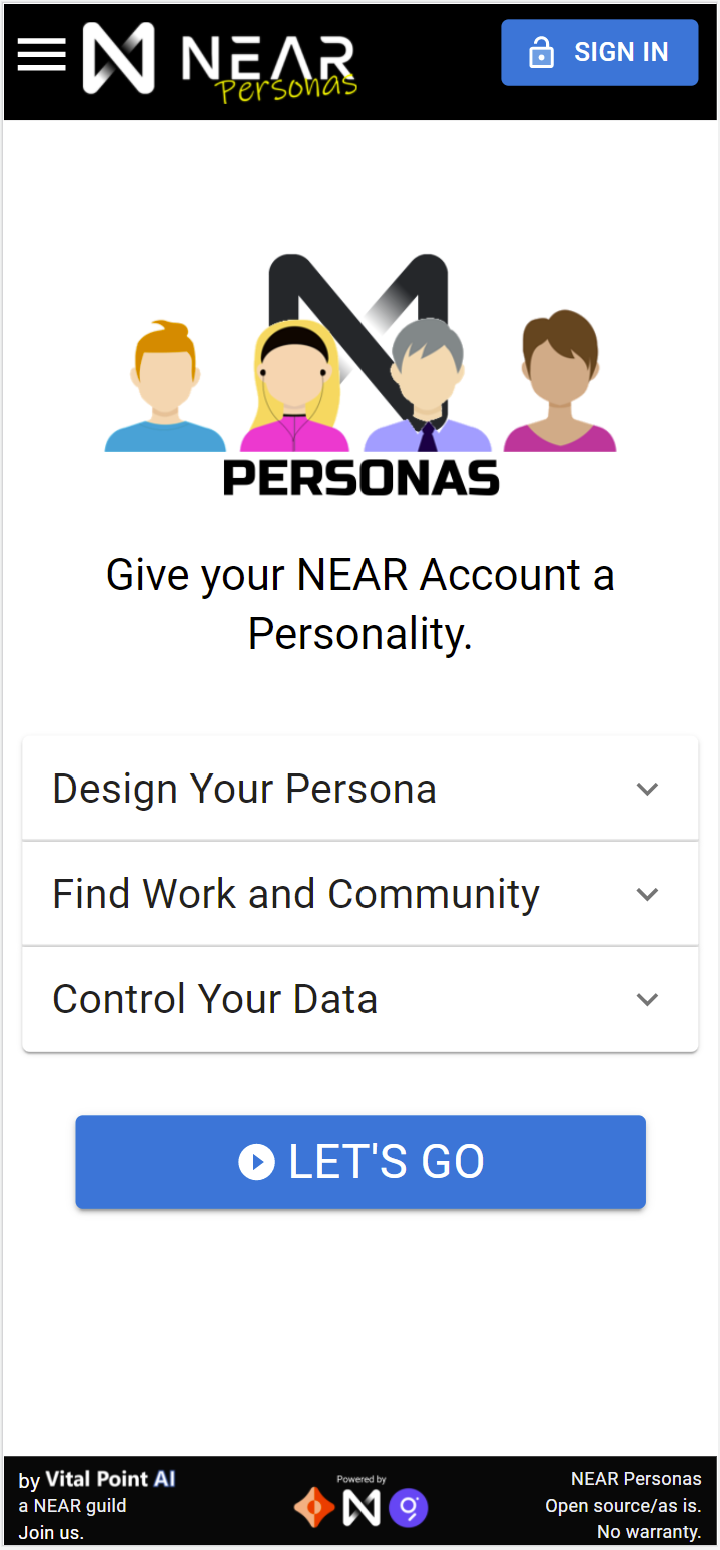
When arriving at NEAR Personas for the first time, you'll be greeted with a screen like this:

Expanding the three accordions (down arrows) will give you an overview of the persona creation process.
It's really simple and you can supply as much or as little information as you want. The only person who is going to be able to change your data is the one holding the seed phrase for your account (which you'll create after signing in to the app).
We'll mention it later, but the seed phrase you use for NEAR Personas is NOT the same seed phrase you use when you create a NEAR account (see below). It is a seed phrase that controls access to your data stream.
You could use the same seed phrase, but we really do not recommend it. If it gets compromised, not only do you lose your funds, but could also lose control of your data.
If you click on 'Let's Go' or 'Sign In' at the top, you'll be prompted to connect your NEAR account to the application. If you don't have a NEAR Account, read on to learn how to create one from that point.
How to Create and use a NEAR Account
It's a quick three step process and then you'll be ready to use any decentralized application built on NEAR including NEAR Personas.
Reserve your ID (Name)
You'll use the NEAR wallet to choose an available name in the format of yourchoice.near and then choose how to secure it (passphrase, ledger, email, SMS).
Fund your account
You need to add some NEAR to your new account so it can do something when you use a decentralized application (dApp) like Catalyst. Below we'll go over some ways to get some NEAR.
Use your account
Interacting with dApps is a little different than what you're likely used to. Many interactions require you to sign (authorize) them. Below we'll cover how that works and what to watch for.
Watch the Video (text version below)
Links mentioned in the video:
Video not your thing? Let's try pictures and words...
How to Create a NEAR Account

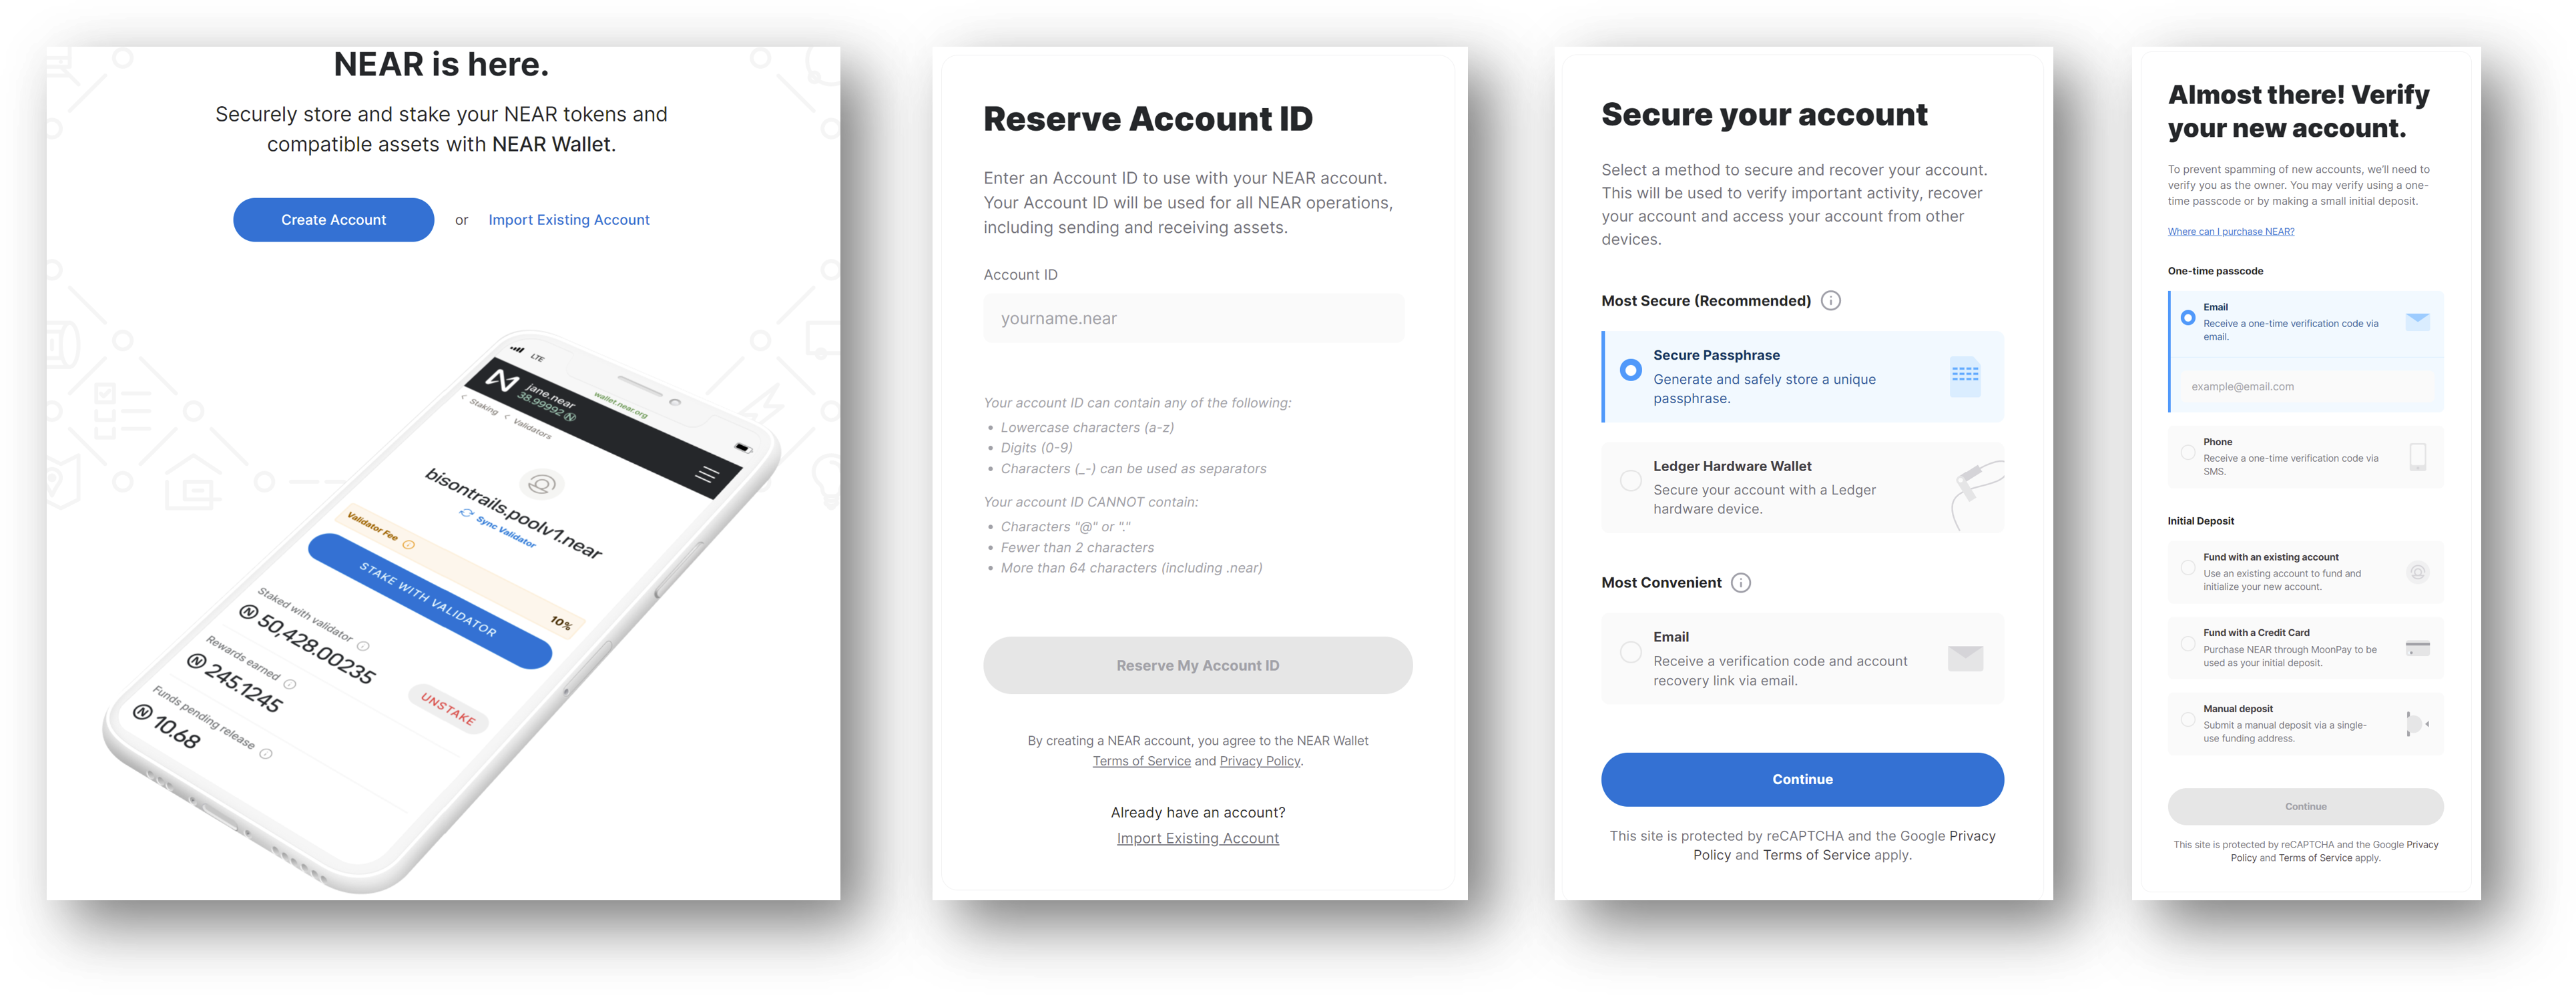
Step 1: Reserve your Account ID
1. Go to NEAR Wallet and click on `Create Account`.
2. Enter an account ID to use for your NEAR account. It will tell you if you're trying to use one that already exists. Otherwise, when you're happy with your name, click `Reserve My Account ID`.
Step 2: Secure your account
1. Select one of the methods (secure passphrase, ledger hardware wallet, or email). It is highly recommended that you choose either secure passphrase or ledger hardware wallet. This is crypto and if you lose your keys or have them hacked, you will lose everything in your account.
2. Depending on the option you choose, you will need to follow the subsequent direction. Read them carefully and perform the requested actions.
Step 3: Verify your account
1. This can be done either through receipt of a one-time code or by making an initial deposit into your new account.
Before you can use your account with dApps like Catalyst it will need some NEAR in it to pay for gas fees. It is recommended you verify through a small initial deposit using one of the options listed.
2. If you decide to verify through email or phone, note that you can only associate one NEAR account with one email address or phone number.
How to fund a NEAR Account
Now that you have a NEAR account ID (name) reserved, you need to fund it which simply means ensuring it has some NEAR in it so when you visit a dApp, you can actually use the account to do things there.
If you verified using an initial deposit, then this step is done and you've already figured out how to get NEAR into your account. If you haven't, you basically have variations of three options.
Option 1: Receive it from someone else
You can ask someone who has NEAR to send you some.
The minimum they should send is about 0.2 NEAR which will enable you to select a human readable name. You'll also need some NEAR in order to start using dApps like NEAR Personas built on NEAR. The transaction fees are super small, so 1 NEAR will typically let you do quite a few transactions/last a long time.
Option 2: Buy some NEAR
You can buy NEAR using fiat (Cdn, USD, Euro, etc...) either through a centralized exchange like Crypto.com or specialized service like MoonPay.
If you already have other Ethereum based (ERC 20) cryptocurrencies, then you convert them to NEAR as you send them over Aurora's rainbow bridge to your NEAR wallet. Be sure to understand exactly how that works before trying it.
Option 3: Earn some NEAR
There are quite a few ways to earn NEAR. You can play play to earn games, do some learn and earn education, complete tasks, create and sell art, or contribute to projects looking for help.
Catalyst is a Vital Point AI project that is the perfect place to earn as you participate in and contribute to community projects and objectives.
How to use a NEAR Account with dApps
(like NEAR Personas)
Congratulations, by this point you have a new NEAR account and it has some NEAR in it. You're ready to start using decentralized applications (dApps) built on NEAR Protocol like NEAR Personas. So how do you do that?
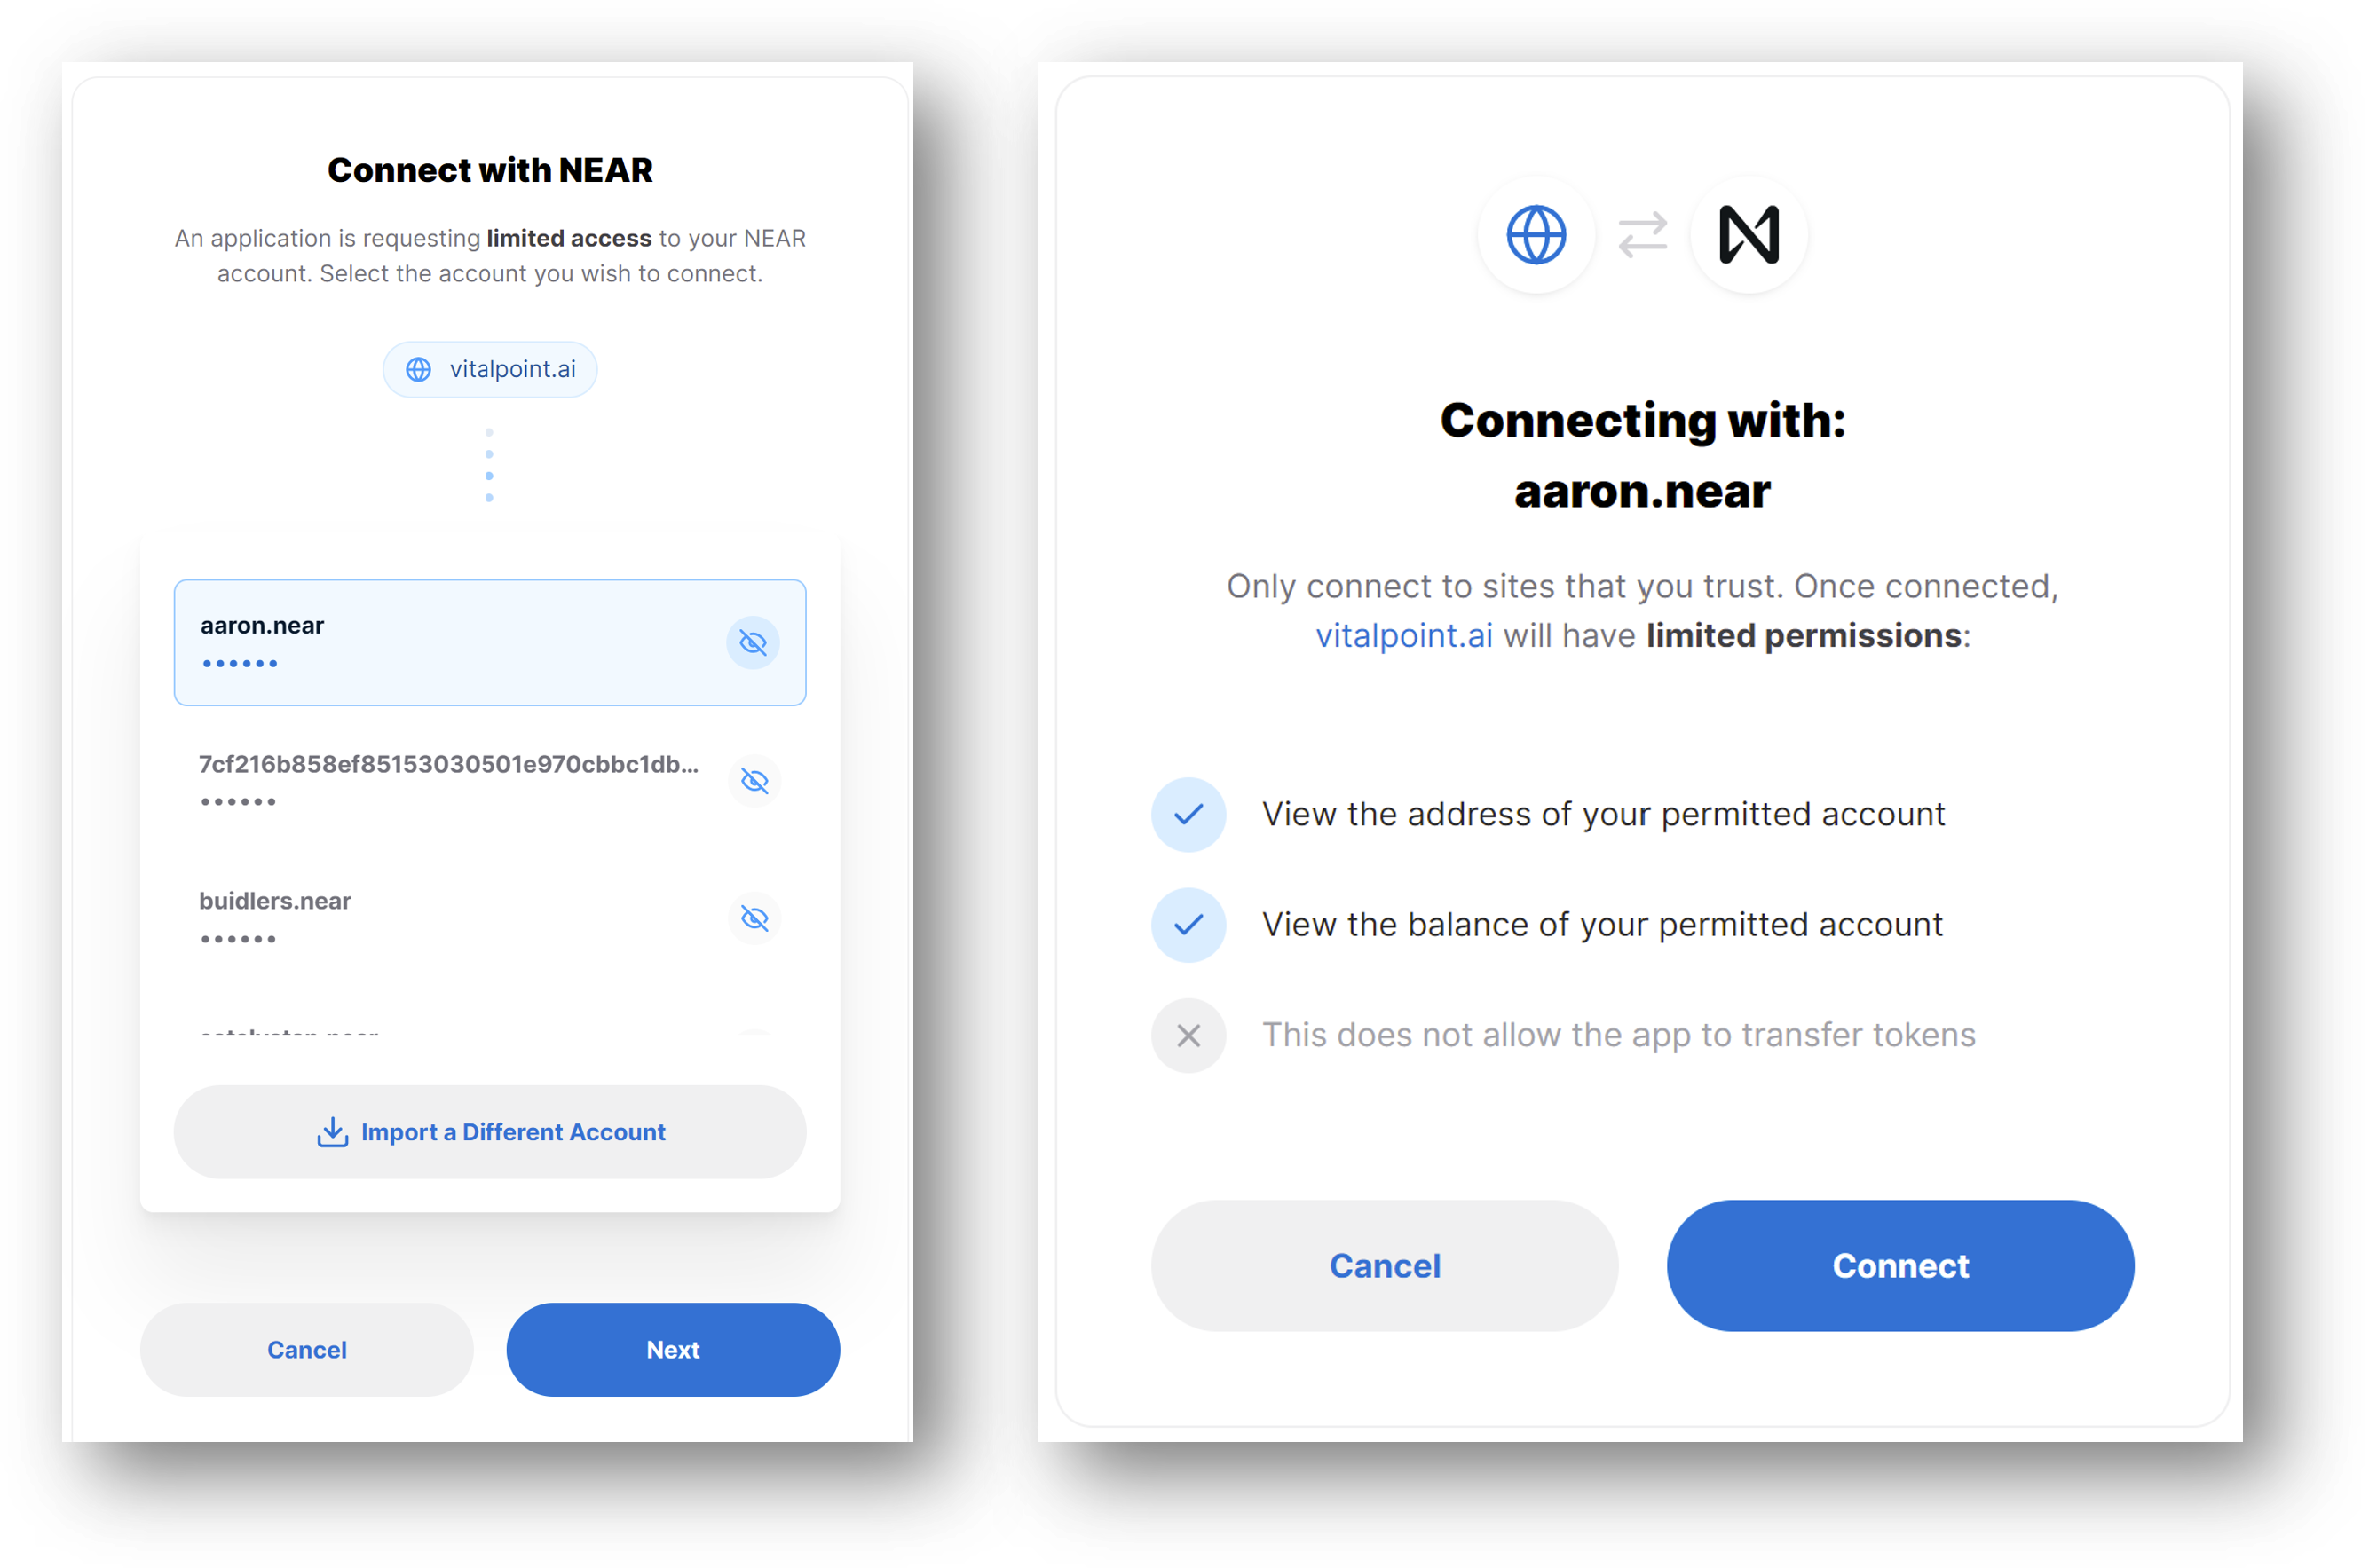
In general, the first time you visit a dApp, you will be asked to authorize your account to interact with it. Saying yes means an access key specific to that application will get stored in your NEAR account and on your device. This is a usually a one-time thing unless the application requires you to log out when leaving which will clear your browser's local storage, deleting the key.
For instance, when trying to connect to NEAR Personas for the first time, you will see screens similar to the following (note that vitalpoint.ai in the connect dialogs is us - we made NEAR Personas):

What you are really doing by authorizing is signing a request using your account's private key. This signing/authorization process is what is required anytime you ask the dApp to do something that causes a change on the underlying blockchain (e.g. transfer funds or invoke a transaction that requires gas).
There's a lot more to learn about NEAR accounts and access keys if you want, but what you need to know about using dApps is that at times you will be directed back to NEAR wallet to authorize (sign) a transaction to confirm you have the authority (control of the applicable private key) to do that action.
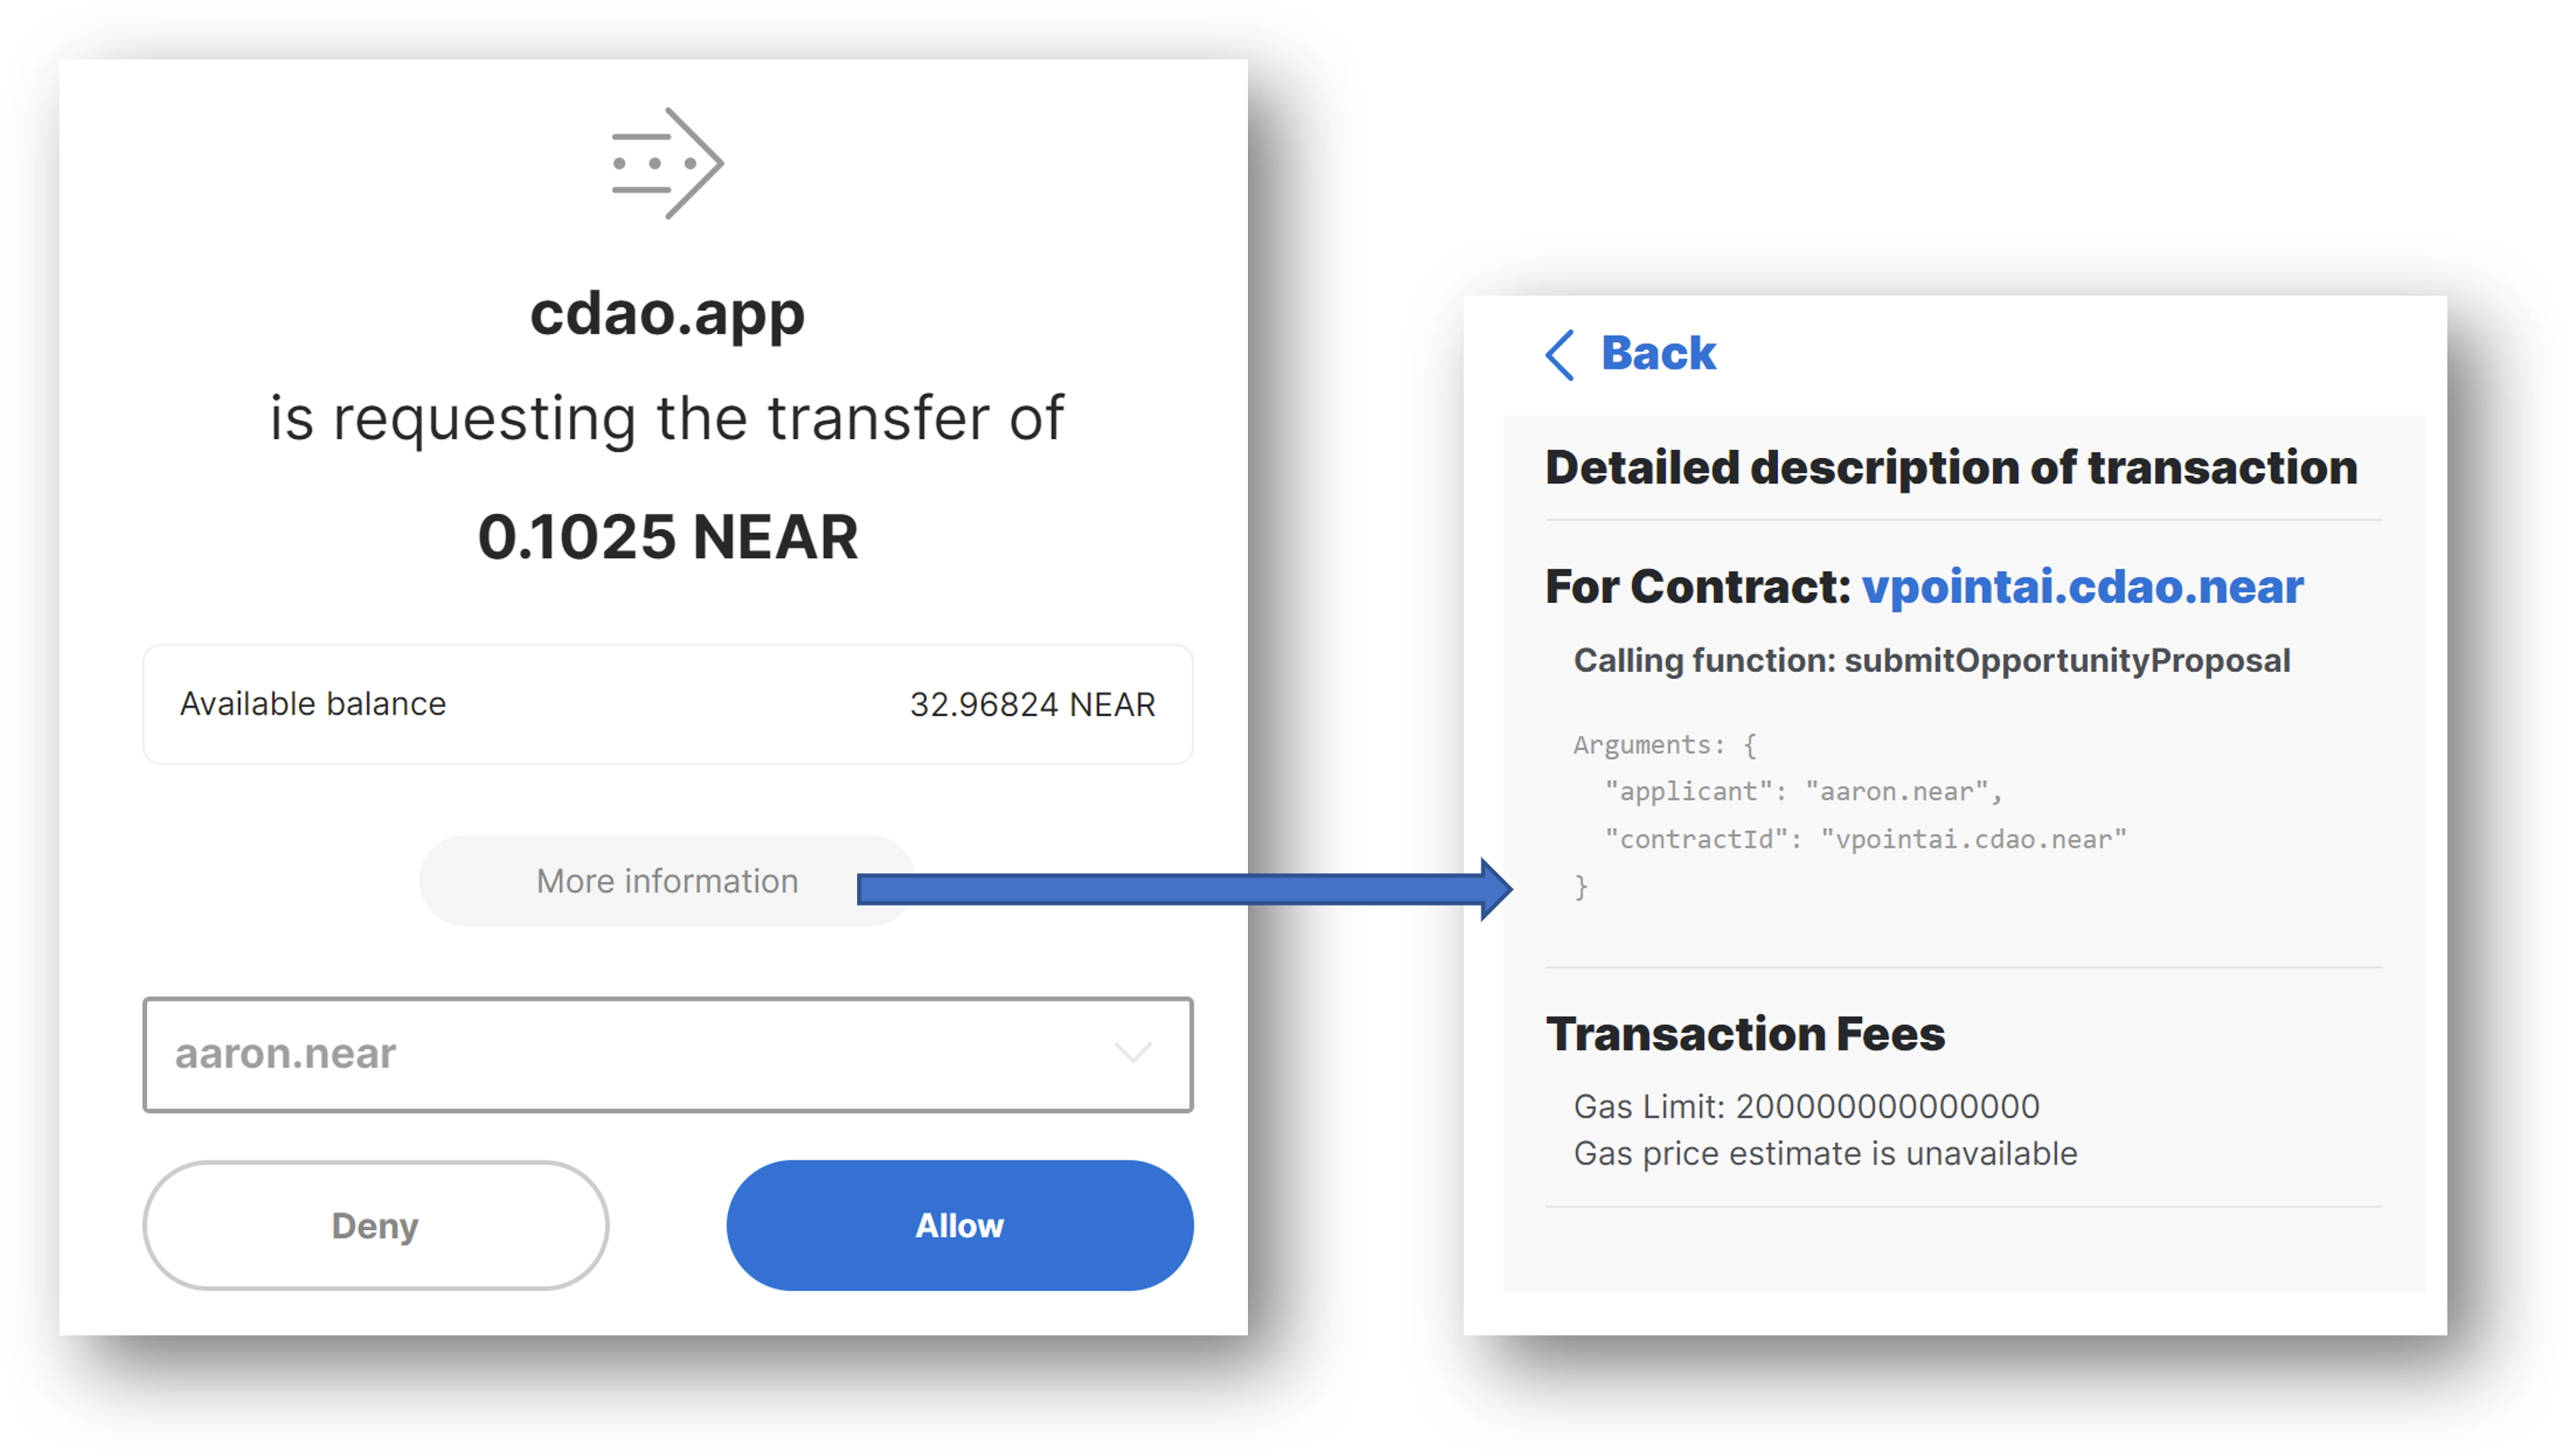
For instance, here's what that looks like:

When presented with a screen like this, it's important to understand what you are signing. Usually it involves transferring funds so be sure to read what it says. You can also click on the `more information` button to see the actual function being called on the contract, what arguments are being sent and what the maximum transaction fee (in yocto) could be.
If you're happy with signing, simply click `Allow` and it will do its thing and return you to the dApp (in this case NEAR Personas) to carry on. If you aren't happy with it, click `Deny` and it won't sign and you'll be returned to the dApp at the point where you were.
And that's it - you're ready to start using your NEAR account on NEAR Personas and other NEAR dApps.
Previous